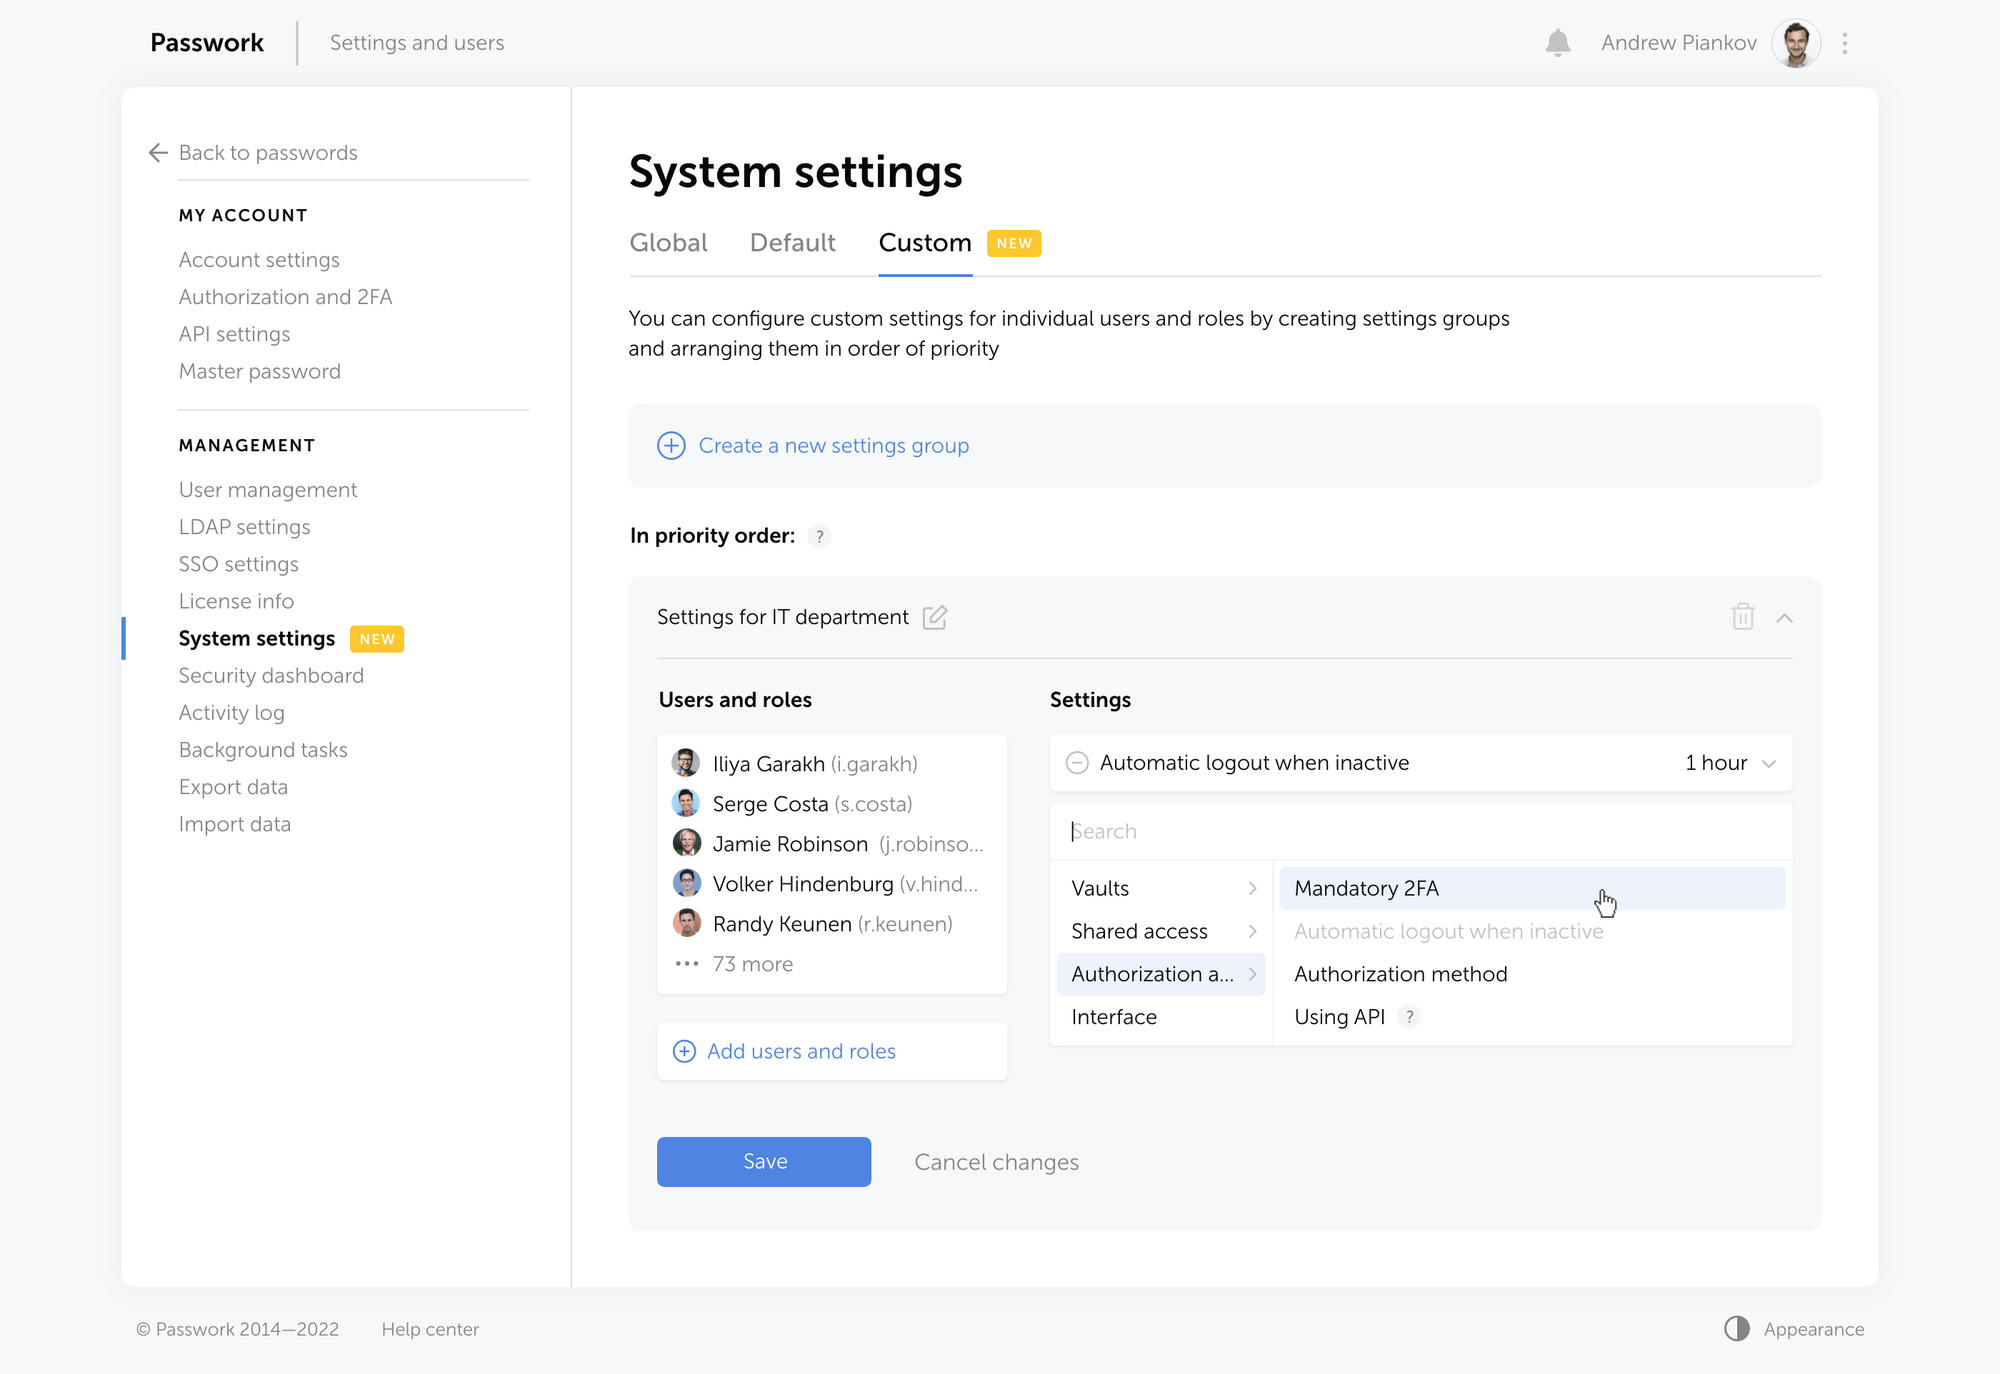
In the new version of Passwork, we have completely redesigned the System settings. They are now divided into three sections:
- Global — organization settings that determine the operations of most of the Passwork functions
- Default — the values of the settings that will be used if no other custom settings are specified
- Custom — settings that can be set for individual users and roles
Now you can set up different interface languages, configure authorization methods, and enable mandatory two-factor authentication for individual users and roles.
To do this, click "Create a new settings group" in Сustom settings, add users or roles and select your desired settings. The newly created group will be added to the top of the list and will get the highest priority.
The following settings are now available:
- Ability to create organization vaults and private vaults
- Ability to create links to passwords
- Mandatory 2FA
- Time of automatic logout when inactive
- Authorization method (by local password, LDAP password or SSO)
- API usage
- Interface language
We're already working to add new settings.
If you are already using Passwork — update your Passwork
Or request a free demo at passwork.pro
The 2025 small business cybersecurity checklist: A complete guide | Passwork
Passwork’s 2025 cybersecurity checklist, based on the NIST framework, provides actionable steps to prevent data breaches and financial loss.

How to protect your online business from cyberattacks
Protect your online business from cyber threats with actionable strategies, from employee education to advanced tools like Passwork. Learn about phishing, ransomware, and more while discovering how to enhance security with simple yet effective measures. Stay protected — read the full article!
Why do employees ignore cybersecurity policies?
Employees often ignore cybersecurity rules not out of laziness, but because they feel generic, irrelevant, or disconnected from real work. True change starts with empathy, leadership, and context-driven policies. Read the full article to learn how to make security stick.

Introducing Custom settings
Multi-factor authentication (often known as MFA for short), refers to the process of confirming the identity of a user who is attempting to log in to a website, application, or another type of resource using more than one piece of information. Indeed, multi-factor authentication is the difference between entering a password to gain access to a resource and entering a password plus a one-time password (OTP), or a password plus the answer to a security question. Another example of multi-factor authentication is entering a password plus the answer to a security question.
Multi-factor authentication provides greater assurance that individuals are who they claim to be by requiring them to confirm their identity in more than one way. This, in turn, reduces the risk of unauthorised access to sensitive data. Multi-factor authentication requires individuals to confirm their identity in more than one way. After all, entering a stolen password to get access is one thing; it is quite another to enter a stolen password and then be needed to additionally input an OTP that was sent to the smartphone of the real user.
Multi-factor authentication can be achieved through the use of any combination of two or more factors. Two-factor authentication is another name for the practice of using only two factors to verify a user's identity.
How Does MFA work?
MFA is effective because it necessitates the collection of extra verification information (factors). One-time passwords are one of the multi-factor authentication mechanisms that consumers encounter most frequently (OTP). OTPs are the four-digit to eight-digit codes that you frequently receive through email, SMS, or a mobile application of some kind. When using OTPs, a fresh code will be created at predetermined intervals or whenever an authentication request is sent in. The code is created based on a seed value that is assigned to the user when they first register and some other component, which might simply be a counter that is incremented or a time value. This seed value is used in conjunction with some other factor to generate the code.
The three categories of multi-factor authentication methods
Generally speaking, a technique of multi-factor authentication will fall into one of these three categories:
• Something you are familiar with: a PIN, password, or the solution to a security question
• Something you own: an OTP, a token, a trusted device, a smart card, or a badge
• Something you are, such as your face, fingerprint, retinal scan, or other biometric information
Methods of multi-factor authentication
In order to accomplish multi-factor authentication, you will need to utilize at least one of the following methods in addition to a password.
Biometrics
A method of verification that depends on a piece of hardware or software being able to recognize biometric data, such as a person's fingerprint, facial characteristics, or the retina or iris of their eye.
Push to approve
A notice is shown on someone's smartphone that prompts the user to tap their screen in order to accept or deny a request for access to their device.
One-time password (OTP)
A collection of characters that are created automatically and are used to authenticate a user for a single login session or transaction only.
An SMS
A method for sending a One-Time Password (OTP) to the user's smartphone or other devices.
Hardware token
A compact, portable OTP-generating device that is sometimes referred to as a key fob.
Software token
A token that does not exist in the form of a physical token but rather as a software program that can be downloaded onto a smartphone or other device.
The advantages of multi-factor authentication
Enhancing the level of safety
Authentication that takes into account many factors is more secure. After all, when there is only one mechanism defending a point of access, such as a password, all a malicious actor needs to do to get admission is figure out a means to guess or steal that password. This is the only thing that needs to be done in order to acquire access. However, if admittance additionally needs a second (or perhaps a second and a third) element of authentication, then it becomes far more difficult to obtain access, particularly if the requirement is for something that is more difficult to guess or steal, such as a biometric characteristic.
Providing support for various digital initiatives
Multi-factor authentication is a key enabler in today's business world, where more companies are keen to deploy remote workforces, more customers want to purchase online rather than in shops, and more companies are migrating apps and other resources to the cloud. In this day and age, it can be difficult to ensure the safety of organisational and e-commerce resources. Multi-factor authentication can be an extremely useful tool for assisting in the protection of online interactions and financial transactions.
Are there any disadvantages to multi-factor authentication?
It is feasible to establish a less easy-to-access environment while building a more secure one — and this might be a disadvantage (this is especially true as zero trust, which sees everything as a possible threat, including the network and any apps or services running on it, gains acceptance as a safe access basis). No employee wants to spend additional time each day dealing with several impediments to getting on and accessing resources, and no consumer wants to be slowed down by multiple authentication procedures. The objective is to strike a balance between security and convenience so that access is secure but not so onerous that it causes excessive hardship for those who legitimately require it.
The role of risk-based authentication in multi-factor authentication
One technique to achieve a balance between security and convenience is to increase or decrease authentication requirements based on the risk associated with an access request. This is what risk-based authentication entails. The risk might be associated with either what is being accessed or who is requesting access.
The risk presented by what is accessed
For example, if someone seeks digital access to a bank account, is it to initiate a money transfer or simply to verify the status of an existing transfer? Or, if someone interacts with an online shopping website or app, is it to place an order or to monitor the progress of an existing purchase? For the latter, a username and password may be sufficient, but multi-factor authentication makes sense when a high-value item is at stake.
The risk is presented by the person requesting access
When a remote employee or contractor seeks access to the corporate network from the same city, on the same laptop, day after day, there's little reason to assume it's not that person. But what happens when a request from Mary in Minneapolis arrives from Moscow unexpectedly one morning? A request for extra authentication is warranted due to the possible danger – is it really her?
The future of Multi-Factor Authentication: AI, Machine Learning and more
Multi-factor authentication is always improving to provide enterprises with access that is both more secure and less unpleasant for individuals. Biometrics is an excellent example of this concept. It's more secure, since stealing a fingerprint or a face is difficult, and it's more convenient because the user doesn't have to remember anything (such as a password) or make any other substantial effort. The following are some of the current advancements in multi-factor authentication.
Machine learning (ML) and artificial intelligence (AI)
AI and ML may be used to identify characteristics that indicate if a particular access request is "normal" and as such, does not require extra authentication (or, conversely, to recognize anomalous behaviour that does warrant it).
Online Quick Identity (FIDO)
The FIDO Alliance's free and open standards serve as the foundation for FIDO authentication. It facilitates the replacement of password logins with safe and quick login experiences across websites and applications.
Authentication without a password
Rather than utilizing a password as the primary means of identity verification and complementing it with alternative non-password methods, passwordless authentication does away with passwords entirely.
Be certain that multi-factor authentication will continue to evolve and develop in the pursuit of methods for individuals to show they are who they say they are — reliably and without having to jump through an endless number of hoops.
HIPAA requirements for password management
Introduction In the complex ecosystem of modern healthcare, patient data is essential for secure management. In 2024, the U.S. healthcare sector experienced over 700 large-scale data breaches, marking the third consecutive year with such a high volume of incidents. This surge compromised over 275 million patient records, a significant

Private password breach checking: A new algorithm for secure password validation
Introduction Data breaches have become routine: millions of users worldwide face the consequences of compromised passwords. The scale is staggering: billions of credentials are exposed, fueling automated attacks and credential stuffing on a massive scale. Services like “Have I Been Pwned” now track over 12 billion breached accounts, and that
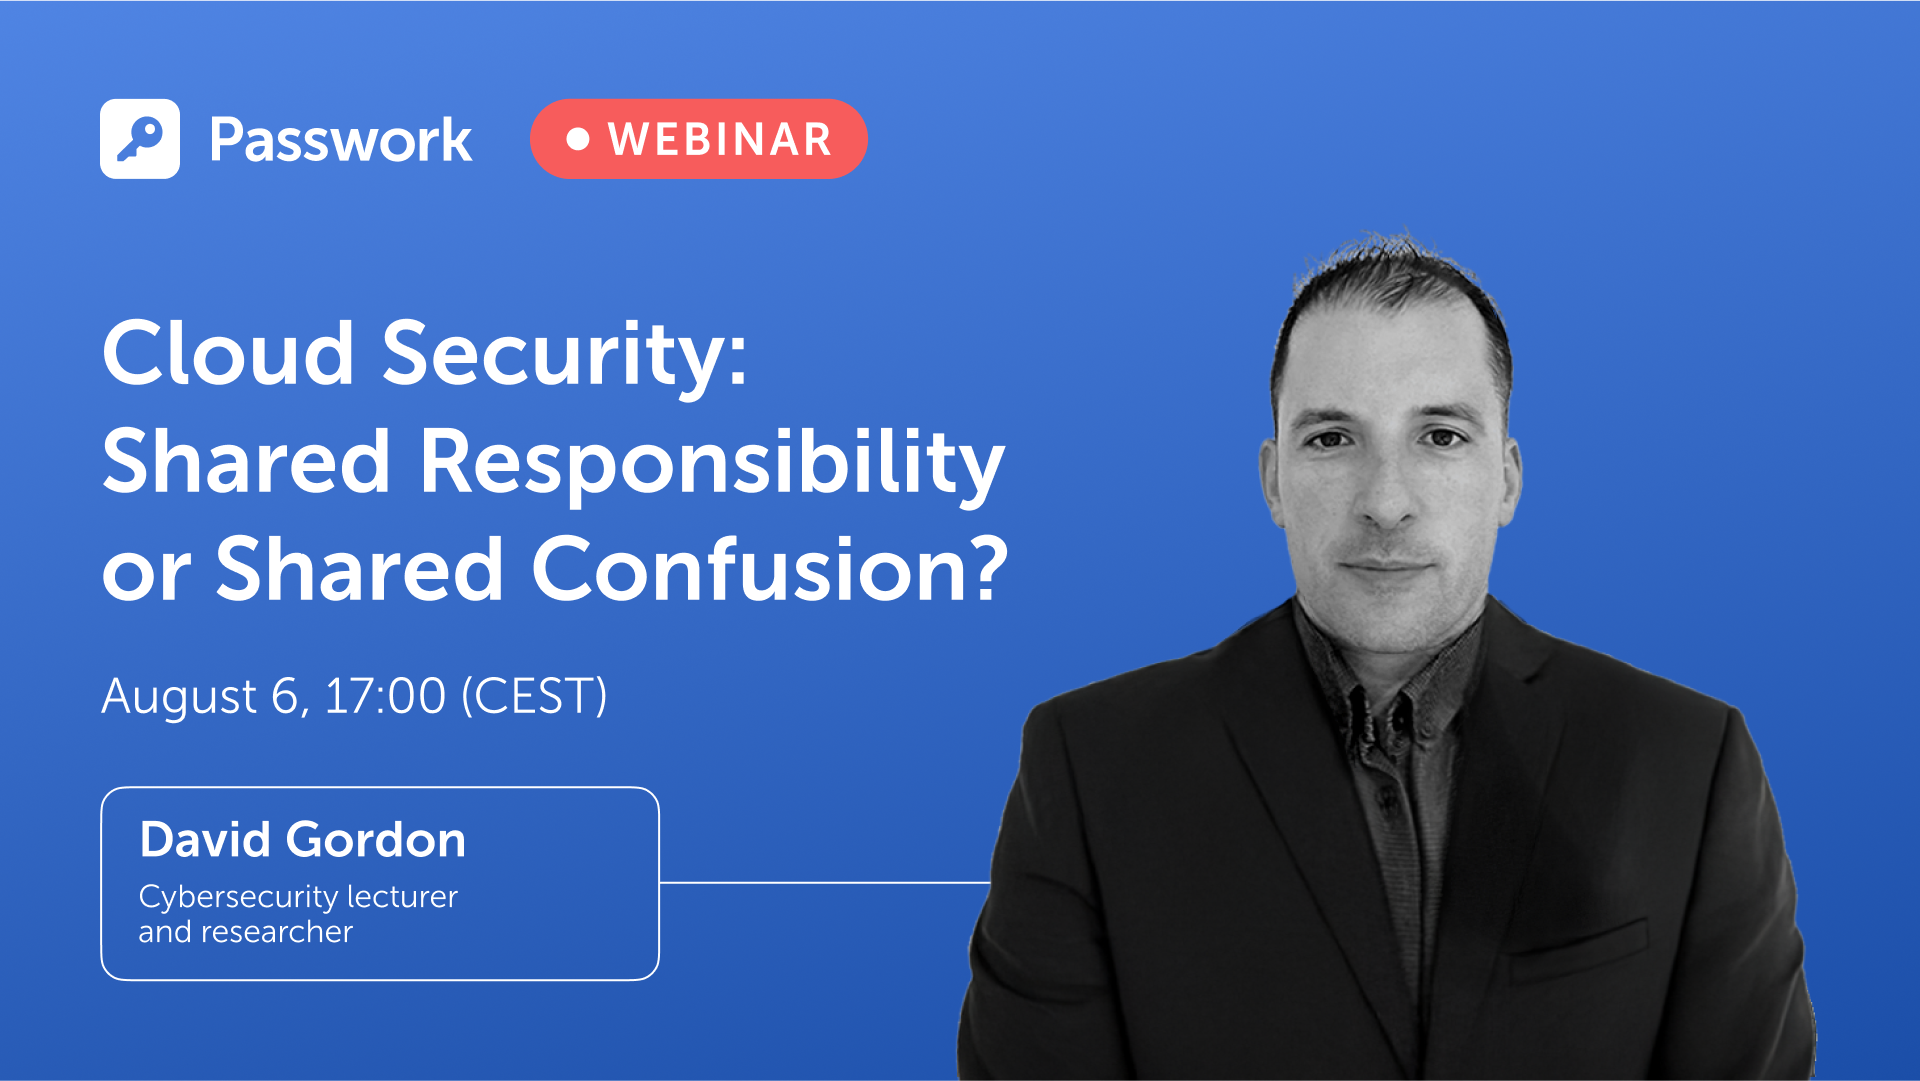
Cloud security: Shared responsibility or shared confusion?
Introduction Cloud security remains one of the most debated topics in modern IT. As organizations continue their migration to cloud platforms, the question of “Who is responsible for what?” grows increasingly complex. In our latest Passwork webinar, cybersecurity lecturer David Gordon joined host Turpal to unpack the realities behind the
What exactly is multi-factor authentication (MFA) and how does it work?
It's possible that you've become familiar with the term "time-based one-time passwords" (TOTP) in relation to "two-factor authentication" (FA) or "multi-factor authentication" (MFA).
However, do you really understand TOTP and how they work?
The Meaning of TOTP
"Time-Based One-Time Passwords” refer to passwords that are only valid for 30-90 seconds after they have been formed with a shared secret value and the current time on the system.
Passwords are almost always composed of six-digit sequences that are changed every thirty seconds. On the other hand, some implementations of TOTP make use of four-digit codes that become invalid after a period of 90 seconds.
An open standard is used in the TOTP algorithm, and this standard is detailed in RFC 6238.
What is a shared secret?
TOTP authentication uses a shared secret in the form of a secret key that is shared between the client and the server.
To the naked eye, the Shared Secret seems to be a string with a representation in Base32 that is similar to the following:
KRUGS4ZANFZSAYJAONUGC4TFMQQHGZLDOJSXIIDFPBQW24DMMU======
Computers are able to comprehend and make sense of information even if it is not legible by humans in the manner in which it is presented.
The client and the server both have a copy of the shared secret safely stored on their respective systems after a single transmission of the secret.
If an adversary is able to discover the value of the shared secret, then they will be able to construct their own unique one-time passcodes that are legitimate. Because of this, every implementation of TOTP needs to pay particular attention to securely storing the shared secret in a safe manner.
What is system time?
There is a clock that is integrated into every computer and mobile phone that measures what is referred to as Unix time.
Unix time is measured in terms of the number of seconds that have passed since January 1, 1970, at 00:00:00 UTC.
Unix time appears to be nothing more than a string of numbers:
1643788666
This small number, however, is excellent for the generation of an OTP since the majority of electrical devices using Unix time clocks are sufficiently synced with one another.
Implementations of the TOTP Authentication Protocol
The use of passwords is not recommended. However, you may increase security by combining a traditional password with a time-sensitive one-time password (TOTP). This combination is known as two-factor authentication or 2FA, and it may be used to authenticate your accounts, virtual private networks (VPNs), and apps securely.
TOTP can be implemented in hardware and software tokens:
• The TOTP hardware token is a physical keychain that displays the current code on a small screen
• The TOTP soft token is a mobile application that displays a code on a phone’s screen
It makes no difference whether you use software tokens or hardware tokens. The purpose of using two different forms of authentication is to increase the level of protection afforded to your online accounts. You have access to a one-time password generator that you may use during two-factor authentication to obtain access to your account. This generator is available to you regardless of whether you have a key fob or a smartphone with an authentication app.
How does a time-based one-time password work?
The value of the shared secret is included in the generation of each time-based one-time password (TOTP), which is dependent on the current time.
To produce a one-time password, the TOTP method takes into account both the current Unix time and the shared secret value.
The counter in the HMAC-based one-time password (HOTP) method is swapped out for the value of the current time in the time-based one-time password algorithm, which is a version of the HOTP algorithm.
The one-time password (TOTP) technique is based on a hash function that, given an input of indeterminate length, generates a short character string of fixed length. This explanation avoids getting too bogged down in technical language. If you simply have the result of a hash function, you will not be able to recreate the original parameters that were used to generate it. This is one of the hash function's strengths.
It is essential to keep in mind that TOTP offers a higher level of security than HOTP. Every 30 seconds, a brand new password is produced while using TOTP. When using HOTP, a new password is not created until after the previous one has been entered and used. The fact that the one-time password for HOTP continues to work even after it has been used for authentication leaves hackers with a significant window of opportunity to mount a successful assault.
Authentication using Multiple Factors (MFA)
A user must first register their TOTP token in any multi-factor authentication (MFA) system that supports a time-based one-time password before they can use the device to connect to their account.
Some TOTP soft tokens need the registration of a different OTP generator for each account. This effectively implies that if you add two accounts to your authenticator app, the program will produce two temporary passwords, one for each account, every 30 seconds. A single TOTP soft token (authenticator program) may support an infinite number of one-time password generators. Individual one-time password generators safeguard the security of all other accounts in the case where the security of an account is compromised.
To use 2FA, a secret must be created and shared between the TOTP token and the security system. The security system's secret must then be passed to the token.
How is the shared secret sent to the token?
Typically, the security system creates a QR code and requests that the user scan it using an authenticator app.
A QR code of this type is a visual depiction of a lengthy string of letters. The shared secret is, roughly speaking, part of this lengthy sequence.
The software will string the image and extract the secret when the user scans the QR code using the authenticator app. The authenticator program may now utilize the shared secret to generate one-time passwords.
When registering a TOTP token, the secret is only sent once. Many of the concerns about stealing the private key are alleviated. An adversary can still steal the secret, but they must first physically steal the token.
It works even when you're not connected to the internet!
To use the TOTP technique, you do not need an active internet connection on your smartphone or a physical key.
The TOTP token only needs to obtain the shared secret value once. The security system and the OTP generator may thus produce successive password values without needing to communicate. As a consequence, time-based one-time passwords (TOTP) operate even when the computer is turned off.
The 2025 small business cybersecurity checklist: A complete guide | Passwork
Passwork’s 2025 cybersecurity checklist, based on the NIST framework, provides actionable steps to prevent data breaches and financial loss.

Passwork: Secrets management and automation for DevOps
Introduction In corporate environment, the number of passwords, keys, and digital certificates is rapidly increasing, and secrets management is becoming one of the critical tasks for IT teams. Secrets management addresses the complete lifecycle of sensitive data: from secure generation and encrypted storage to automated rotation and audit trails. As
5 ways to keep your business safe from cyber threats
In an era where cybercrime is rampant, businesses must take a proactive approach to safeguard their confidential information. In 2021 alone, over 118 million people have been affected by data breaches, and this number is expected to rise exponentially. In this post, we’ll discuss some of the best practices

All about Time-Based One-Time Passwords (TOTP)

1. Basic Information about SSL
1.1 What Are ‘Certificates’ and Why Are They Needed?
Certificates are text files on a web server, the placement and content of which confirms the identity of the responsible owner of a web resource. Owner confirmation is carried out by specially authorized companies or divisions of an organization – Certification Centers (also referred to as the CC, Certificate Authority, CA).
Additionally, certificates contain the public key required to establish an encrypted connection to work on a network in order to prevent data interception by intruders. The protocols by which this connection is established end with the letter "S", from the English word "Secure" — see HTTP(S), FTP(S), etc. This means that standard internet protocols, such as HTTP and FTP, are used over an encrypted TLS connection, whereas ordinary messages are exchanged over TCP/IP without encryption. TLS (which stands for Transport Layer Security is a protocol that ensures secure data transfer based on SSL (Secure Sockets Layer), which is another cryptographic protocol. This uses asymmetric cryptography to authenticate exchange keys so that a session can be established, symmetric encryption to further preserve the confidentiality of the session, and the cryptographic signature of messages to guarantee the delivery of information without loss. Despite the fact that it is the only TLS protocol that is actually used, due to habit, the entire family of these protocols is called SSL, and the accompanying certificates are SSL certificates.
The use of SSL certificates primarily allows you to prevent data theft by using clones of sites of well-known services, when attackers duplicate the main pages of said sites, employ similar domain names, and forge personal information forms. The user may input personal information about themselves, their documents, and payment details on fake websites. As a result, users' personal information may subsequently be used to gain unauthorized access to other resources or social networks so it can be resold, or used to steal funds from a bank account. Service owners can help customers avoid these problems by configuring HTTPS on their resource and demonstrating the authenticity of their web pages to their users directly in the browser address bar.
As mentioned above, TLS/SSL is used to encrypt traffic from the client to the web server, and this prevents intruders from intercepting traffic on public unsecured networks.
1.2 How Do They Work?
When it comes to TLS /SSL, three parties are involved: the client – the consumer of services or goods on the internet; the server – the provider of these services or goods; and the Certification Center, whose duties include ensuring that the domain name and resource belong to the organization specified in the registration information of the certificate.
The TLS/SSL algorithm works as follows:
1. The owners of the service contact the Certification Center through partners and provide information about themselves.
2. The Certification Center makes inquiries about the owners of the service. If the primary information is verified, the Certification Center issues the owners of the service with a certificate which includes the verified information and a public key.
3. The user launches a browser on a personal device and goes to the service page.
4. The browser, along with other standard operations, requests the SSL certificate while the service page is loading.
5. The service sends the browser a copy of the certificate in response.
6. The browser checks the validity period and validity of the copy of the certificate using the Certificate Centers’ pre-installed root certificates. If everything is approved, the browser sends the corresponding response to the service, signed with the client's key.
7. The service receives confirmation of the client’s verification with their digital signature and they begin an encrypted session.
Session encryption is carried out using PKI (Public Key Infrastructure). PKI is based on the following principles:
1. There is a related pair of non-interchangeable control sequences of almost random characters called keys: public or public and private, also referred to as private.
2. Any dataset can be encrypted with a public key. Because of this, the public key can be freely transmitted over the network, and an attacker will not be able to use it to harm users.
3. The private key is known only to its owner and can decrypt the received data stream into structured information that has been encrypted with a public key paired with it. The private key should be stored on the service and used only for local decryption of messages that have been received. If an attacker is able to gain access to a private key, then procedures for revoking and reissuing the certificate must be initiated to make the previous certificate useless. A leak of a private key is called a compromise.
An SSL certificate from a Certificate Authority is one way of distributing a server’s public key to clients in unsecured networks. After verifying the validity of the certificate, the client encrypts all outgoing messages with the public key attached to the certificate and decrypts incoming messages with the private one, thereby ensuring a secure communication channel.
1.3 Who Releases Them?
Certificates are issued by Certification Centers upon the request of customers. The Certification Center is an independent third–party organization that officially verifies the information specified in a certificate request: i.e. whether the domain name is valid, whether a network resource with this name belongs to a specific company or individual to whom it is registered; whether the site of the company or individual to whom the SSL certificate was issued is genuine, and other checks. The most famous international Certification Centers are Comodo, Geotrust, GoDaddy, GlobalSign, Symantec. The root SSL certificates of these Certification Authorities are pre-installed as trusted in all popular browsers and operating systems.
It is often more cost-effective to purchase certificates not directly from the Certification Center but from their partners instead, as they offer wholesale discounts. In Russia, many companies and hosting providers that have their own tariffs for the SSL certificate service sell certificates from well-known Certification Centers.
2. Advanced Information about Certificates
2.1 Which Crypto Algorithms Are Used?
The following algorithms are used to establish a secure connection:
- Encryption algorithm
- Hashing algorithms
- Authentication algorithms
The most commonly used encryption algorithms for cryptographic operations in TLS/SSL are combinations of the algorithms RSA (an initialism of the names of the creators Rivest, Shamir and Adleman), DSA (which stands for Digital Signature Algorithm, patented by the National Institute of Standards and Technology of the USA) and several variations of the Diffie–Hellman algorithm or DH, such as a one-time DH (Ephemeral Diffie–Hellman, EDH) and DH based on elliptic curves (Elliptic curve Diffie–Hellman, ECDH). These Diffie-Hellman variations, unlike the original algorithm, provide progressive secrecy, i.e. when previously recorded data cannot be decrypted after a certain amount of time — even if it was possible to obtain the server's secret key — because the original parameters of the algorithm are generated again when the channel is re-established after a forced break when the connection has timed out.
Hashing algorithms are based on a family of mathematical functions for calculating the hash SHA (Secure Hash Algorithm). The hash function allows you to convert the original data array into a string of a certain length, and this length determines the amount of processing time and the computing power required. All encryption algorithms today support the SHA2 hashing algorithm, most often SHA-256. SHA-512 has a similar structure, but in it the word length is 64 bits rather than 32, the number of rounds in the cycle is 80 rather than 64, and the message is divided into blocks of 1024 bits rather than 512 bits. Previously, SHA1 and MD5 algorithms were used for the same purpose, but today they are considered vulnerable to attack. Modern services use keys 64 bits long and higher. The current version of the SHA-3 algorithm (Keccak), uses an amount necessary to verify the integrity of the transmitted data — MAC (Message Authentication Code). The MAC uses the mapping function to represent message data as a fixed length value, and then hashes the message.
In modern versions of the TLS protocol, HMAC is used (Hashed Message Authentication Code), which uses a hash function immediately with a shared secret key. This key is transmitted along with the flow of information, and to confirm authenticity, both parties must use the same secret keys. This provides greater security.
The General Algorithm of SSL Operation
1. Handshake protocol. The connection confirmation (handshake) protocol is the order of operations performed directly during the initialization of the SSL connection between the client and the server. The protocol allows the server and client to carry out mutual authentication, determine the encryption algorithm and MAC, as well as secret keys to protect data during a further SSL session. The handshake protocol is used by participants at the stage before data exchange. Each message transmitted as part of the handshake protocol contains the following fields:
- Type is the category of messages. There are 10 categories of messages.
- Length refers to the length of each message in bytes.
- The content is the message itself and its parameters.
During the handshake, the following stages take place:
1.1 Determination of supported algorithms. At the first stage, the connection between the client and the server is initiated and the encryption algorithms are selected. First, the client sends a welcome message to the server, before entering response-waiting mode. After receiving the client's welcome message, the server returns its own welcome message to the client to confirm the connection. The client's welcome message includes the following data:
- The maximum SSL version number that the client can support
- A 32-byte random number used to generate the master secret
- Session ID
- A list of cipher suites
- A list of compression algorithms
The format of the list of cipher suites is as follows:
<1>_<2>_<3>_<4>Wherein lies:
- The name of the protocol, for example, "SSL" or "TLS".
- Key exchange algorithm (with an indication of the authentication algorithm).
- The encryption algorithm.
- Hashing algorithm. For example, the entry "SSL_DHE_RSA_WITH_DES_CBC_SHA" means that the fragment "DHE_RSA" (temporary Diffie-Hellman with RSA digital signature) is defined as a key exchange algorithm; the fragment "DES_CBC" is defined as an encryption algorithm; and the fragment "SHA" is defined as a hashing algorithm. As will be discussed later in TLSv1.3, the key exchange and encryption protocols are combined into an authenticated encryption algorithm with attached data (AEAD), so the entry there will be shorter. Example: TLS_AES_256_GCM_SHA384. The server response includes the following fields:
- The SSL version number. On the client side, the lowest version number supported by the client and the largest version number supported by the server are compared. Depending on the server’s settings, selection priority can be given to either the client or server.
- A 32-byte random number used to generate the master secret.
- Session ID.
- A set of ciphers from the list of ciphers supported by the client.
- Compression method from the list of compression methods supported by the client.
1.2 Server authentication and key exchange
At the second stage, all messages are sent by the server. This stage is divided into 4 steps:
- The sending of a digital certificate to the client so they can use the server's public key for authentication purposes.
- Key exchange on the server. Depending on the established algorithm, this step may be skipped.
- Client certificate request. Depending on the settings, the server may require the client to send their own certificate.
- A message confirming that the server authentication and key exchange stage is complete, before moving on to the next stage.
1.3 Client authentication and key exchange:
At the third stage, all messages are sent by the client. This stage is divided into 3 steps:
- The sending of the certificate to the server — if the server requested it (this depends on the established algorithm). If the algorithm includes this, the client can authenticate on the server. For example, in IIS, you can configure mandatory authentication of the client certificate.
- Client key exchange (Pre-master-secret) – the sending of the master key to the server, which will later be encrypted using the server key. The client knows the master key and in case of server substitution will be able to terminate the connection.
- Signing a random number to confirm ownership of the certificate's public key. This stage also depends on the algorithm chosen.
1.4 Server shutdown
At the fourth stage, messages are exchanged directly and errors are monitored. If an error is detected, the alarm protocol comes into effect. This stage consists of exchanging session messages: the first two messages come from the client, and the last two come from the server.
2. The Key Generation Process
To ensure the integrity and confidentiality of information, SSL requires six encryption secrets: four keys and two values of the initialization vector (IV, see below). The information’s authenticity is guaranteed by an authentication key (for example, HMAC). The data is then encrypted by a public key, and data blocks are created based on IV. The keys required by SSL are unidirectional, so when a client is hacked, the data obtained cannot be used to hack the server.
3. Record Agreement (Record Protocol)
The recording protocol is used after a connection between the client and the server has been successfully established, and when the client and server have passed mutual authentication and have determined the algorithm they will use to exchange information about the algorithms used. The recording protocol implements the following functions:
- Confidentiality by using the secret key defined at the handshake stage;
- Integrity by analyzing the MAC defined at the handshake.
4. Alarm Protocol
When the client and server detect an error, they send a message recognizing this. If it is a critical error, the algorithm immediately closes the SSL connection, and both sides first delete the session details: the identifier, secret, and key. Each error message is 2 bytes long. The first byte indicates the type of error. If the connection fails, the value is 1, while if a critical error is detected, it is 2. The second byte indicates the nature of the error.
2.2 Versions of SSL (SSL, TLS) — and How They Differ
During the initial installation of a secure connection between the client and the server, the protocol is selected from those supported by both sides from the set of SSLv3, TLSv1, TLSv1.1, TLSv1.2 or TLSv1.3.
Earlier versions of the SSL protocol are not used. The SSLv1 version was never made public. The SSLv2 version was released in February 1995, but it contained many security flaws that led to the development of SSLv3. Various IT companies have begun to attempt to implement their own versions of secure data transfer protocols. In order to prevent disunity and monopolization in the field of network security, the international community of designers, scientists, network operators, and providers (The Internet Engineering Task Force [IETF]), which was created by the Internet Architecture Council in 1986, is involved with developing protocols and organizing the internet, specifically regarding the standardized TLS protocol version 1, slightly different from SSL 3.0.
The technical details of the protocol are recorded by the release of a document called RFC (Request for Comments, working proposal). These documents can be found on the IETF website: www.ietf.org/rfc/rfcXXXX.txt , where XXXX is a four-digit RFC number. Thus, the TLSv1 version is fixed in RFC 2246, the TLSv1.1 version is fixed in RFC 4346, the TLSv1 version.2 in RFC 5246, and the TLSv1 version.3 in RFC 8446. In addition, RFC 3546 defines several extensions for cases when TLS is used in systems with limited bandwidth, such as wireless networks; RFC 6066 defines a number of additional TLS changes made to the extended client greeting format (presented in TLSv1.2); RFC 6961 defines a method for reducing traffic when a client requests information about the status of a certificate from the server; and, finally, RFC 7925 defines what happens to TLS (and DTLS) when it is used in IoT (Internet Of Things) to exchange data between hardware and other physical objects without human intervention.
As mentioned above, the TLSv1 protocol was released as an update to SSLv3. RFC 2246 states that "the differences between this protocol and SSLv3 are not hugely significant, but they are significant enough to exclude interaction between TLSv1 and SSLv3."
In contrast to the TLS Version 1.0, the TLSv1.1 protocol provides:
- Added protection against attacks using CBC (Cipher Block Chaining), when each block of plaintext is associated with the previous block of ciphertext before encryption.
1. The implicit initialization vector (the original pseudorandom number initiating the calculation of the further cipher, IV) was replaced by an explicit one which is not secret, but nonetheless cannot be predicted in a reasonable timeframe.
2. A change in the handling of block filling errors when a data packet is expanded to a fixed block size. - Support for registering server IP address parameters and other network information.
The TLS 1.2 protocol is based on the TLS 1.1 specification. This is the most common at the moment. The main differences include:
- The combination of MD5–SHA-1 hashing algorithms in a pseudorandom function (PRF) has been replaced by the more secure SHA-256, with the possibility of using a set of ciphers, the specified function.
- The hash size in the finished message has become at least 96 bits.
- The combination of MD5–SHA-1 hashing algorithms in the digital signature has been replaced by a single hash agreed upon during the handshake, which is SHA-1 by default.
- The implementation of the function of selecting encryption and hashing algorithms for the client and server.
- The extension of support for authenticated encryption ciphers used mainly for Galois/Counter mode (GCM) and CCM mode for Advanced Encryption Standard (AES).
- The addition of TLS extension definitions and AES cipher suites.
- The ending of backward compatibility with SSLv2 as part of the 6176 RFC. Thus, TLS sessions have ceased to negotiate the use of SSL version 2.0.
The TLS 1.3 protocol is based on the TLS 1.2 specification. Internet services are gradually transitioning to this protocol. The main differences include:
- The separation of key matching and authentication algorithms from cipher suites.
- The ending of support for unstable and less-used named elliptic curves.
- The ending of support for MD5 and SHA-224 cryptographic hash functions.
- The need for digital signatures even when using the previous configuration.
- The integration of the HMAC-based key generation function and a semi-ephemeral DH sentence.
- The introduction of support for a one-time resumption of the receive-transmit session (Round Trip Time or 1-RTT) handshakes, and initial support for zero time for resuming the receive-transmit session (the name of the 0-RTT mode).
- Session keys obtained using a set of long-term keys can no longer be compromised when attackers gain access to them. This property is called perfect direct secrecy (PFS) and is implemented through the use of ephemeral keys during the DH key agreement.
- The ending of support for many insecure or outdated functions, including compression, renegotiation, ciphers other than AEAD-block encryption modes (Authenticated Encryption with Associated Data), non-PFS key exchange (including static RSA key exchange and static DH key exchange), configurable EDH groups, elliptic curve point ECDH format negotiation, encryption modification specification protocol, UNIX time welcome message, etc.
- The prevention of SSL or RC4 negotiation that was previously possible to ensure backward compatibility.
- The ceasing of use of a record-level version number and fixing the number to improve backward compatibility.
- The addition of the ChaCha20 stream cipher with the Poly1305 message authentication code.
- The addition of digital signature algorithms Ed25519 and Ed448.
- The addition of the x25519 and x448 key exchange protocols.
- The addition of support for sending multiple responses to the Online Certificate Status Protocol, OCSP.
- The encryption of all confirmations of receiving and transmitting a block of data after calling the server.
2.3 What Is PKI (Public Key Infrastructure)?
Public Key Infrastructure (PKI) is a system of software, hardware and regulatory methods that solve cryptographic tasks based on a pair of private and public keys. The PKI is based on the exclusive trust of the exchange participants in the certifying center in the absence of information about each other. The certifying center, in turn, confirms or refutes the ownership of the public key to the specified person who owns the corresponding private key.
The main components of PKI:
- The certifying center or Certification Center is an organization that performs, among other things, legal verification of data on participants in a network interaction (client or server). From a technical point of view, the Certification Center is a software and hardware complex that manages the lifecycle of certificates, but not their direct use. It is a trusted third party.
- A public key certificate (most often just ‘certificate’) consists of client or server data and public key signed with the electronic signature of the Certifying Center. The issuance of a public key certificate by a Certification Authority ensures that the person specified in the certificate also owns the private part of a single key pair.
- Registration Center (RC) is an intermediary of the Certification Center that acts on the basis of trust in the root Certification Center. The Root Certification Center trusts the data received by the Registration Center while verifying the information about the subject. After verifying the authenticity of the information, the Registration Center signs it with its own key and transmits the data it has received to the root Certification Center. The Root Certification Authority verifies the registration authority’s signature and, if successful, issues a certificate. One Registration Center can work with several Certification Centers (in other words, it can consist of several PKIs), just as one Certification Center can work with several Registration Centers. This component may not be present in the corporate infrastructure.
- Repository – a repository of valid certificates and a list of revoked certificates that are constantly updated. The list of revoked certificates (Certificate Revocation List, CRL) contains data on issued certificates whose paid period or validity period have elapsed, as well as certificates of resource owners that have been compromised or have not been authenticated.
- A Certificate Archive is a repository of all certificates ever issued (including expired certificates) within the current PKI. The certificate archive is used for security incident investigations, which include verifying all data that has ever been signed.
- The Request Center is the personal account of the Certification Center’s clients, where end users can request a new certificate or revoke an existing one. It is implemented most often in the form of a web interface for the registration center.
- End users are clients, applications, or systems that own a certificate and use the public key management infrastructure.
3. How the Browser Works with SSL Certificates
3.1 What Happens in the Browser When the Certificate Is Checked?
Regardless of any extensions, browsers should always check a certificate’s basic information, such as the signature or the publisher. Steps for verifying Certificate Information:
1. Checking the integrity of the certificate. This is done with the cryptographic Verify operation with a public key. If the signature is invalid, then the certificate is considered fake: it has been modified after it was issued by a third party, so it is rejected.
2. Verifying the validity of the certificate. This is done with the cryptographic Decrypt operation, and by reading the accompanying information. The certificate is considered valid as long as the period for which the client has paid has not elapsed, or the expiration date has not passed. The expiration date of the certificate is the length of time for which the owner’s identity is validated by the Certifying Center that issued the certificate. Browsers reject any certificates with an expiration date that has expired before or started after the date and time of verification.
3. Checking the certificate revocation status. This is done with the cryptographic Decrypt operation, and loading and reconciliation with CRL. A number of circumstances, for example, law enforcement agencies’ appeals, the identification of a change in the source information or confirmation of the fact that the server's private key has been compromised, can make the certificate invalid before its expiration date. To do this, the certificate is added to the CRL on the side of the Certifying Center.
Certification authorities periodically release a new version of the signed CRL, and it is distributed in public repositories. Browsers access the latest version of the CRL when verifying the certificate. The main drawback of this approach is that it limits verification to the CRL issuance period. The browser will be informed of the revocation only after it receives the current CRL. Depending on the policy of the signing Certification Authority, the CRL update period can be calculated in weeks.
When working with TLSv2 and TLSv3, the browser can use the OCSP Network Certificate Status detection protocol described in RFC 6960. OCSP allows the browser to request the revocation status of a particular certificate online (the reply operation). If the OCSP is configured correctly, the verification of certificates in the CRL is much faster and avoids the use of actually revoked certificates until the next CRL update. There is an OCSP Stapling technology that allows you to include a copy of the response to the certificate status request from the Certifying Center in the headers of the HTTP responses of the web server, which in turn increases the performance and speed of data exchange.
4. Verification of the certificate publisher by the certificate chain.
Certificates are usually associated with several Certification Authorities: the root authority, which is the owner of the public key for signing certificates, and a number of intermediary ones, which refer to previous owners of the public key all the way up to the root one.
Browsers check the certificates of each Certifying Authority for being in the chain of trust with the root at the head. For added security, most PKI implementations also verify that the public key of the Certifying Authority matches the key with which the current certificate was signed. Thus, self-signed certificates are determined, because they have the same publisher only on the server where they were issued, or were added to the list of root certificates.
The X.509 v3 format allows you to determine which chain certificates should be checked. These restrictions rarely affect the average Internet user, although they are quite common in corporate systems at the development and debugging stage.
5. Checking the domain name restriction
The certification authority may restrict the validity of the certificate on a server with a specific domain name or a list of the organization's child domains. Domain name restrictions are often used for intermediate Certification Authority certificates purchased from a publicly trusted Certification Authority to exclude the possibility of issuing valid certificates for third-party domains.
6. Checking the certificate issuance policy
The Certificate Issuance Policy is a legal document published by the Certification Authority, which describes in detail the procedures for issuing and managing certificates. Certification authorities can issue a certificate in accordance with one or more policies, links to which are added to the information of the issued certificate so that the verifying parties can validate these policies before deciding whether to trust this certificate. For example, restrictions may be imposed on the region or time frame (for the period of technological maintenance of the Certification Center software).
7. Checking the length of the certificate chain
The X.509 v3 format allows publishers to define the maximum number of intermediate certification authorities that can support a certificate. This restriction was introduced after the possibility of forgery of a valid certificate was demonstrated in 2009 by including a self-signed certificate in a very long chain.
8. Verifying the public key assignment
The browser checks the purpose of the public key contained in the certificate encryption, signatures, certificate signature and so on. Browsers reject certificates, for example, if a server certificate is found with a key intended only for CRL signing.
9. Checking the rest of the chain certificates
The browser checks each certificate of the chain. If the verification data was completed without errors, then the entire operation is considered valid. If any errors occur, the chain is marked as invalid and a secure connection is not established.
3.2 How to View Certificate Information and Check that Everything Is Working Correctly
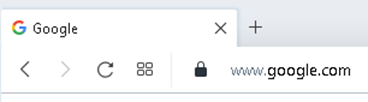
The security certificate can be checked directly in the browser. All modern browsers display certificate information visibly in the address bar. If a secure connection with a web resource is established, a lock icon is displayed on the left of the browser address bar. In case of an error, the crossed-out word "HTTPS" or an open lock icon will be displayed. Depending on the type of browser and its version, the type of icons and behavior when working with SSL certificates may differ. Below are examples of images for different versions of modern browsers:
Google Chrome

Mozilla Firefox

Opera
Microsoft Edge

Chrome for Android

Safari for iOS

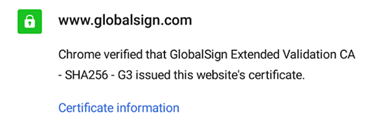
To view the details of the certificate, click on the lock icon and in the subsequent menu, click on the option that outlines the security details. Information about the certificate will appear after clicking on the appropriate button or information link.
Google Chrome

Mozilla Firefox

Microsoft Edge

Chrome for Android
3.3 A Message that the Browser Does Not Trust the Certificate
Most browsers display a security warning. These warnings inform you that the certificate has not been verified by a trusted certificate authority.
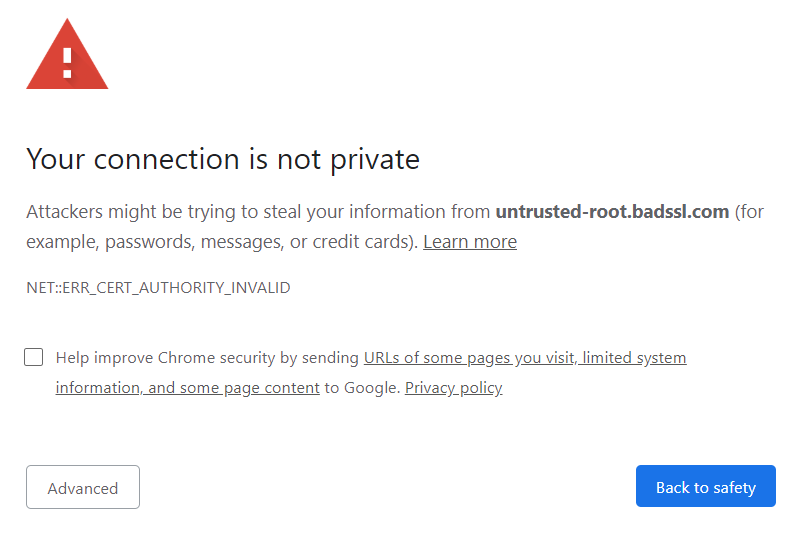
There are a number of reasons why an SSL certificate may be considered invalid in the browser. The most common reasons are:
- Errors in the certificate chain installation process, the intermediate certificate is missing;
- The SSL certificate has expired;
- The SSL certificate is valid only for the primary domain, not for subdomains;
- A self-signed SSL certificate has been used, or the root certificate of the Certification Authority has not been added to the trusted list on the current device.
4. Certification Centers
4.1 More Details about the Certification Centers
As mentioned above, the main task of the Certification Center is to confirm the authenticity of encryption keys using electronic signature certificates. The overarching operating principle can be described by the phrase "users do not trust each other, but everyone trusts the Certifying Center."
Any HTTPS interaction is based on the fact that one participant has a certificate signed by the Certification Authority, and the other attempts to verify the authenticity of this certificate. Verification will be successful if both participants trust the same Certification Authority. To solve this problem, the Certification Center’s certificates are preinstalled in operating systems and browsers. If the Certification Authority itself has issued a certificate, it is called a root certificate. A certificate issued by a partner of the Certification Authority with which it has a trust relationship is called an intermediate certificate. As a result, a tree of certificates is formed with a chain of trust between them.
By installing the certificate of the Certifying Center in the system, you can trust the certificates that have been signed with it. A certificate (particularly for HTTPS) that is issued but not signed by a root or intermediate Certification authority is called a self-signed certificate and is considered untrusted on all devices where this certificate is not added to the root/intermediate lists.
According to the distribution level of certificates, the Certification Center can be international, regional, and corporate. The public key management infrastructure’s activities are carried out in accordance with the regulations of the appropriate level: i.e. public directives recorded by the international community of Internet users, the legislation of the region, or the relevant provisions of the organization.
The main functions of the certification center are:
- verifying the identity of future certificate users;
- issuing certificates to users;
- revoking certificates;
- maintaining and publishing lists of revoked certificates (Certificate Revocation List/CRL), which are used by public key infrastructure clients when they decide whether to trust a certificate.
Additional functions of the certification center are:
- Generating key pairs, one of which will be included in the certificate.
- Upon request, when resolving conflicts, the UC can verify the authenticity of the electronic signature of the owner of the certificate issued by this UC.
Browsers and operating systems of devices fix the trust of the Certifying Center by accepting the root certificate into their storage – a special database of root certificates of Certifying centers. The storage is placed on the user's device after installing the OS or browser. For example, Windows maintains its root certificate store in operating systems, Apple has a so-called trust store, Mozilla (for its Firefox browser) creates a separate certificate store. Many mobile operators also have their own storage. Regional and corporate should be added either at the stage of software certification in the country, or by contacting the technical support of the organization.
Regional representatives of the world Certification Centers have the authority to make legal requests for the activities of organizations related to the publication of web resources. For corporate Certification Centers, this is not necessary, since they usually have access to the internal information of the organization. For security purposes, Certification Authorities should not issue digital certificates directly from the root certificate transmitted to operators, but only through one or more Intermediate Certificate Authority, ICA. These intermediate Certification Authorities are required to comply with security recommendations in order to minimize the vulnerability of the root Certification authority to hacker attacks, but there are exceptions. For example, GlobalSign is one of the few certification authorities that have always (since 1996) used ICA.
Certificates come in different formats and support not only SSL, but also the authentication of people and devices, as well as certifying the authenticity of code and documents.
The universal algorithm for obtaining a certificate from the Certification Center:
1. Private key generation
2. Creation of a certificate signing request (CSR request)
3. Procurement of a certificate signed by the Certificate Authority’s root certificate after passing the checks
4. Configuration of the web server for your resource
Since browsers have a copy of the international Certification Authority’s root certificate, as well as a number of intermediate certificates from the chain of trust, the browser can check whether a certificate was signed by a trusted certification authority. When users or an organization create a self-signed certificate, the browser does not trust it as it knows nothing about the organization, so the root certificate of the organization must be manually added to all controlled devices. These certificates will become trusted after this.
4.2 What Are Root Certificates?
A root certificate is a file that contains service information about the Certification Authority. Special software or a library that verifies, encrypts and decrypts information is called a crypto provider (a provider of cryptographic functions). The cryptographer gets access to the encrypted information, thereby confirming the authenticity of the personal electronic signature.
A chain of trust for the certificates is then built based on the certifying center’s root certificate. Any electronic signature issued by the Certifying Center only works if there is a root certificate.
The root certificate stores information with the dates of its validity. The cryptographic provider can also get access to the organization's registry through the root certificate.
4.3 What Is a Certificate Chain?
Historically and technologically, certain Certification Centers are widely recognized among SSL users, and as a result, it was agreed that the certificates they issued would be considered root certificates, and they would always be trusted. Regional Certifying certificates, in turn, can be confirmed by the root Certifying center. In turn, they can confirm other certificates, forming a chain of trust to certificates. The Certifying Center acts as a guarantor-certifier which issues an SSL certificate at the request of the owner of a web resource.
The certificate and the web resource to which it is issued are certified by an electronic digital signature (EDS). This signature indicates who the owner of the certificate is and records its contents, that is, it allows you to check whether it has been changed by someone after it was issued and signed.
The list of certificates of root Certifying centers and their public keys is initially placed in the operating system’s software storage on the users' workstation, in the browser, and in other applications that use SSL.
If the chain of sequentially signed certificates ends with the root certificate, all certificates included in this chain are considered confirmed.
Root certificates located on the user's workstation are stored in a container protected by the operating system from accidental access. However, the user can add new root certificates themselves, and this is a source of potential security problems.
By carrying out certain actions and accessing an attacked workstation, an attacker can include their own certificate among the root certificates and use it to decrypt the data that is received.
The Root Certification Center can be formed by the government of a particular country or the leaders of an organization. In these cases, root Certification Centers will not operate everywhere, but they can nonetheless be used quite successfully in a specific country or within a specific enterprise.
At present, the list of root certification authorities on the user's computer can be automatically changed when updating the operating system, software products, or manually by the system administrator.
Certification centers can issue a variety of SSL certificates linked by what is known as a tree structure. The root certificate is the root of the tree, with the secret key with which other certificates are signed. All intermediate certificates that are at a lower level inherit the degree of trust that the root certificate has. SSL certificates located further down the structure receive trust in the same way from the Certifying Centers located higher up the chain. Using the example of the Comodo Certification Center, the structure of SSL certificates can explained as follows:
1. The root certificate of the Comodo Certification Authority: AddTrustExternalCARoot
2. Intermediate Certificates: PositiveSSL CA 2, ComodoUTNSGCCA, UTNAddTrustSGCCA, EssentialSSLCA, Comodo High-Assurance Secure Server CA
3. SSL certificates for individual domains
5. General Information about Certificate Types
5.1 Paid Trusted Certificates
The purchase of trusted certificates, except in some cases, is a paid service.
5.1.1 Where and How to Buy
In most cases in Russia, web resource hosting companies or partner organizations of international Certification centers provide SSL certificate services. It is possible to purchase certificates directly from Certification Centers, but such certificates are usually more expensive than from partners who purchase them in bulk.
The procedure for purchasing an SSL certificate is no different from purchasing other internet services. It entails:
1. Selecting a supplier and going to the SSL certificates order page.
2. Selecting the appropriate SSL certificate and clicking the purchase button.
3. Entering the name of your domain and selecting the protection option — for one domain or Wildcard certificate for a group of subdomains.
4. Paying for the service in whichever way is most convenient.
5. Continue configuring the service in accordance with the following parameters:
a. The number of domains that the certificate protects (i.e. one or more).
b. Subdomain support.
c. The speed of release. Certificates with domain-only validation are issued the quickest, while certificates with EV validation are issued the slowest.
d. Most Certifiers offer unlimited certificate reissues. This is required if there are mistakes in the organization data.
e. Warranty – for some certificates there is a $10,000 warranty. This is a guarantee not for the certificate buyer, but rather for the visitor of a site that installs a certificate. If a site visitor with such a certificate suffers from fraud and loses money, the Certification Center undertakes to compensate the stolen funds up to the amount specified in the guarantee. In practice, such cases are extremely rare.
f. Free trial period – Symantec Secure Site, Geotrust Rapidssl, Comodo Positive SSL, Thawte SSL Web Server certificates have paid certificates. There are also free certificates.
g. Refund – almost all certificates have a 30-day refund policy, although there are certificates without this.
5.1.2 Approximate Cost
SSL certificates can be separated into different groups based on their properties.
1. Regular SSL certificates. These are issued instantly and confirm only one domain name. Cost: from $20 per year.
2. SGC certificates. These support customers with increasing the level of encryption. Server Gated Cryptography technology allows you to forcibly increase the encryption level to 128 bits in older browsers that supported only 40 or 56 bit encryption. Cryptography is used to solve this problem, but it cannot cope with the other vulnerabilities present in unsecure browsers, so there are a number of root Certification centers that do not support this technology. Cost: from $300 per year.
3. Wildcard certificates. They provide encryption of all subdomains of the same domain by mask. For example, there is a domain domain.com; if the same certificate must be installed on support.domain.com, forum.domain.com and billing.domain.com, customers can issue a certificate for *.domain.com. Depending on the number of subdomains that need the certificate, it may be more cost-effective to purchase several ordinary SSL certificates individually. Examples of wildcard certificates: Comodo PositiveSSL Multi-Domain Wildcard and Comodo Multi-Domain Wildcard SSL. Cost: from $180 per year.
4. SAN Certificates Subject Alternative Name technology allows customers to use one certificate for several different domains hosted on the same server. Such certificates are also referred to as UCC (Unified Communication Certificate), MDC (Multi-domain certificate) or EC (Exchange Certificate). Generally, one SAN certificate includes up to 5 domains, but this number can be increased for an additional fee. Cost: from $395 per year.
5. Certificates with IDN support Certificates with national domain support (International Domain Name, such as *.US, *.CN, *.UK). Not all certificates can support IDN. This must be clarified with the Certification Center. Certificates supporting IDN include:
- Thawte SSL123 Certificate;
- Thawte SSL Web Server;
- Symantec Secure Site;
- Thawte SGC SuperCerts;
- Thawte SSL Web Server Wildcard;
- Thawte SSL Web Server with EV;
- Symantec Secure Site Pro;
- Symantec Secure Site with EV;
- Symantec Secure Site Pro with EV.
As is mentioned above, partners of Certification Centers can provide significant discounts on prices — starting at $10 — or offer service packages.
5.1.3. Certificate Validation
Certificates are divided into the following levels of validation:
1. DV
Domain Validation, or certificates with domain validation. The certification authority verifies that the client who requests the certificate controls the domain that needs the certificate. A network service for verifying the ownership of WHOIS web resources is used to do this. This type of certificate is the cheapest and most popular, but it is not completely secure, since it contains only information about the registered domain name in the CN field (CommonName is the common domain name of a web resource).
2. OV
Organization Validation, or certificates with organization verification. The certification center verifies the affiliation of a commercial, non-profit or government organization to the client, who must provide legal information when purchasing. This type of certificate is seen as more reliable, since it meets the RFC standards and also confirms the registration data of the owner company in the following fields:
- O (Organization – name of the organization);
- OU (Organizational Unit – name of the organization's division);
- L (Locality – name of the locality of the organization’s legal address);
- S (State or Province Name – name of the territorial and administrative unit of the organization’s legal address);
- C (Country Name – the name of the organization's country).
The certification center can contact the company directly to confirm this information. The certificate contains information about the person that confirmed it, but not data about the owner. An OV certificate for a private person is called IV (individual validation/ individual verification) and verifies the identity of the person requesting the certificate.
3. EV
Extended validation, or a certificate with extended validation. The Certification Center verifies the same data as the OV, but in accordance with stricter standards set by CA/Browser Forum. CA/Browser Forum (Certification Authority Browser Forum)is a voluntary consortium of certification authorities, developers of Internet browsers and software for secure email, operating systems, and other applications with PKI support. The Consortium publishes industry recommendations governing the issuing and management of certificates. This type of certificate is considered the most reliable. Previously, when using these certificates in a browser, the color of the address bar changed and the name of the organization was displayed. It is widely used by web resources that conduct financial transactions and require a high level of confidentiality. However, many sites prefer to redirect users to make payments to external resources confirmed by certificates with extended verification, while using OV certificates which are secure enough to protect the rest of the user data.
5.1.4. The Setup Process (General Information, What Is CSR?)
To initiate the certificate issuing process, a CSR request must be made. Technically, a CSR request is a file that contains a small fragment of encrypted data about the domain and the company to which the certificate is issued. The public key is also stored in this file.
The CSR generation procedure depends entirely on the software used on your server, and is most often performed using the settings in the administrative panel of your hosting. If your hosting does not provide this, then you can use online services to generate a CSR request, or alternatively you can turn to specialized software, such as OpenSSL, GnuTLS, Network Security Services, etc. After generating the CSR, the private key will also be generated.
To successfully generate a CSR, you need to enter data about the organization that has requested the certificate. The information must be entered in the Latin alphabet. The following parameters are sufficient:
- Country Name — the country of registration of the organization in two-letter format. For the USA — US;
- State or Province Name — region, region of registration of the organization. For New York — New York;
- Locality Name — the city where the organization is registered. For New York — New York;
- Organization Name — the name of the organization. For individuals, "Private Person" is indicated;
- Common Name — the domain name of those who have requested the certificate;
- Email Address — the administrator’s email address. Acceptable values:
• admin@domain_name;
• administrator@domain_name;
• hostmaster@domain_name;
• postmaster@domain_name;
• webmaster@domain_name.
5.2. Self-Signed Certificates
Self–signed certificates are SSL certificates created by the service developers themselves. A pair of keys for them is generated through specialized software, for example, OpenSSL. Such a communication channel may well be used for internal purposes, i.e. between devices within your network or applications at the development stage.
5.3. Let’s Encrypt
Let's Encrypt is an Authentication Center that provides free X.509 cryptographic certificates for encrypting HTTPS data transmitted over the Internet and other protocols used by servers on the Internet. The process of issuing certificates is fully automated. The service is provided by the public organization Internet Security Research Group (ISRG).
The Let's Encrypt project was started to translate most of the Internet sites to HTTPS. Unlike commercial Certification centers, this project does not require payment, reconfiguration of web servers, use of e-mail, or the processing of expired certificates. This simplifies the installation and configuration of TLS encryption. For example, on a typical Linux-based web server, you need to run two commands that will configure HTTPS encryption, receive and install a certificate in about 20-30 seconds.
Let's Encrypt root certificates are installed as trusted by major software vendors, including Microsoft, Google, Apple, Mozilla, Oracle and Blackberry.
The Let's Encrypt Certification Authority issues DV certificates with a validity period of 90 days. It has no plans to start issuing OV or EV Certificates, although it began providing support for Wildcard certificates some time ago.
The key to the root certificate of the RSA standard has been stored in the HSM hardware storage since 2015 and is not connected to the network. This root certificate is signed by two intermediate root certificates, which were also signed by the IdenTrust certification authority. One of the intermediate certificates is used to issue sites’ final certificates, while the second is kept as a backup in storage that is not connected to the Internet, in case the first certificate is compromised. Since the root certificate of the IdenTrust center is preinstalled in most operating systems and browsers as a trusted root certificate, the certificates issued by the Let's Encrypt project are verified and accepted by clients — despite the absence of the ISRG root certificate in the trusted list.
The Automated Certificate Management Environment (ACME) authentication protocol is used to automatically issue a certificate to the destination site. In this protocol, a series of requests are made to the web server that seeks a signature for the certificate to confirm the ownership of the domain (DV). To receive requests, the ACME client configures a special TLS server, which is polled by the ACME server using Server Name Indication (Domain Validation using Server Name Indication, DVSNI).
Validation is carried out repeatedly, using different network paths. DNS records are pulled from a variety of geographically distributed locations to prevent DNS spoofing attacks. This is when domain name cache data is changed by an attacker in order to return a false IP address and redirect the intermediary to the attacker's resource (or any other resource on the network)1.
6. Paid Trusted Certificates
6.1 Usage on Windows Server and IIS
6.1.1 What Are the Formats of the Private Key?
These are today’s private key formats:
1. PEM format
This format is most often used by Certification Authorities. PEM certificates most often have extensions *.pem, *.crt, *.cer or *.key (for private keys) and others. For example, the package file SSL.com The CA available in the download table in the order of the certificate has the extension *.ca-bundle. The contents of the files are encrypted using Base64 and contain the strings "--BEGIN CERTIFICATE--" and "--END CERTIFICATE--".
This certificate format is common in Linux OS. Multiple PEM certificates and even a private key can be included in one file, one under the other. But most servers, such as Apache, expect the certificate and private key to be in different files.
2. PKCS#7/P7B format
PKCS#7 or P7B format certificates are usually saved in Base64 ACVII format and have the extension *.p7b or *.p7c. The P7B certificate contains the strings "--BEGIN PKCS7--" and "--END PKCS7--". This format contains only the certificate and certificate chain, but not the private key. Several commonly-used platforms support this format, including Microsoft Windows and Java Tomcat.
3. PKCS#12/PFX format
PKCS#12 or PFX format is a binary format for saving a certificate, any intermediate certificates, and a private key in one encrypted file. PFX files are usually saved with the extension *.pfx or *.p12. As a rule, this format is used on Windows certificates to export/import the certificate and private key 2.
6.1.2 How to Generate a CSR Request
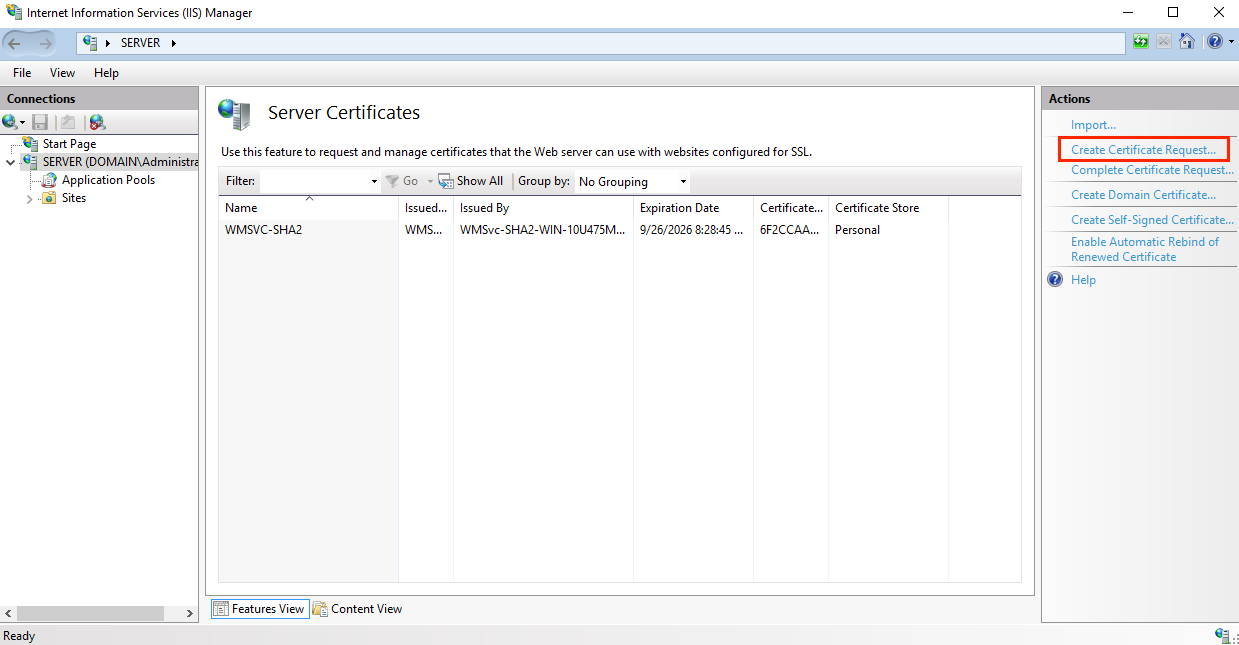
To generate a CSR request in IIS 10, perform the following operations:
1. Run IIS from the iis.msc command line or from the visual interface.
2. Select your server from the Connections list and click the Server Certificates button.
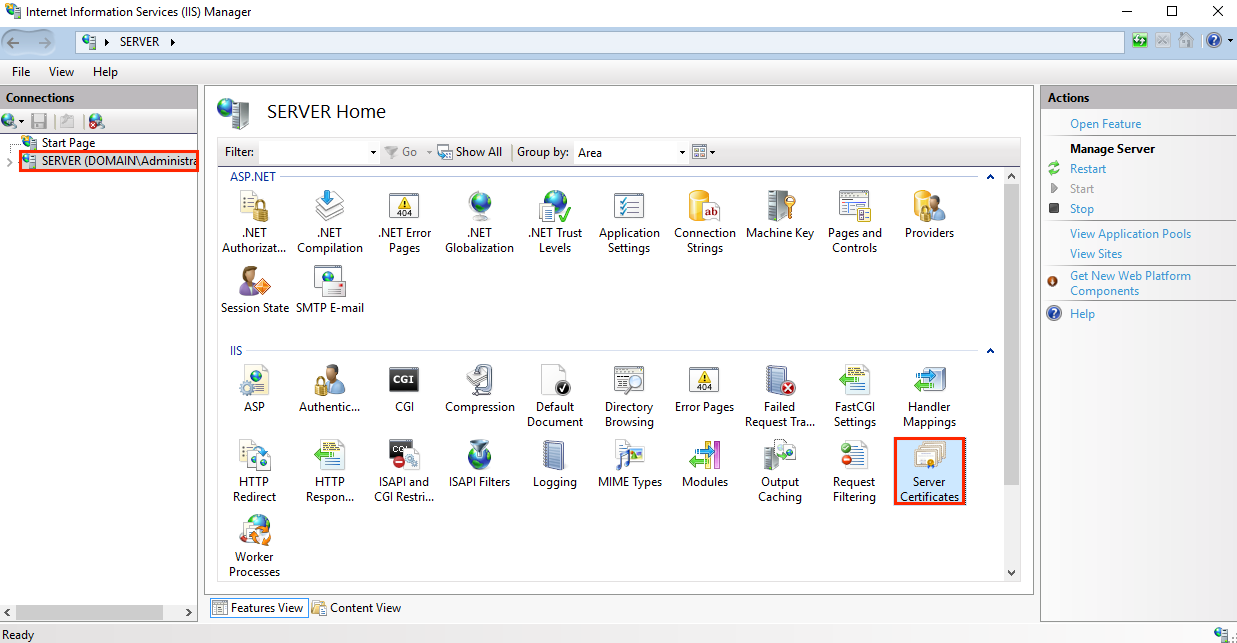
3. On the Server Certificates page, click the Create Certificate Request link in the Actions block.
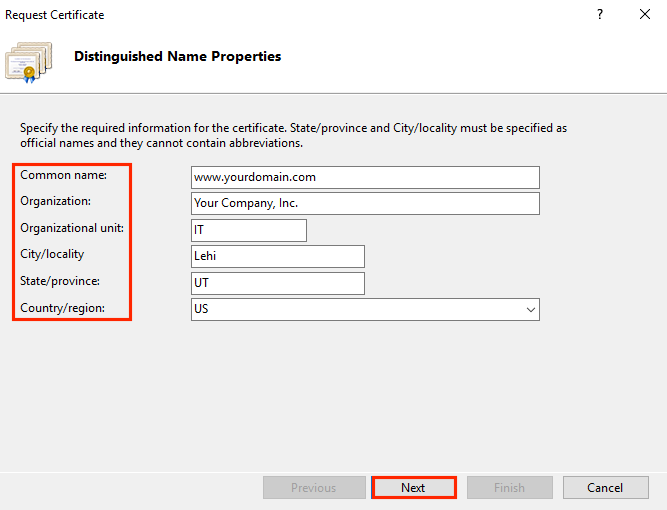
4. In the Request Certificate window of the wizard, fill in the CSR fields and click Next.
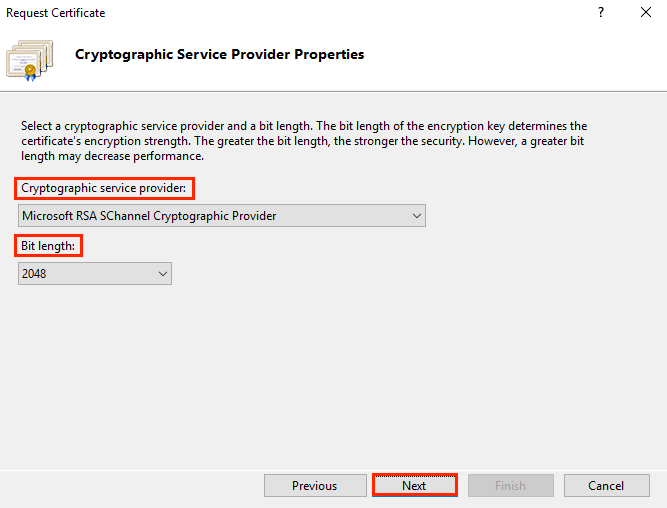
5. In the Cryptographic Service Provider Properties window of the wizard, select the required cryptographic provider, depending on the desired algorithm and the key length, and then click Next.
6. In the File Name window of the wizard, specify the path to the CSR being created, and then click Finish.
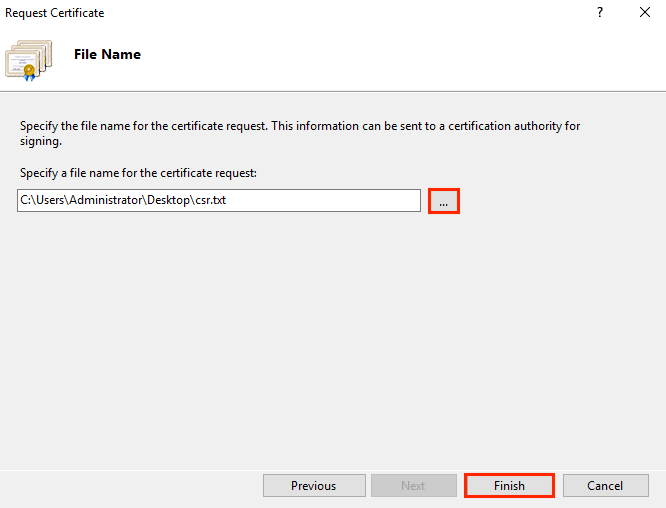
To send the finished CSR to the Certification Center, open the file in a text editor and copy the contents to the web form of the certificate provider.
6.1.3 How to Create a Private Key
As a result of creating the CSR, the private key will be created automatically by IIS. Viewing is available on the Certificates console snap-in in the Personal or Web Hosting points of the certificate tree.
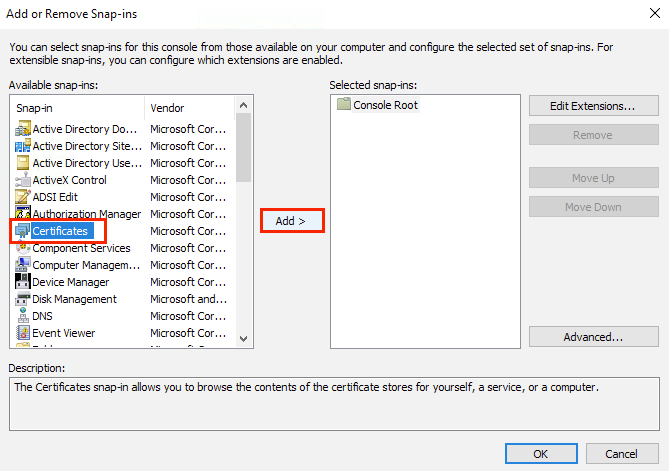
The snap-in can be hidden in the console. To add it, run the mmc command in Start menu > Run and in the window that appears, add the Certificates snap-in to the list available on the local machine:
6.1.4 How to Export It
To export a private key for backup purposes or to configure a new server, follow these steps:
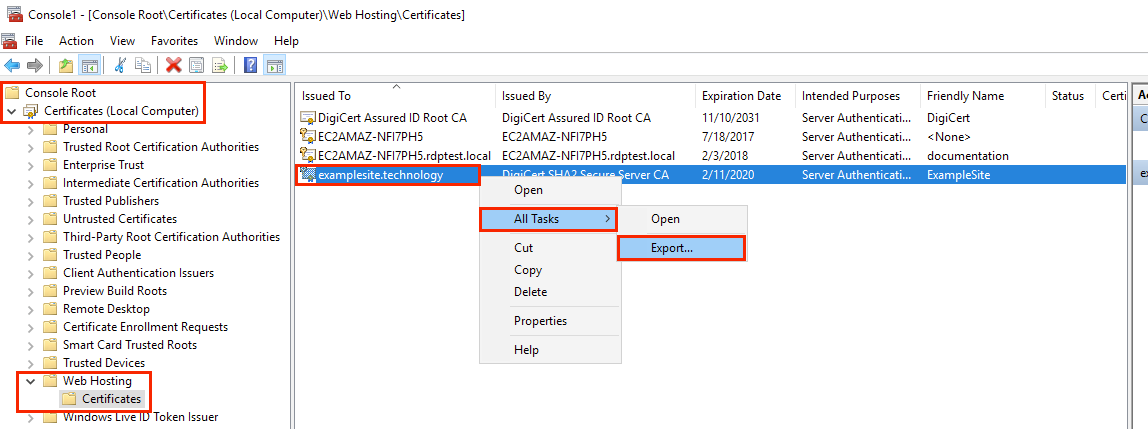
1. Find the certificate in the Certificates snap-in of the management console, and right-click on it. In the context menu that appears, click on the menu item All Tasks > Export;
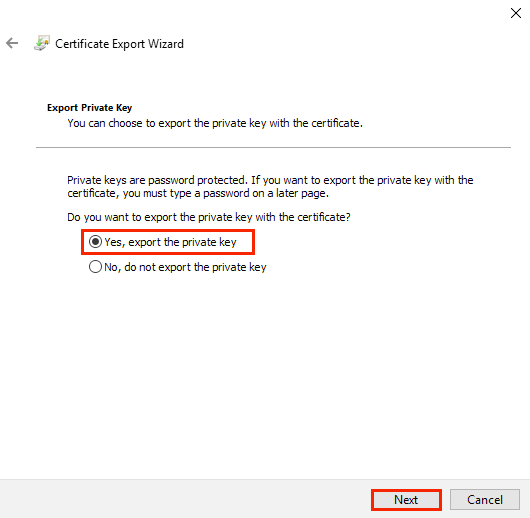
2. In the Welcome to the Certificate Export wizard window of the Certificate Export Wizard, click Next and then in the Export Private Key window, set the switch to Yes, export the private key, and then click Next;
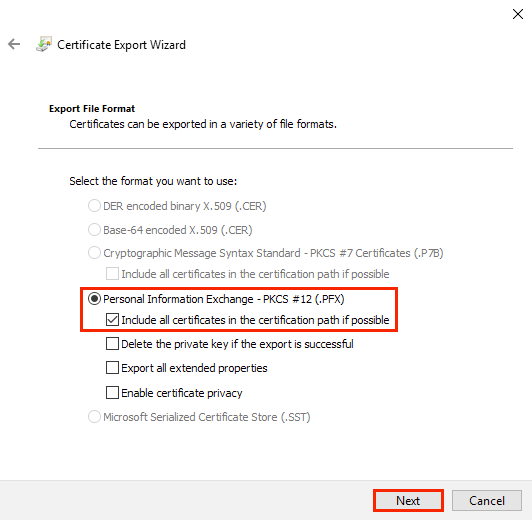
3. In the Export File Format window of the wizard, select the type item Personal Information Exchange – PKCS #12 (.PFX) and select the checkbox Include all certificates in the certification path if possible. Then click Next. Be aware that if the Delete the private key if the export is successful checkbox is checked, the private key created on the current server will be deleted after export;
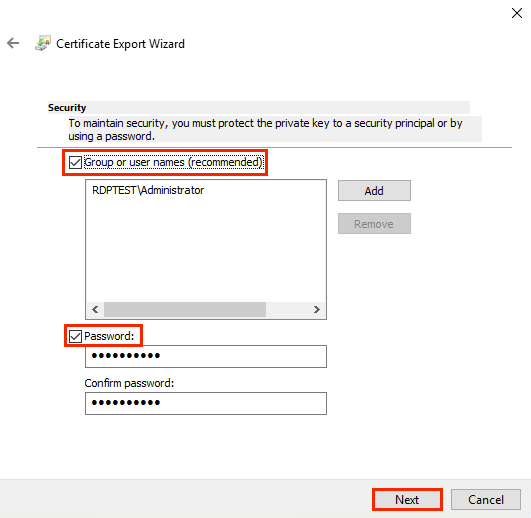
4. In the Security wizard window, fill the Password checkbox and enter the password twice to protect the private key. It will be required for the subsequent import. Additionally, it is recommended that Active Directory users or groups that have the ability to use a private key are restricted. To do this, fill the Group or User Name checkbox and select Required Groups or Users, then click Next;
5. In the File to Export window of the wizard, specify the path to the exported file with the private key and its name. To do this, enter it manually or use the system file search dialog box, then click Next;
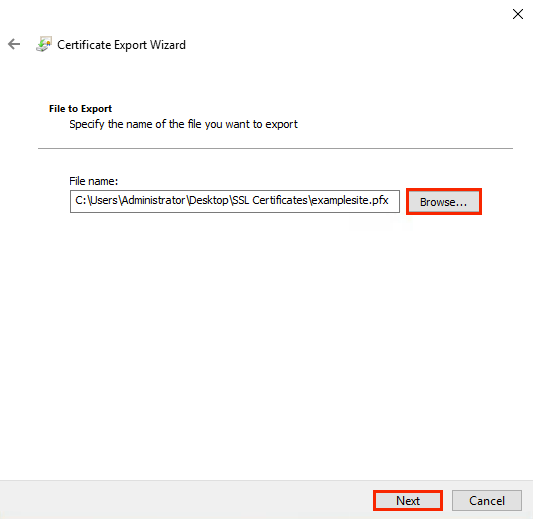
6. In the File to Export window of the wizard, specify the path to the exported file with the private key and its name. To do this, enter it manually or use the system file search dialog box, and then click Next. In the next window Completing the Certificate Export Wizard, a list of the installed settings will appear. Click Finish. The exported file will appear in the specified directory.
6.1.5 How to Configure SSL on IIS
To configure SSL in IIS, follow these steps:
1. Run IIS from the iis.msc command line or from the visual interface.
2. Select your server from the Connections list and click on the Bindings... link in the Actions block.
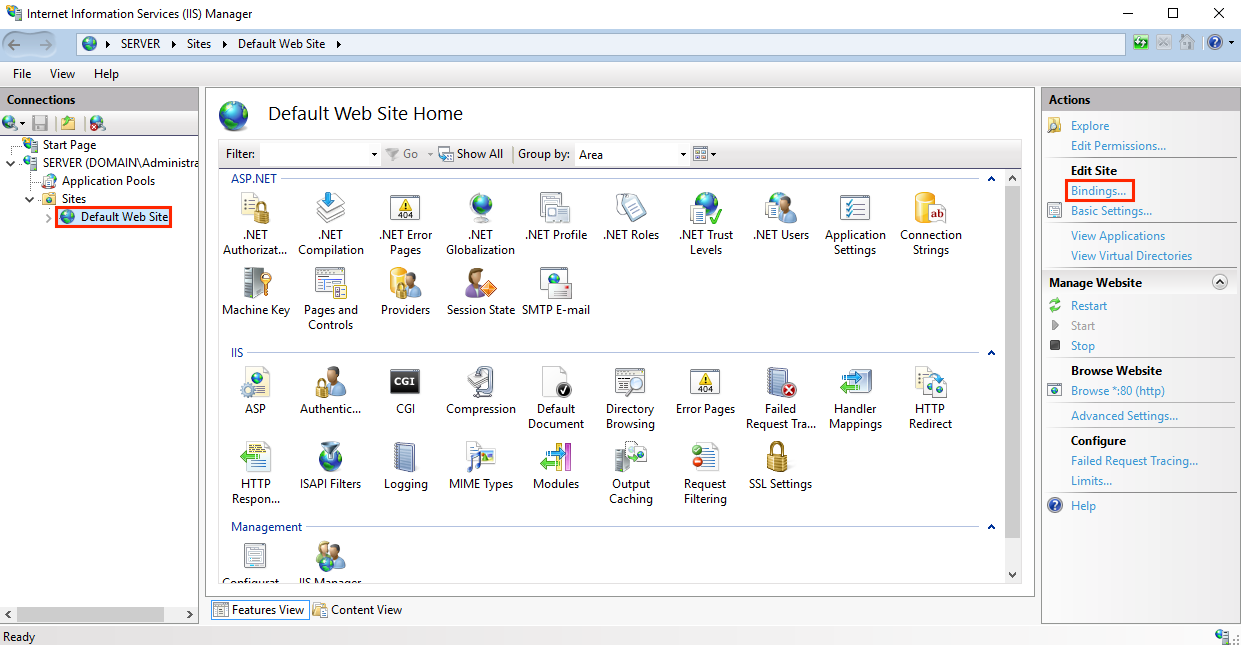
3. In the Site Bindings window, click Add.
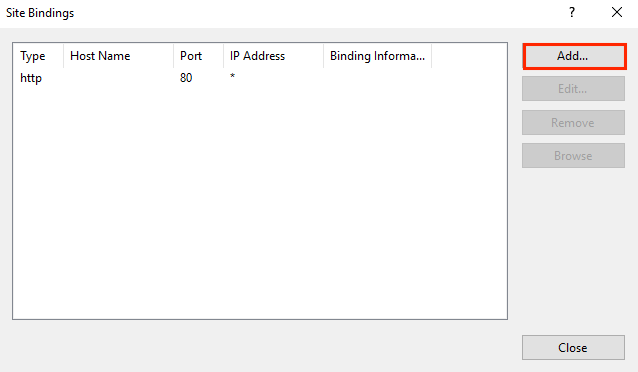
4. In the Add Site Bindings window, fill in the following fields and click OK.
- IP address – select the IP addresses of the servers with which the certificate will be associated from the drop-down list or click the All Unassigned button to associate the certificate with all servers.
- Port – leave the value 443. This is a standard SSL port.
- SSL certificate – select the required SSL certificate from the drop-down list.
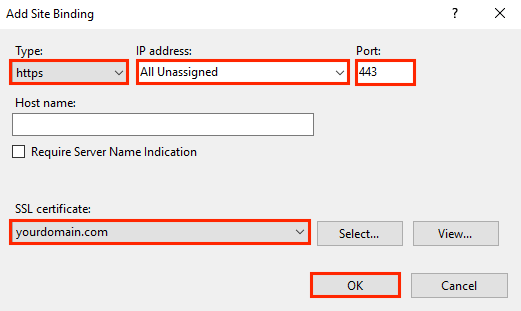
The setup is finished, you can check the operation of the web service. If the private key is missing, then import it in the Certificates snap-in of the Management console. To do this, select the desired resource and right-click on it. Then, in the context menu that appears, click on the menu item All Tasks > Import, and follow the instructions of the wizard.
6.2 Usage on Linux
6.2.1 How to Create a Private Key
The private key that has been created can be obtained in the interface of the SSL certificate provider after sending the CSR or using specialized software, such as OpenSSL, for example.
Below is a fragment of private key generation in the web interface of the SSL certificate provider.
If the private key was created in the web interface, then the export is carried out by clicking the button there. After clicking on the button, the browser starts downloading the archive with the key file in the desired format.
To create a private RSA key using OpenSSL, one command is enough:
openssl genrsa -out rsaprivkey.pem 2048This command generates the PEM private key and stores it in the rsaprivkey.pem file. In our example, a 2048-bit key is created, which is suitable for almost all situations.
To create a DSA key, you need to perform two steps:
openssl dsaparam -out dsaparam.pem 2048
openssl gendsa -out dsaprivkey.pem dsaparam.pem
The first step creates a DSA parameters file (dsaparam.pem), which in this case contains instructions for OpenSSL to create a 2048-bit key in step 2. The dsaparam.pem file is not a key, so it can be deleted after the public and private keys are created. In the second step, a private key is generated (dsaprivkey.pem file), which must be kept secret.
To create a file in the PKCS#12 format used in Windows OS, use the following command:
openssl pkcs12 -export -out certificate.pfx -inkey privateKey.key -in certificate.crt -certfile CACert.crtWhere:
- pkcs12 – private key format;
- export – the operation of exporting the private key to the required format;
- out – the directory in the file system where the resulting file should be placed;
- inkey – private key file in PEM format;
- in – file of the certificate received from the Certifying Center;
- certfile is a copy of the root certificate and intermediate certificates in the chain. In the example above, they are missing.
6.2.2 How to Generate a CSR Request
To generate a CSR, fill in the suggested fields in the web form of the SSL certificate service provider. The figure above demonstrates an example of this. The set of minimum required fields is the same and is given in the section about CSR description, but some vendors can add their own or change the input method.
To generate CSR using OpenSSL, use the following command:
openssl req -new -key private.key -out domain_name.csr -sha256Where:
- new – creating a new CSR request by direct input in the console. Without this option, the OpenSSL configuration file data will be used;
- key – the name of the private key required for generation. If the option is not specified, a new private key will be created according to the default algorithm;
- out – the path to the CSR file being created;
- sha256 is an encryption algorithm.
After executing the command, a request to fill in the required fields will appear in the console.
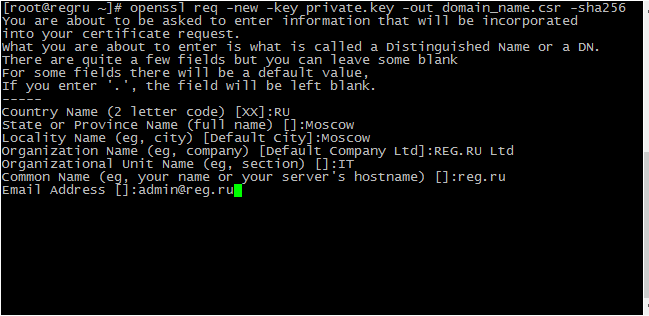
Then send the resulting CSR to the Certifying Center. In response, a personal certificate must be returned.
6.2.3 How to Configure SSL for Apache
Follow these steps to configure SSL in Apache:
1. Add the personal certificate issued by the Certification Authority, the private key, and the root certificate to the /etc/ssl/ directory — along with the rest of the certificates in the chain.
2. Open the Apache configuration file with any text editor: vim, for example. Depending on the server OS, the file may be located in one of the following locations:
- for CentOS: /etc/httpd/conf/httpd.conf;
- for Debian/Ubuntu: /etc/apache2/apache2.conf;
3. If you are installing an SSL certificate on an OpenServer, use the path to its root folder. At the end of the file, create a copy of the "VirtualHost" block. Specify port 443 for the block and add the following lines inside:
SSLEngine on
SSLCertificateFile /etc/ssl/domain_name.crt
SSLCertificateKeyFile /etc/ssl/private.key
SSLCertificateChainFile /etc/ssl/chain.crt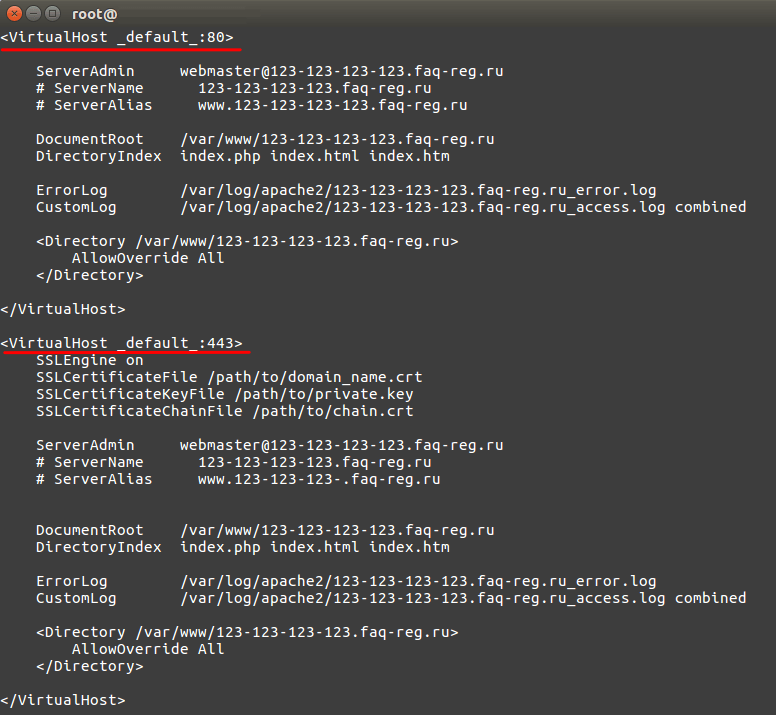
4. Check the Apache configuration before restarting with the command: apachectl configtest, then restart Apache.
6.2.4 How to configure SSL for Nginx
Follow these steps to configure SSL in Nginx:
1. Open a text editor and add the contents of the personal certificate issued by the Certification Authority, and the root certificate — along with the rest of the certificates in the chain. The resulting file should look like this:
----BEGIN CERTIFICATE-----
#Your certificate#
----END CERTIFICATE-----
----BEGIN CERTIFICATE-----
#Intermediate certificate#
----END CERTIFICATE-----
----BEGIN CERTIFICATE-----
#Root certificate#
----END CERTIFICATE-----
2. Save the resulting file with the *.crt extension to the /etc/ssl/ directory. Please note: the second certificate should come directly after the first, without any empty lines.
3. Save the your_domain file.key with the certificate's private key in the /etc/ssl directory.
4. Open the Nginx configuration file and edit the virtual host of your site that you want to protect with a certificate. Perform the minimum setup for the job by adding the following lines to the file:
server {
listen 443 ssl;
server_name your_domain.com;
ssl_certificate /etc/ssl/your_domain.crt;
ssl_certificate_key /etc/ssl/your_domain.key;
}
Where:
- your_domain.com — the domain name of the site;
- /etc/ssl/your_domain.crt — the path to the file created with three certificates;
- /etc/ssl/your_domain.key — the path to the file with the private key.
The names of files and directories can be arbitrary.
Additionally, you can configure the operation of the site over HTTP, the type of server cache, the cache update timeout, and the operating time of a single keepalive connection. You can also configure the supported protocols and their level of priority (server set or client set), as well as OCSP responses for certificate validation. Details are given in the Nginx user manual.
5. For the changes to take effect, restart the Nginx server with the following command:
sudo /etc/init.d/nginx restart7. Self-Signed Certificates
7.1 Usage on Windows Server and IIS
7.1.1 How to Create a Private Key
You can create a private key with IIS by creating a CSR and then actioning the above instructions.
7.1.2 How to Create a Self-Signed Root Certificate
To generate a self-signed root certificate in IIS 10, perform the following operations:
1. Run IIS from the iis.msc command line or from the visual interface.
2. Select your server from the Connections list and click on the Server Certificates button.
3. On the Server Certificates page, click the Create Domain Certificate link in the Actions block.
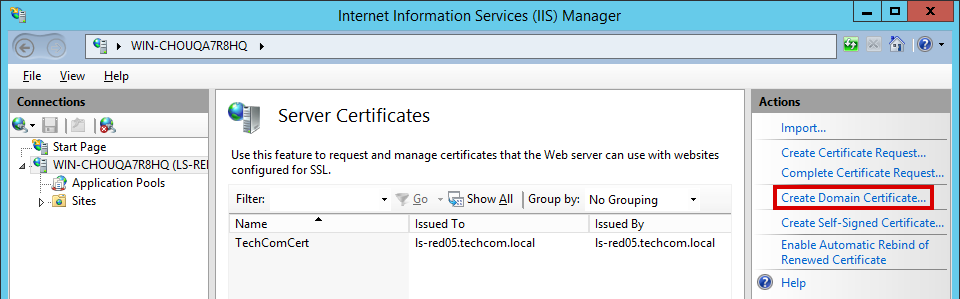
4. In the Distinguished Name Properties window of the Create Certificate wizard, fill in the Common Name field (the server name specified in the browser), the remaining fields that were filled when creating the CSR, and click Next.
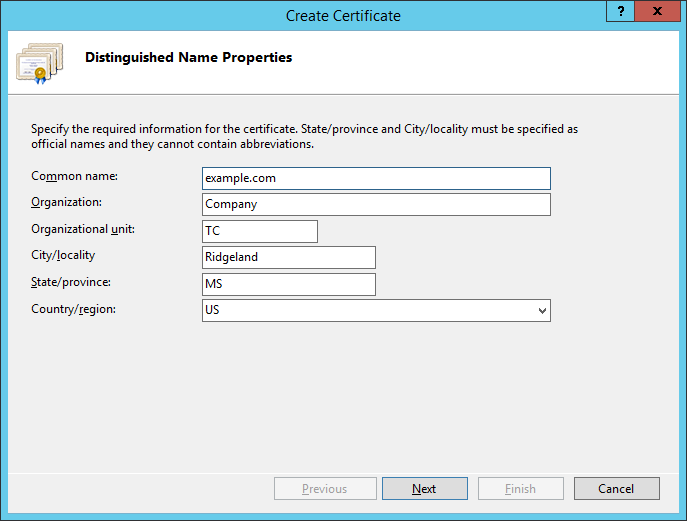
5. In the Online Certification Authority window of the wizard, specify in the Specify Online Certification Authority field the repository where you want to place the root certificate. In the Friendly Name field, specify the name of the certificate, and then click Finish.
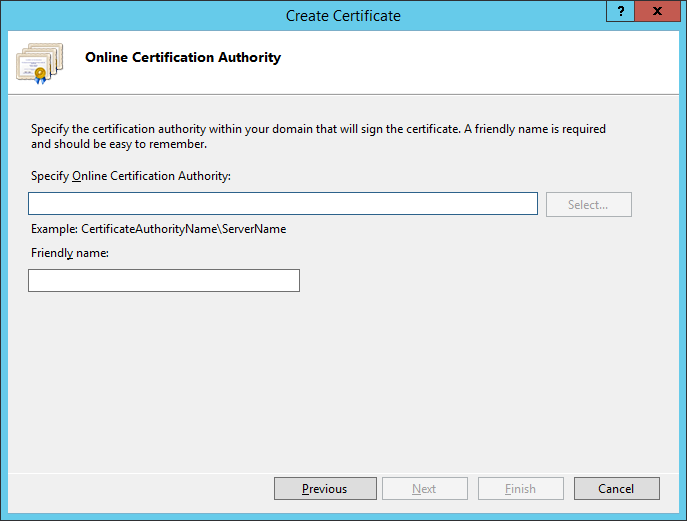
7.1.3 How to Create an SSL Certificate Signed by the Root
To generate a self-signed SSL certificate in IIS 10, perform the following operations:
1. Run IIS from the iis.msc command line or from the visual interface.
2. Select your server from the Connections list and click on the Server Certificates button.
3. On the Server Certificates page, click the Create Self-Signed Certificate link in the Actions block.

4. In the ‘Create Self-Signed Certificate’ window in the ‘Friendly Name’ field, specify the name of the certificate in the ‘Select a Certificate Store for the New Certificate’ field. Then, select the repository in which the self-signed certificate will be stored, and click OK.
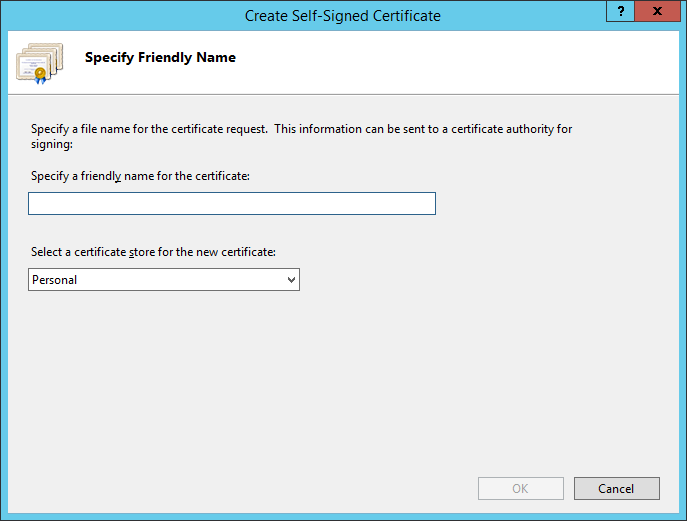
7.1.4 How to Configure IIS for a Self-Signed Certificate
IIS configuration for Configuring IIS for a self-signed certificate requires the same process as a certificate issued by a Certification Authority.
7.2 Usage on Linux
7.2.1 How to Create a Private Key
Creating a private key using the genrsa command and other similar ones in OpenSSL is described above.
7.2.2. How to Create a Self-Signed Root Certificate
To generate a self-signed root certificate in OpenSSL, run the following command:
openssl req -x509 -new -nodes -key rootCA.key -sha256 -days 1024 -out rootCA.pemWhere:
- key – a private key created earlier;
- out – root certificate file;
- days – the number of days the certificate is valid, starting from the current day.
7.2.3. How to Create an SSL Certificate Signed by the Root
To generate a self-signed SSL certificate in OpenSSL, follow these steps:
1. Create a CSR according to the instructions above.
2. Issue a self-signed certificate:
openssl x509 -req -in org.csr -CA rootCA.pem -CAkey rootCA.key -CAcreateserial -out org.crt -days 365 -sha256Where:
- req – create a signature request;
- in – file of the CSR request;
- CA file of the root certificate;
- CAkey – private key of the root certificate;
- out – output CRT file;
- days – the number of days of the action.
7.2.4. How to Configure Apache for a Self-Signed Certificate
Apache configuration for a self-signed certificate is performed in the same way as for a certificate issued by a Certification Authority.
7.2.5. How to Configure Nginx for a Self-Signed Certificate
Nginx configuration for a self-signed certificate requires the same process as a certificate issued by a Certification Authority.
7.3 How to Make Self-Signed Certificates Trusted
7.3.1 On Windows
To make a self-signed certificate trusted, follow these steps:
1. Find the repository of trusted certificates in the Certificates snap-in of the management console. Right-click on it, and then in the Context Menu that appears, click on the menu item All Tasks > Import;
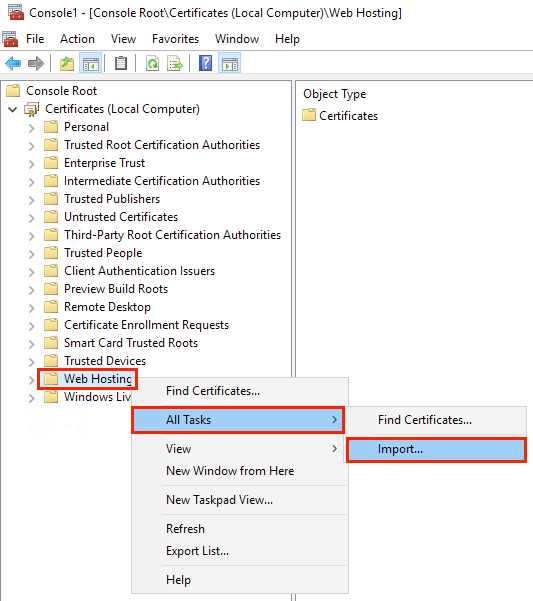
2. In the Welcome to the Certificate Import wizard window of the Certificate Import wizard, click Next. Then, in the File to Import window, specify the path to the imported file with the self-signed certificate. To do this, either enter it manually or use the system file search dialog box. Afterwards, click Next.
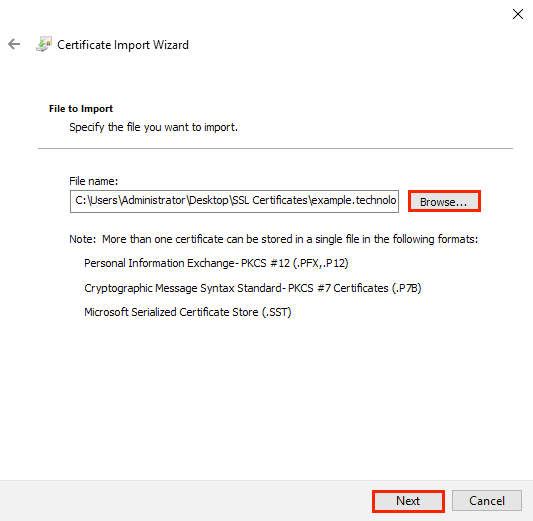
3. In the Private Key Protection window of the wizard, enter the password specified when creating the self-signed certificate. Set the checkboxes Mark this key as exportable to allow further export of the certificate for backup purposes, and Include all extended properties, then click Next. Further export will only work if the private key is available.
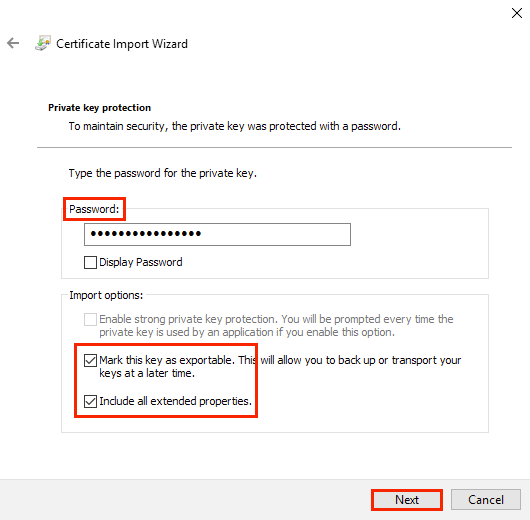
4. In the Certificate Store window of the wizard, turn on Place all certificates in the following store, select the Trusted Root Certification Authorities repository, and then click Next. In the next window Completing the Certificate Import Wizard, you will see a list of the installed settings. Click Finish. The imported file will appear in the specified repository.
7.3.2 On macOS
To add a self-signed certificate to trusted certificates, follow these steps:
1. Open the Keychain Access application by clicking on the icon below and go to the All Items menu item.

2. Use Finder to find the self-signed certificate file (*.pem, *.p12 or other).
3. Drag the file to the left side of the Keychain Access window.
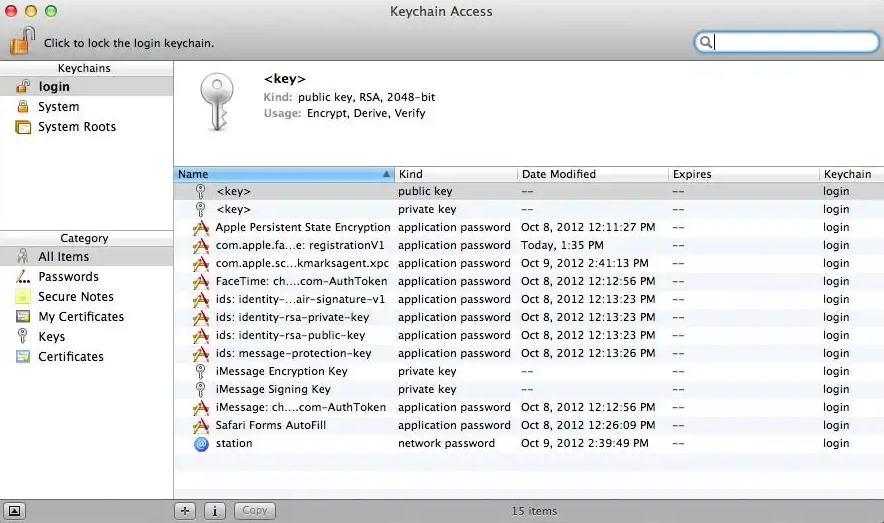
4. Go to the Certificates menu item, find the self-signed certificate that has been added and double-click on it.
5. Click on the Trust button in the drop-down menu and set the When using this certificate field from System Defaults to Always Trust.
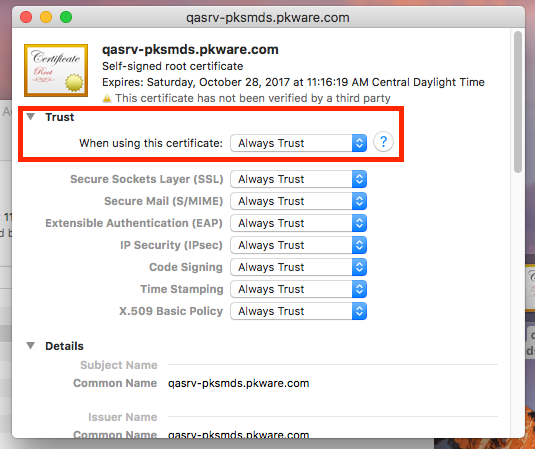
7.3.3 On Linux
To add a self-signed certificate to trusted ones in Linux OS (Ubuntu, Debian), follow these steps:
1. Copy the root self-signed certificate file to the /usr/local/share/ca-certificates/ directory. To do this, run the command sudo cp foo.crt /usr/local/share/ca-certificates/foo.crt, where foo.crt is the personal certificate file.
2. Run the sudo update-ca-certificates command.
To add a self-signed certificate to trusted certificates in Linux OS (CentOS 6), follow these steps:
1. Install the root certificates using the command: yum install ca-certificates.
2. Enable the dynamic configuration mode of root certificates: update-ca-trust force-enable.
3. Add the certificate file to the directory /etc/pki/ca-trust/source/anchors/: cp foo.crt /etc/pki/ca-trust/source/anchors/.
4. Run the command: update-ca-trust extract.
7.3.4 On iOS
To add a self-signed certificate to trusted certificates, follow these steps:
1. Install any web server and place the certificate file in the root of the application directory.
2. Go to the URL of the web server, after which the file will be downloaded to the profile of the current user.
3. Open the Profiles menu and click Install.
4. Go to Settings > General > About-> Certificate Trust Settings and set the switch for the certificate to Enabled.
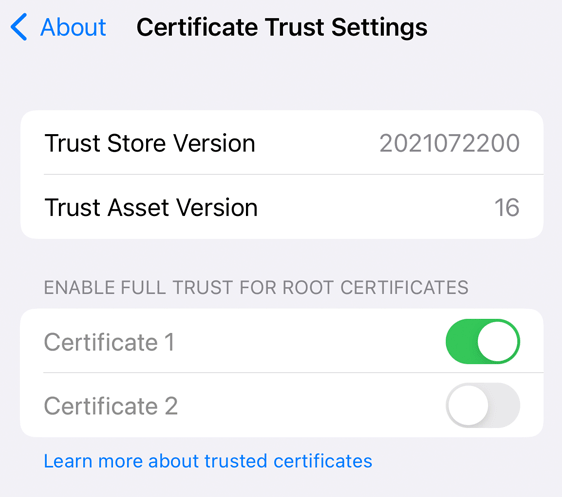
7.3.5 On Android
To make a self-signed certificate trusted, follow these steps:
1. Download the file to the device.
2. Go to Settings > Security > Credential Storage and tap Install from Device Storage.

3. Find the *.crt that has been downloaded and enter its name in the Certificate Name field. After it has been imported, the certificate will be displayed in Settings > Security > Credential Storage > Trusted Credentials > User.
7.3.6 How to Make a Root Certificate Trusted in Windows AD Group Policies
To make a root certificate trusted in Windows Active Directory Group Policies, follow these steps:
1. Run the Group management snap-in from the gpmc.msc command line.
2. Select the desired domain, right-click on it, and select Create a GPO in this domain and link it here.
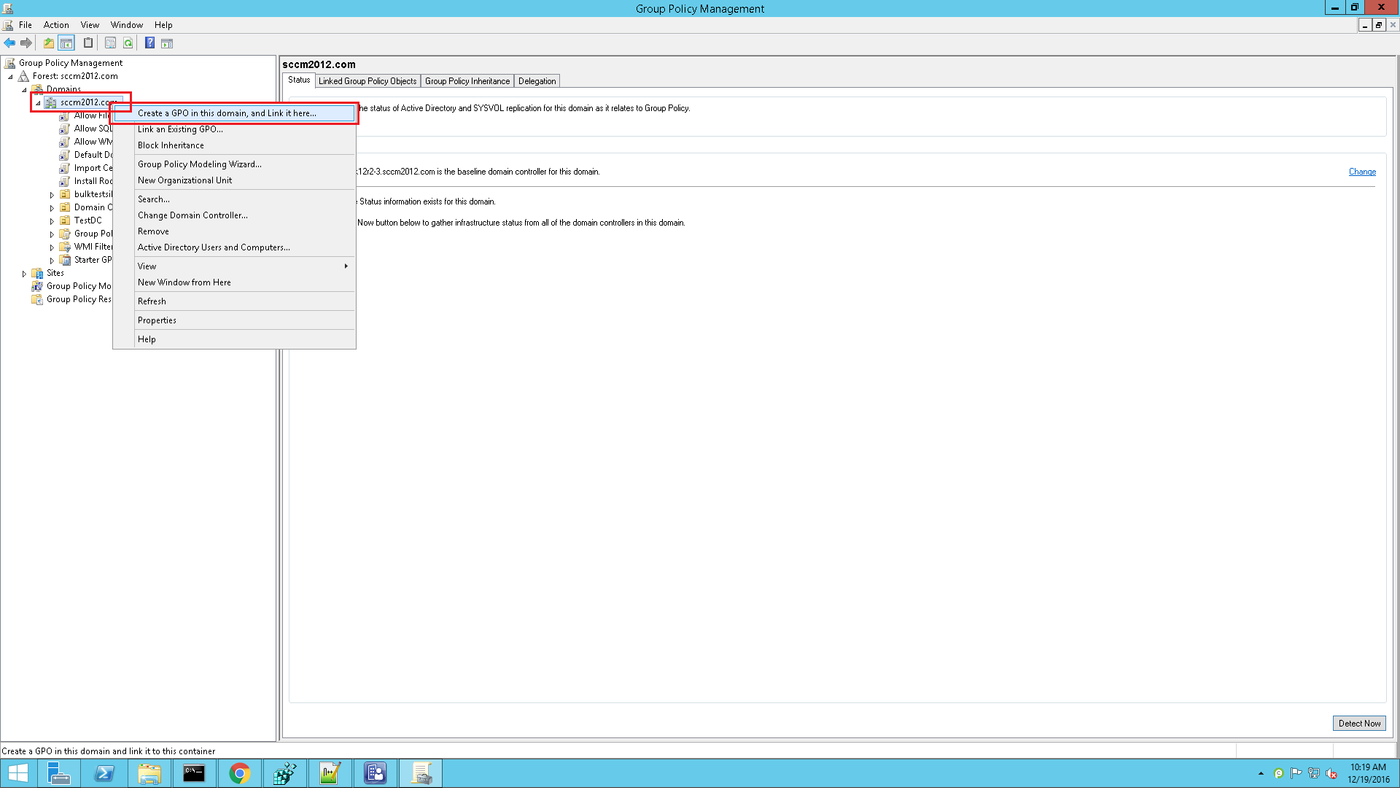
3. Specify the name of the group policy in the window that appears and click OK.
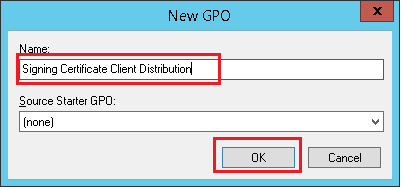
4. Right-click on the created group policy and click Edit.... On the next screen, go to Computer Configuration > Policies > Administrative Templates > Windows Components > Windows Update. Select Allow signed content from intranet Microsoft update service location and click Edit Policy Settings.
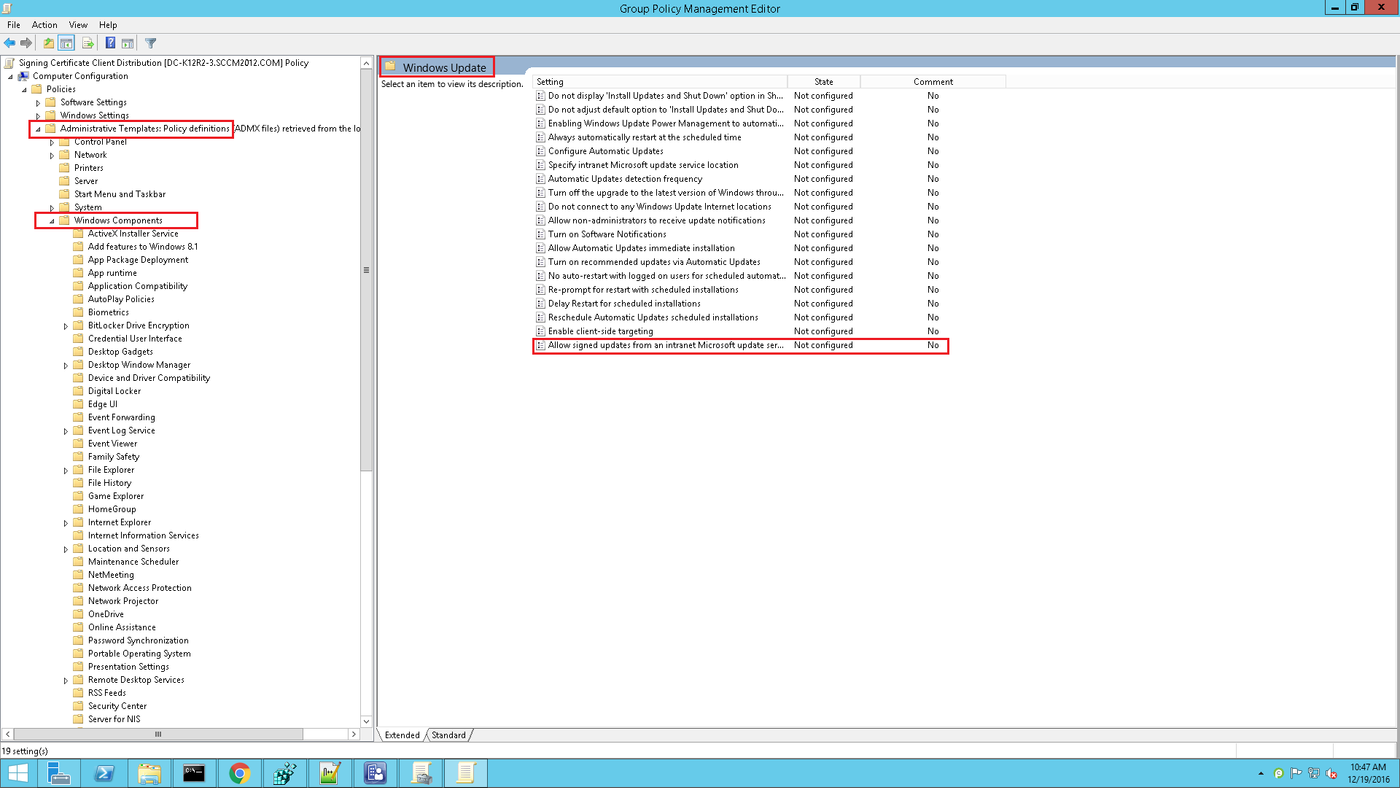
5. Set the switch to Enabled and click OK.
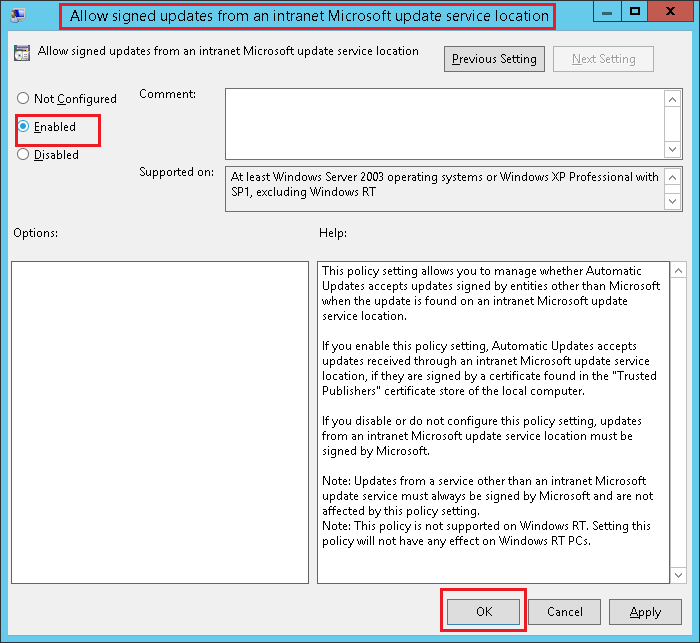
6. Go to Computer Configuration>Windows Settings >Security Settings>Public Key Policies and trust the required certificate in accordance with the instructions above.
7. Repeat step 4 and close the Group Policy Editor. The policy will be applied shortly. To apply it immediately, run gpupdate /force on the command line.
8. Let’s Encrypt
8.1 Usage on Windows Server and IIS
8.1.1 How to Issue a Certificate
To install the Let's Encrypt certificate, an ACME client must be installed on the server. The following implementations are common for Windows:
- The Windows ACME Simple Utility (WACS) is a command–line utility for interactively issuing a certificate and binding it to a specific site on your IIS web server;
- The ACMESharp Powershell module is a Powershell library. It has many commands for interacting with Let's Encrypt servers via the ACME API;
- Certify is a graphical SSL certificate manager for Windows that allows you to interactively manage certificates via the ACME API.
To issue a Let's Encrypt certificate using WACS, follow these steps:
1. Download the latest release of the WACS client from the project page on GitHub https://github.com/PKISharp/win-acme/releases and unpack it onto a directory on the server.
2. Open a command prompt and run the client wacs.exe from the specified location.
3. Press the N key. This will create a certificate for IIS.
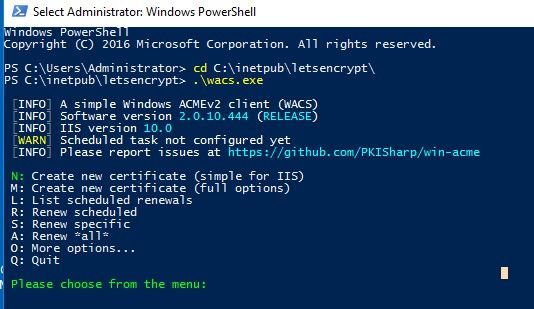
4. Select the certificate type: DV for one domain, DV for all domains in IIS (SAN), domains corresponding to Wildcard, or a manual list of domains in IIS.
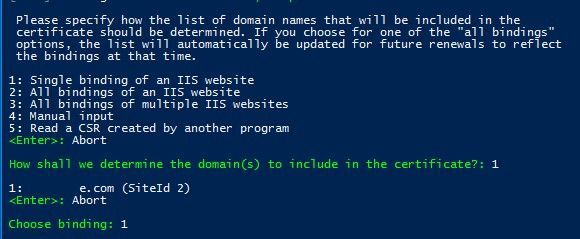
5. Depending on the choice, WACS.exe will display a list of sites running on the IIS server and will prompt you to select the desired site.
6. After selecting the site, provide an email address to receive information about problems including site certificate updates (several addresses can be given if they are separated by commas).

7. Agree to the terms of use by pressing the Y key, after which Windows ACME Simple will connect to Let's Encrypt servers and try to automatically generate a new SSL certificate for the site 3.
8.1.2 How to Configure IIS for Let's Encrypt Certificate
The WACS utility saves the certificate's private key (*.pem), the certificate itself, and a number of other files to the directory C:\Users\%username%\AppData\Roaming\letsencrypt-win-simple . It will then install the generated Let's Encrypt SSL certificate in the background and bind it to your IIS site.
For more details, see here https://www.win-acme.com/manual/getting-started
8.2 Usage on Linux
8.2.1 How to Issue a Certificate
To install the Let's Encrypt certificate, the ACME client must be installed on the server. For Linux, this is the Certbot utility.
To issue a Let's Encrypt certificate using Certbot, follow these steps:
1. Install Certbot according to the instructions on the website https://certbot.eff.org / to the server.
2. Execute the certificate issue command: certbot --nginx or certbot --apache. When launching for the first time, an email address for receiving information about problems site certificate updates and other alerts may be required.
Certbot will analyze the ServerName directive that corresponds to the domain name with the requested certificate in the web server’s configuration files. If you need to specify multiple domains or wildcard, use the command line key -d.
For more details, see: https://certbot.eff.org/instructions
8.2.2 How to Configure IIS for a Let's Encrypt Certificate
After executing the certbot command, the web server configuration will be updated automatically. The certbot client will display a successful completion message, and will also show the path to the directory where the certificates are stored.
9. Certificate Renewal for Linux and Windows
9.1 Paid Trusted
When extending the validity of the SSL/TLS certificate, creating a new CSR request is recommended. Generating a new request will create a new unique key pair (public/private) for the updated certificate.
The web interface of many SSL certificate providers allows you to renew the certificate manually or automatically. After renewing, the user will receive a new reissued certificate. This needs to be reconfigured again in accordance with the instructions above.
9.2 Self-Signed
Self-signed certificates are renewed by recreating and configuring the web server in accordance with the instructions described above.
9.3 Let’s Encrypt
9.3.1 On Windows
Windows ACME Simple creates a new rule in the Windows Task Scheduler (called win-acme-renew) to automatically renew the certificate. The task is started every day, and the certificate renewal itself is performed after 60 days. When extending, the scheduler runs the command:
C:\\<path to the WACS directory>\\wacs.exe --renew --baseuri "<https://acme-v02.api.letsencrypt.org >"You can use the same command to manually update the certificate.
9.3.2 On Linux
To renew the certificate via certbot, you need to run the following command:
certbot Renew --force-RenewalTo specify a specific domain, use the -d parameter.
10. Testing
10.1 Services (SSL Checkers) that Allow You to Check SSL Tinctures on a Public Server
SSL verification is carried out using online services provided by Certification Centers, as well as third-party developers such as:
- https://www.wormly.com/test_ssl
- http://www.digicert.com/help/
- http://www.sslshopper.com/ssl-checker.html
- https://www.ssllabs.com/ssltest/
- https://www.sslchecker.com/sslchecker
These services allow you to gain information about certificates, domains, organizations, cities, serial numbers, algorithms used, their parameters (such as key length) and details about the certificate chain.
10.2 Verification of the Entire Certificate Chain
The entire certificate chain is verified by SSL Shopper, Symantec SSL Toolbox and SSL Checker. The links are given above.
10.3 Checking on iOS (via a Special App)
To check certificates on iOS devices, install the SSL Checker app from the App Store. With this application, you can check the current status and validity of the SSL certificate of any server, including self-signed certificates. The application can detect changes in the certificate parameters and send notifications about it.

10.4 Checking on Android
To check certificates on Android devices, install the SSL Certificate Checker application from Google Play. Using this application, you can check the current status and attributes of the SSL certificate of any server, including the certificate chain.
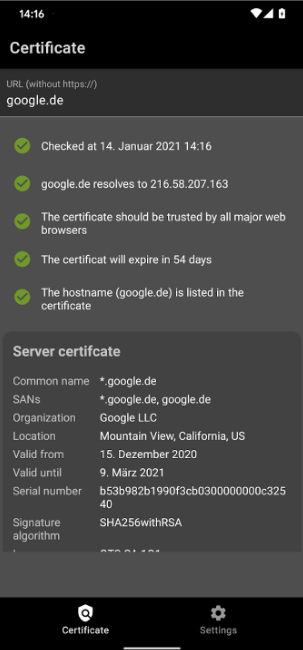
Why Zero-Knowledge Encryption is the best
In this year of our lord, 2022, the term ‘Zero-Knowledge Encryption’ equates to
best-in-class data insurance. We’ve already written an article named “What is
Zero-Knowledge Proof? [https://blog.passwork.club/zero-knowledge-proof/]”, so
we’re not going to look at definitions here, but rather, we’re going to explore
the

Python connector 0.1.5: Automated secrets management
The new Python connector version 0.1.5 expands CLI utility capabilities. We’ve added commands that solve critical tasks for DevOps engineers and developers — secure retrieval and updating of secrets in automated pipelines. What this solves Hardcoded secrets, API keys, tokens, and database credentials create security vulnerabilities and operational bottlenecks.

Cyber insurance: A false sense of security?
Introduction As cyber threats and data breaches become more frequent and sophisticated, many organizations are looking to cyber insurance as a way to manage risk. But is cyber insurance a true safety net — or is it just a false sense of security? This question was at the core of the

Complete guide for SSL, TLS and certificates

Running tasks in the background
A new mechanism for handling tasks allows you to run them in the background. For example, you can run an LDAP synchronization task and still work in Passwork. Your synchronization task will run in the background.
You can see scheduled and completed tasks on the “Tasks” page. Here you can also find the configuration instructions for your operating system.

Display a favicon in the password list
The Passwork interface has become even more user friendly and convenient. If a password has a URL, a website icon will be displayed next to its name.
Automatic favicon loading can be set up by administrators on the “Company settings” page. In this case background tasks should be set up.

Other changes
- Automatic session termination in the mobile app and Passwork extension when API key is changed
- Removed white background in the dark theme when loading pages
- Fixed bug displaying the results of an outdated search query
- Improved validation of TOTP keys
- Fixed empty messages in Syslog
- Added login validation with UTF-8 encoding
- Added automatic LDAP host swap :\\ → ://
- Fixed errors in LDAP code related to the migration to PHP 8
- Redesigned login and registration forms
Passwork: Secrets management and automation for DevOps
Introduction In corporate environment, the number of passwords, keys, and digital certificates is rapidly increasing, and secrets management is becoming one of the critical tasks for IT teams. Secrets management addresses the complete lifecycle of sensitive data: from secure generation and encrypted storage to automated rotation and audit trails. As

How SHA-256 works
If you’ve heard of ‘SHA’ in various forms but aren’t sure what it stands for or
why it’s essential — you’re in luck! We’ll attempt to shed some light on the
family of cryptographic hash algorithms today. But, before we get into SHA, let’s go over what a hash function

How to create a secure password
Of course you want to keep your data safe. So why are so many security precautions frequently overlooked? Many accounts, for example, are protected by weak passwords, making it easy for hackers to do their work. There is a fine line between selecting a password that no one can guess

Introducing Passwork 5.1

Nearly 20 years ago, the National Institute of Standards and Technology (NIST) established guidelines for secure passwords. Indeed, they are still used by many websites, portals, and other services. You’re likely familiar with these password requirements — there ought to be at least 8 characters, both capital and lowercase letters, digits, and special characters. Despite these guidelines, passwords that meet these requirements are no longer safe from modern attackers. The only thing any of us can do to improve the security of our accounts is to make sure that our passwords are lengthy, complicated, and unique for each account. Due to the strict password management requirements, this strategy is, nevertheless, laborious and intimidating for many.
The same password rules do not apply today
In the modern day, password-based security is no longer seen as sufficient. Our digital world is continuously expanding, thus it is more important than ever to make sure that our data is safeguarded from cybercriminals. Cybercriminals perceive an opportunity to target people in a more sophisticated way as a result of the increasing usage of internet services. One explanation is that, although we benefit from technological improvement for our personal, social, or economic growth, cybercriminals have also benefited from the advantages of improved computer graphics cards and machine learning to enhance their attack strategies. In addition to the problem of more sophisticated cyberattacks, there are two interrelated problems with conventional password rules:
The first concern lies in our human nature — keeping track of passwords is tough
You may take a few steps as an individual to increase the security of your passwords. Start by lengthening and making your passwords more complicated. Second, create a unique password for each website you visit. The difficulty of remembering a password increases with its complexity. As a result, we frequently select passwords that are not entirely suitable yet are simple to remember. The difficulty of managing several complicated passwords for every online account leads to the frequent reuse of the same passwords across multiple platforms. As a result, a successful attacker immediately wins big.
However, the high level of password complexity necessary to maintain online safety should not be blamed; rather, it should be pointed out that we can’t improve our inadequate password management skills. Using a password manager to generate and store secure passwords is a useful solution. It is not humanly possible to manage strong passwords for all of our internet accounts without assistance, such as password managers. Because they can't recall the complicated, random sequences of letters, numbers, and special characters, the problem increases the likelihood that individuals will write down their passwords. Passwords are left exposed in digital files stored on a computer or in desk-top notes, making it simple for hackers to hack and read passwords.
The second problem is that passwords have a mathematical limit
There are only ever a finite amount of potential password combinations since a password is a mix of letters, numbers, and symbols. As a result, the best technique for breaking passwords is brute force attacks. Until the correct combination is identified and the password is broken, brute force attacks attempt all possible combinations of letters, numbers, and symbols. Theoretically, a stronger password would be one that is harder to guess due to its length, complexity, and number of possible permutations. However, attackers are now substantially more frequently exploiting Graphic Processing Units (GPUs) to break passwords. GPUs are a component of a computer's graphics card and were first designed to speed up the loading of images and movies. They now show promise for computing hashes (the method used in brute force attacks).
According to studies on password cracking times, passwords may be cracked much more quickly using sophisticated computer graphics cards. Using the most recent computer graphic cards, an 8-character password that used to take 8 hours to crack in 2018 now only takes 39 minutes (see the conclusive 2022 results in the table below). Passwords are gradually getting simpler to crack as a result of recent technical developments, which is a concerning trend. More crucial, however, is the fact that if a password has already been stolen, repeated across sites, or contains basic phrases, attackers may access your accounts right away, regardless of the complexity of the password or the attacker's graphics card.
Consider a 4-character password made up of all 26 letters in the Latin alphabet (case-insensitive) in order to visualize this mathematical example.
26^4 = 456,976 possible password combinations
The number of viable choices rises to when you include digits, uppercase and lowercase letters, and special characters.
95^4 = 81,450,625 possible password combinations
However, because the password must contain at least one special character, one number, one capital letter, and one lowercase letter, the quantity drops to
5,353,920 possible password combinations.
Nevertheless, assuming there are no password-entry security measures, this can be cracked in less than a second by a computer (such as automatic account blocking).
Increase the length and complexity of passwords
Longer or more complicated password phrases are strongly advised when creating new passwords. In this manner, potential attackers will have a harder time breaking the codes. It's crucial to take into account the popularity of the selected password combination in addition to the amount of alternative password combinations. For instance, lists of frequently used passwords or phrases, such as "qwerty," "password," or "12345," are frequently used in brute force assaults.
Therefore, the password should be completely unique or not contain any words at all. For instance, one technique would be to employ acronyms or mnemonics, such as generating a password out of the first few characters of a long text. As an illustration, consider making the password ‘Ilts@7S!’ out of the words I love to ski at Seven Springs.
Password length and complexity alone are insufficient
We are aware that adding length and complexity to passwords is the only method to increase their strength and, consequently, the safety of our accounts. The time it typically takes an attacker to break a password in 2022 using a powerful commercial computer is displayed below. This chart, which has been analysed and periodically updated since 2018, shows how quickly passwords can be broken on current machines. This pattern indicates that, despite our best efforts to create passwords that are longer and more complicated, passwords alone are no longer sufficient to meet the required internet security standards.
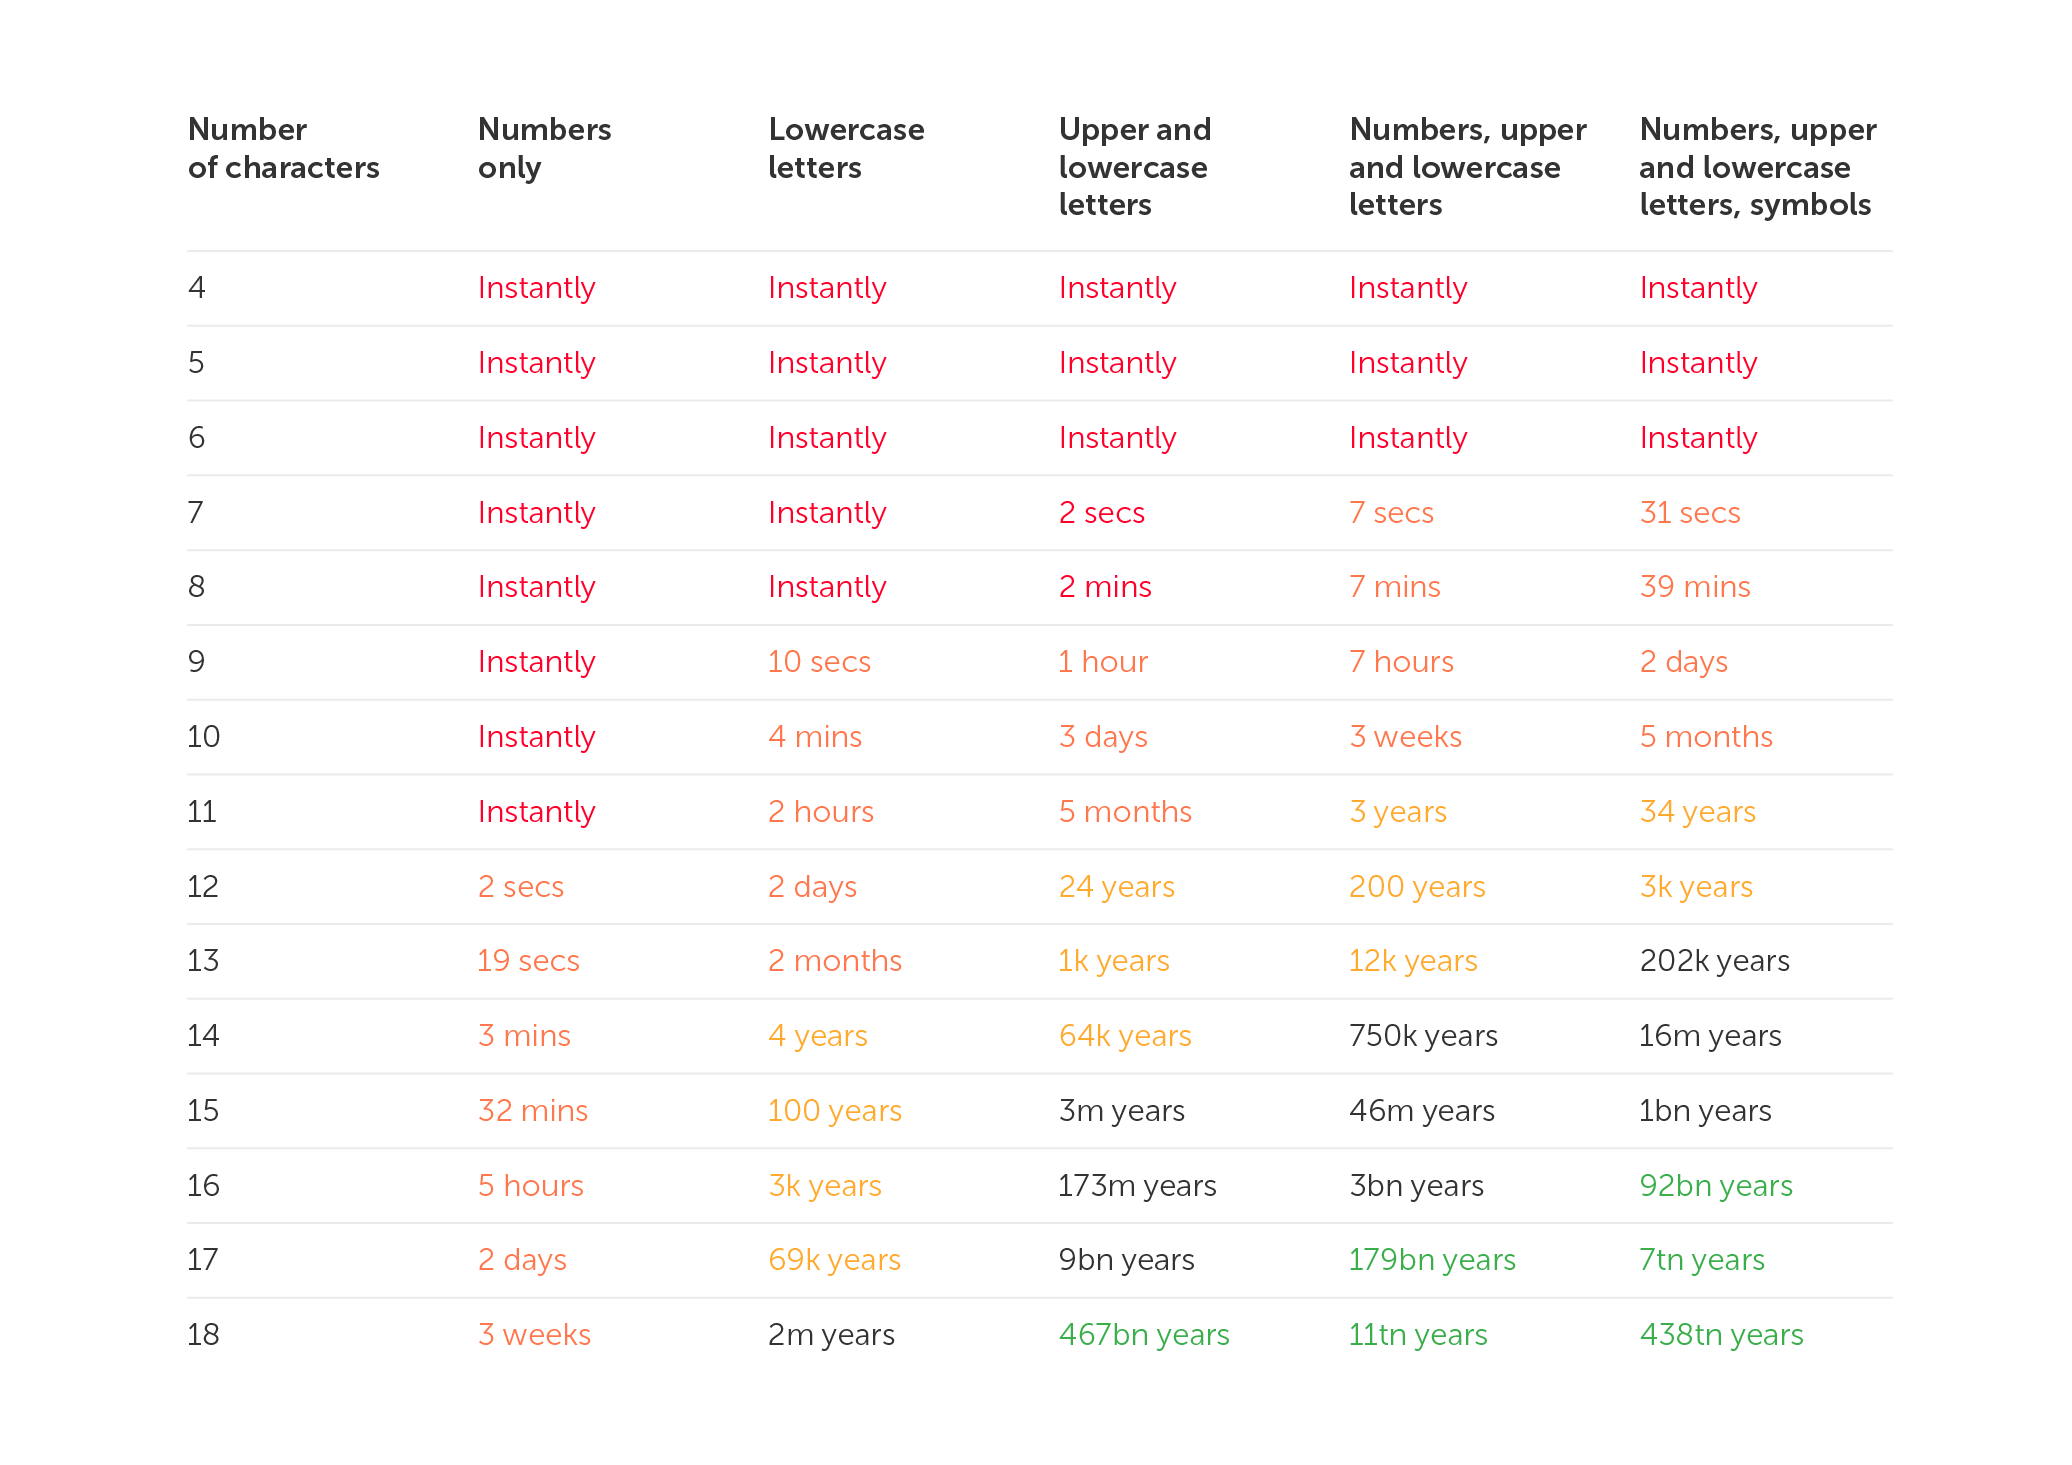
In conclusion, password rules increase the complexity of passwords without necessarily enhancing their security.
Why do employees ignore cybersecurity policies?
Employees often ignore cybersecurity rules not out of laziness, but because they feel generic, irrelevant, or disconnected from real work. True change starts with empathy, leadership, and context-driven policies. Read the full article to learn how to make security stick.

Why do I need a password manager?
Password managers protect your accounts by encrypting credentials, generating strong passwords, and blocking phishing attacks. They help individuals and businesses streamline password management, minimizing risks from weak or reused passwords. Discover their key features in the full article.

Passwork: Secrets management and automation for DevOps
Introduction In corporate environment, the number of passwords, keys, and digital certificates is rapidly increasing, and secrets management is becoming one of the critical tasks for IT teams. Secrets management addresses the complete lifecycle of sensitive data: from secure generation and encrypted storage to automated rotation and audit trails. As

Why your passwords are no longer secure
Whenever the word ‘cybersecurity’ appears, the word ‘password’ springs to mind in parallel. People use them everywhere, from mobile phone locks to the protection of personal and state data stored on individual devices or websites. Everyone knows that a strong and secure password is able to save our sensitive information, however, cybercriminals have invented a huge variety of methods to hack our passwords in order to compromise us. So, modern problems require modern solutions. Now, there are a lot of alternative ways to protect access to personal data. The usual passwords are replaced by multi-layer authentication or just more progressive technologies. These are fingerprints and face recognition functions, keychains, and password vaults. But what is the future of passwords? Will they become an outdated option or stay a necessary part of access.
Why are passwords considered weak?
With the growth of cybercrime, the requirements for passwords are increasing. The first passwords consisted of short, easily-memorized word or numeral combinations, but they were too easy to crack. Now, passwords are sophisticated alpha-numeral combinations, sometimes too long to remember. Nevertheless, it is still possible for hackers to find the solution and get access to your account. Passwords are usually based on some common information like a date of birth, the name of a child, or a home pet, which implies that hackers are able to find out what it is if they have enough time. The other reason why passwords become targets is the fact that they provide unrestricted access to your account. Moreover, many people use the same or similar passwords for many different accounts, so they simplify the process of collecting their sensitive data from multiple sources. Of course, using the same password for every account mitigates the risk of forgetting the password, but reusing the combination is quite risky. Users are sure that they won’t be hacked as the data they store is not valuable enough to be stolen, but it’s a common mistake as almost everyone can be compromised or fall victim to a bot attack that is aimed at spreading spam or malicious links. So, the best way to protect your privacy is not to reuse the same password and exploit multi-layer authentication for your accounts.
The anti-password movement
This movement was established as soon as people understood that usual passwords are more vulnerable than they should be. Passwords are inconvenient and provide multiple avenues for fraudsters to obtain your data and profit from it. The most typical method for hackers to profit from this data is to sell it on the dark web for fast cash. Advanced attacks on logins have been known to shut down entire corporations or launch ransomware campaigns. Credential stuffing is the most well-known form of password hacking, it is based on the reusing of the same password for multiple accounts, pairing it with different email addresses or logins. It is usually aimed at taking over as much information from corporate accounts as possible. Thus, internet users realized that passwords are not the most powerful protection that can be exploited for security goals. So, what was made in addition to, or in place of, the password?
Multi-factor authentication
Single-factor authentication refers to the requirement of only one password to access an account. This method of protection has been used for a long time, but now it’s obsolete. The new practice in authentication is multi-factor access which requires passing two or more layers of authentication before accessing an account. The possible steps of this sophisticated technology could be the PIN code, the server-generated one-time code sent to your email address or mobile phone, or even fingerprints and face recognition.
It makes access more complicated but also serves as an additional barrier to compromise attempts and data thieves. This motivates them to move on to more straightforward targets. While it isn't infallible, it does dissuade attackers from trying anything else, potentially rescuing you from disaster.
Another successful way of protection is the passphrase that is used instead of common password combinations. It is represented as the meaningful or meaningless word combination consisting of up to 100 words. It seems to be hard to remember a long phrase, but it is much easier than remembering alpha-numeric combinations including substitution, capitalization, and different numbers. Hackers will find it incredibly difficult to break into a system since passwords are several words long and can contain an endless number of word combinations. Another good thing about such protection is the lack of necessity to install the special apps or systems required to use this technique. It can be applied to every account without special password character limits.
Is the password dead?
The first hacking attacks were conducted as early as the 80s. Regardless of this, people still use passwords as the main protection force for their private information. So, why can’t we replace it with more modern and convenient technologies?
First of all, it’s related to the ease of creating passwords. The password is generated by the user himself, so there’s no need to create and exploit special services that would be able to provide protection for the account on the user’s behalf. Another point is the privacy of users. The password is one of the more private ways of authentication as it doesn’t require any personal information, it can be a random combination of numbers and lack sense, unlike methods such as biomedical data access, which is connected with personal information that could get out into cyberspace. The last but not the least important point lies in the simplicity of replacing passwords. It can be useful in the event of a major data breach, as it’s easier to change the password than the biomedical options that are used for fingerprints or face recognition.
Conclusion
So what will be the future of passwords? Passwords will definitely be used as one layer of a multi-factor security system for the next few years as there are still no more useful options for saving our privacy than passwords. People are continuing to look for the perfect method of protection, so maybe in a few years, something will finally appear and the world will be able to say goodbye to long sophisticated passwords. Some services have already turned to new systems of access, like one-time codes or fingerprints, but there is still a possibility of being hacked. Indeed, users still believe that a multi-layer system of protection is more convenient than any possible alternative.
Why your passwords are no longer secure (Part 1)
Nearly 20 years ago, the National Institute of Standards and Technology (NIST) established guidelines for secure passwords. Indeed, they are still used by many websites, portals, and other services. You’re likely familiar with these password requirements — there ought to be at least 8 characters, both capital and lowercase letters,

Passwork 7.2 release
The new version introduces customizable notifications with flexible delivery options, enhanced event logging descriptions, expanded CLI functionality, server-side PIN code storage for the browser extension, and the ability to enable client-side encryption during initial Passwork configuration. Notification settings We’ve added a dedicated notification settings section where you can choose notification
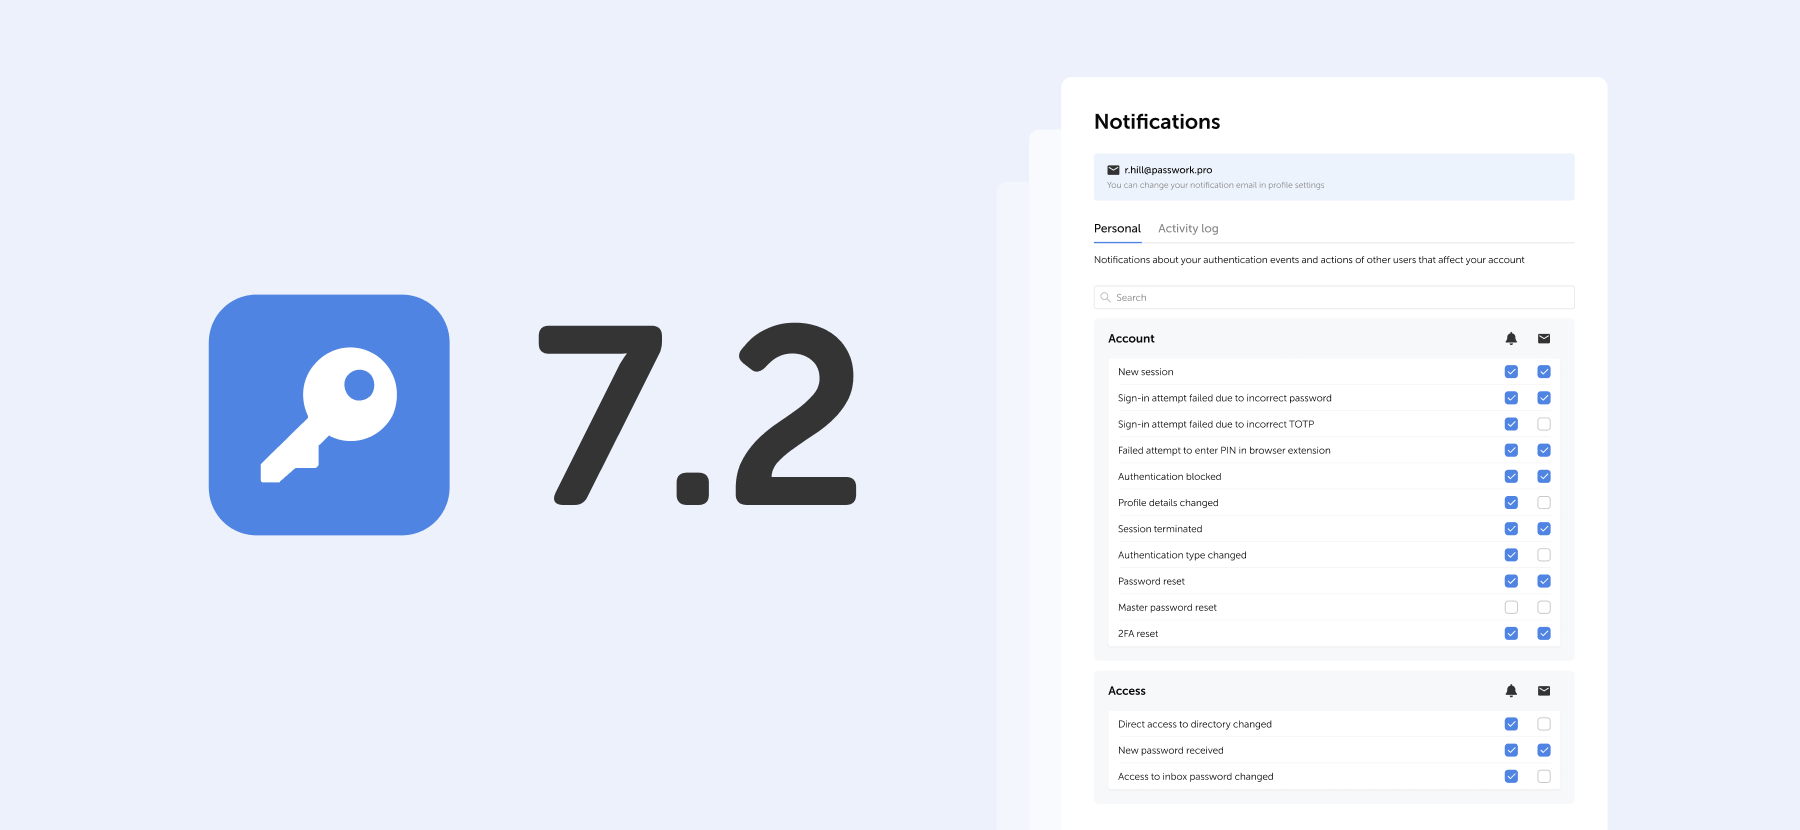
Passwork 7: Security verified by HackerOne
Passwork has successfully completed the penetration testing, carried out by HackerOne — the world’s largest platform for coordinating bug bounty programs and security assessments. This independent evaluation confirmed Passwork’s highest level of data protection and strong resilience against modern cyber threats. What the pentest covered Security architecture and data
The future of password security

Migration to PHP 8
The new version of Passwork now runs on PHP 8. Previous versions of PHP are no longer supported.
New access rights window
The window with access settings for vaults and folders has been completely redesigned. All users and roles having access to a vault or folder are now collected here as well as links and sent passwords.
The rights can now be edited on each tab by selecting multiple objects at once. All modified and deleted objects are marked by an indicator until you save changes. Search filters allow you to display all objects with a certain access right.
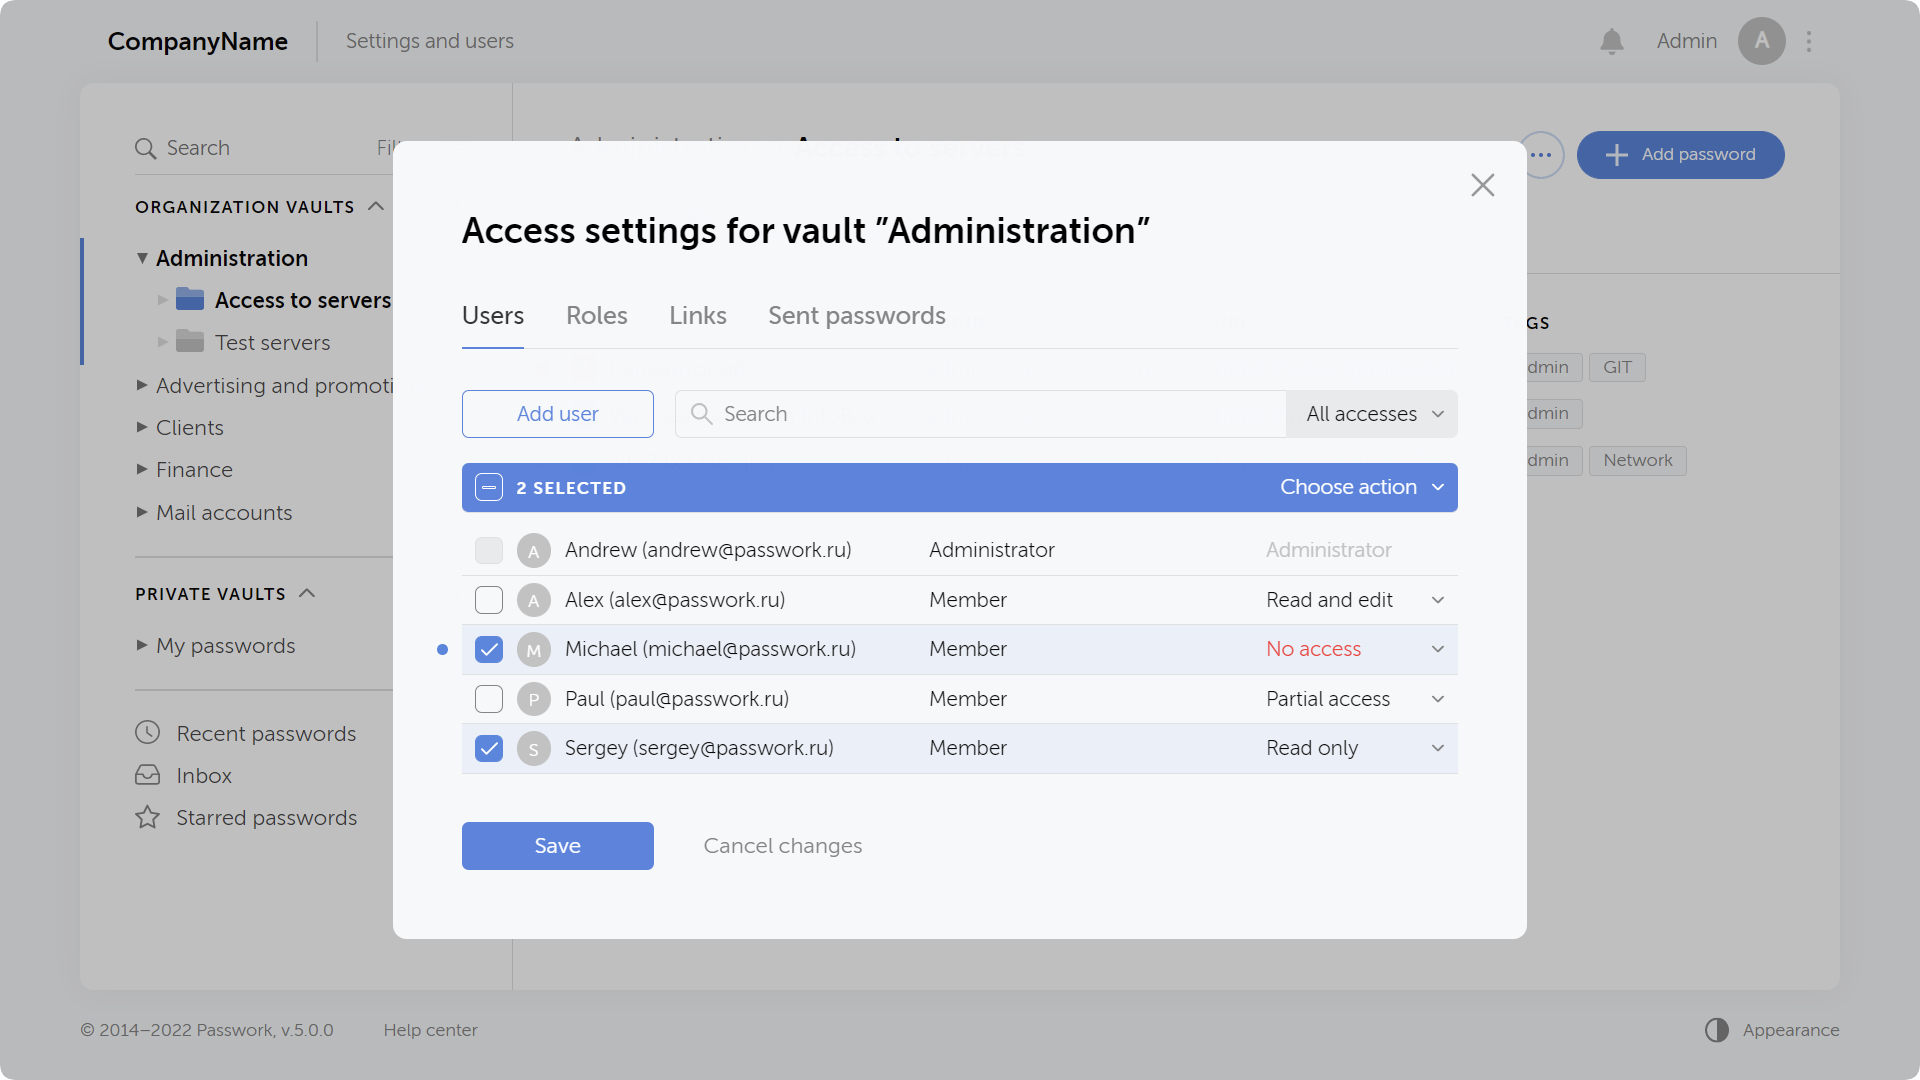
Ability to quickly view who accessed vaults and folders
When hovering over an icon next to the name of a vault or folder you can see some brief information about the number of users, roles, links and sent passwords.
Clicking on a list opens up the window for access rights management inside a given vault or folder.
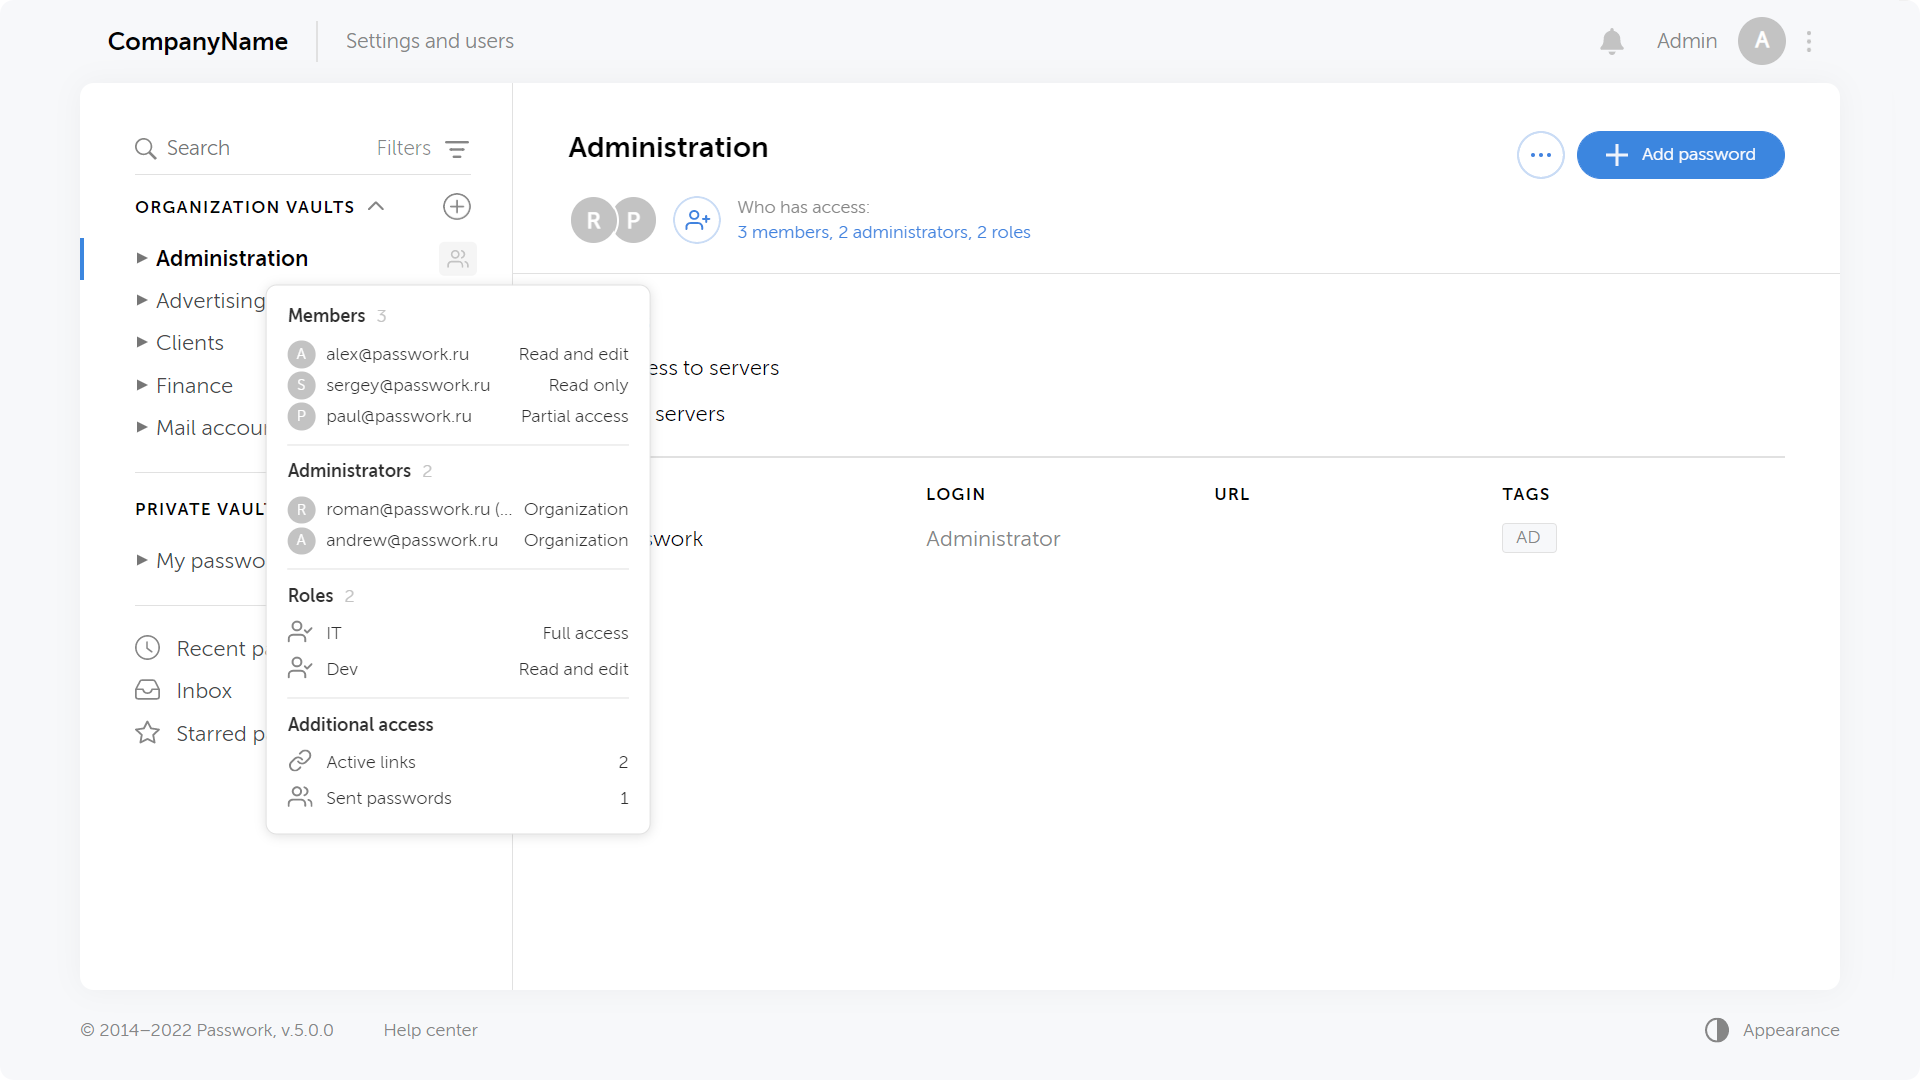
Granting access to individual passwords without adding users to a vault
In previous versions of Passwork, it was possible to send a password copy to users. In the new version, users will see the original password in the Inbox, which will be updated when the original vault changes.
That means you can now give access directly to a password without adding users to a vault or folder.
You can send a password and enable users to edit it, then when a user changes this password, it will be updated for you as well.
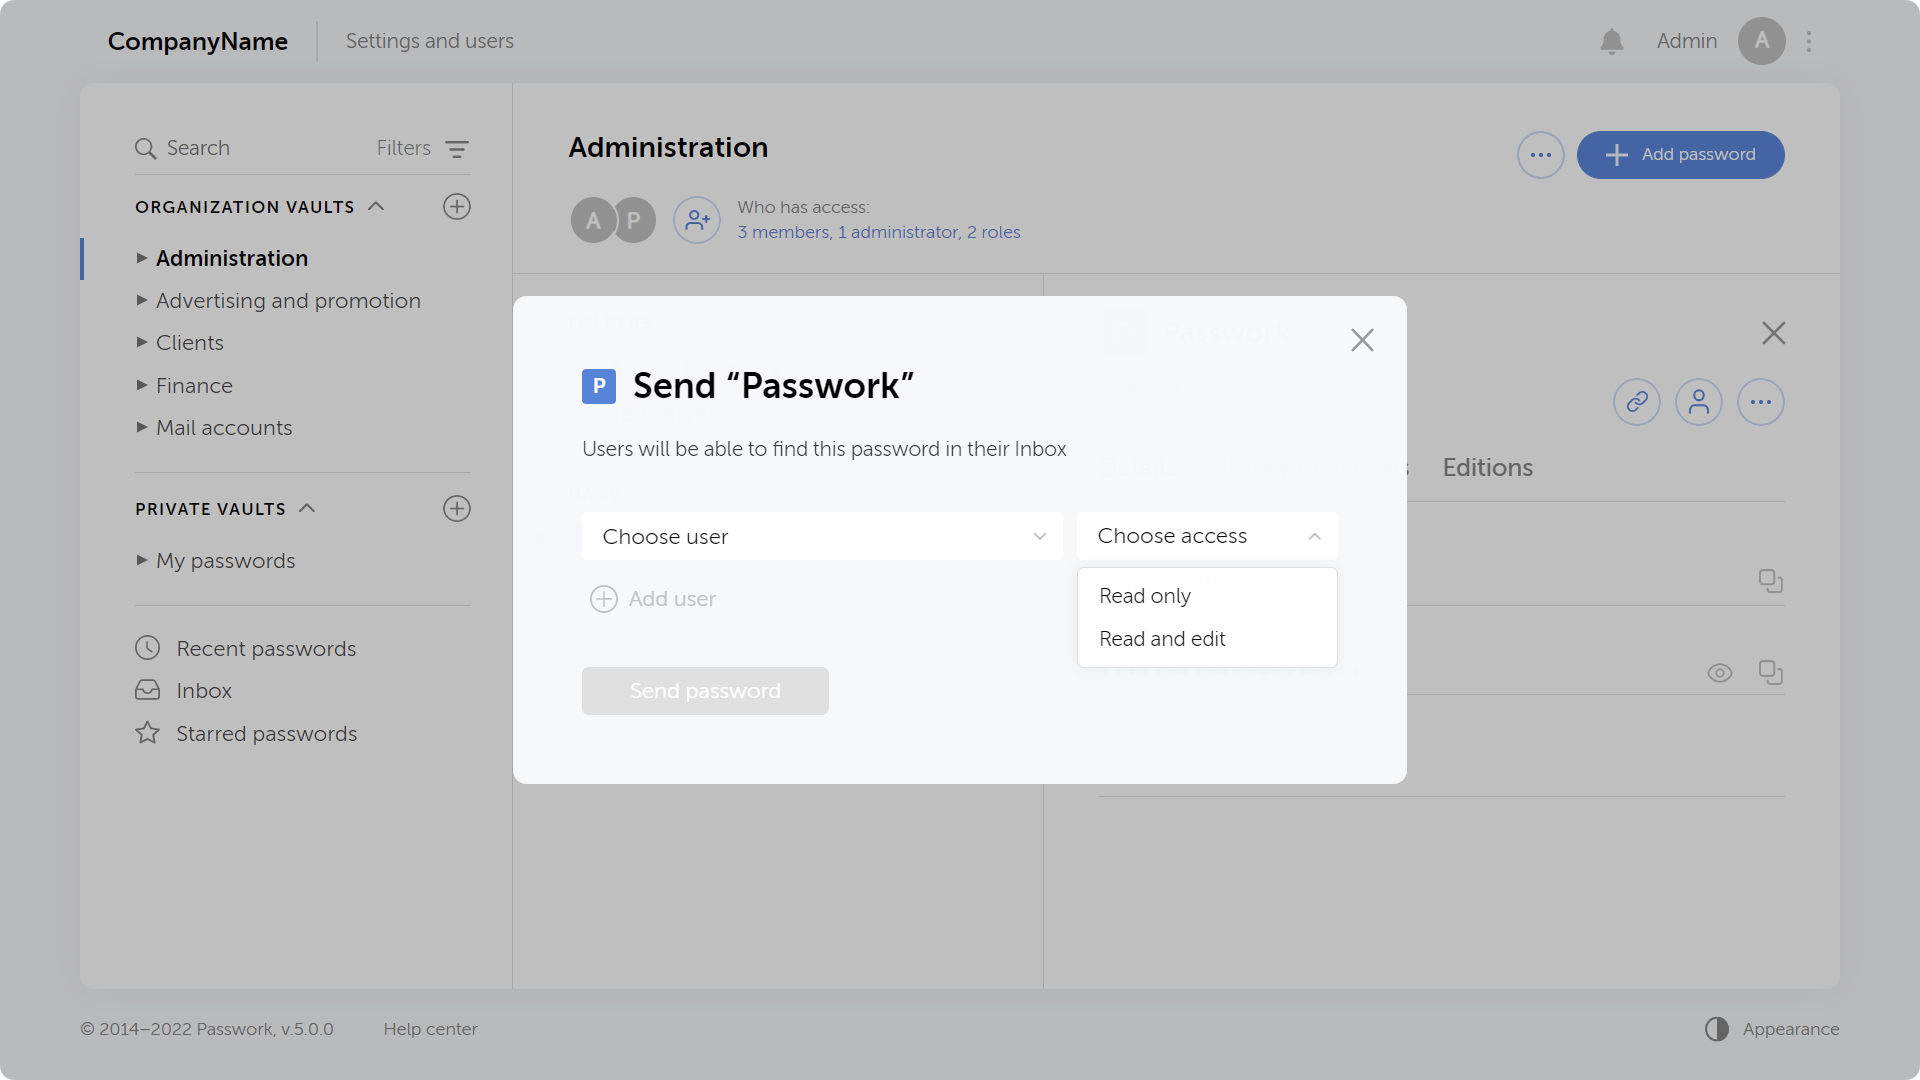
Ability to add TOTP keys and then generate 2FA codes
When adding and editing a password, you can add a TOTP field and enter a secret code to generate 2FA codes. The generated code is updated every 30 seconds.
The "Password" field is now optional, so you can keep 2FA codes separate from main passwords.
Adding TOTP keys and generating 2FA codes is available in the web version, browser extension, and mobile app.
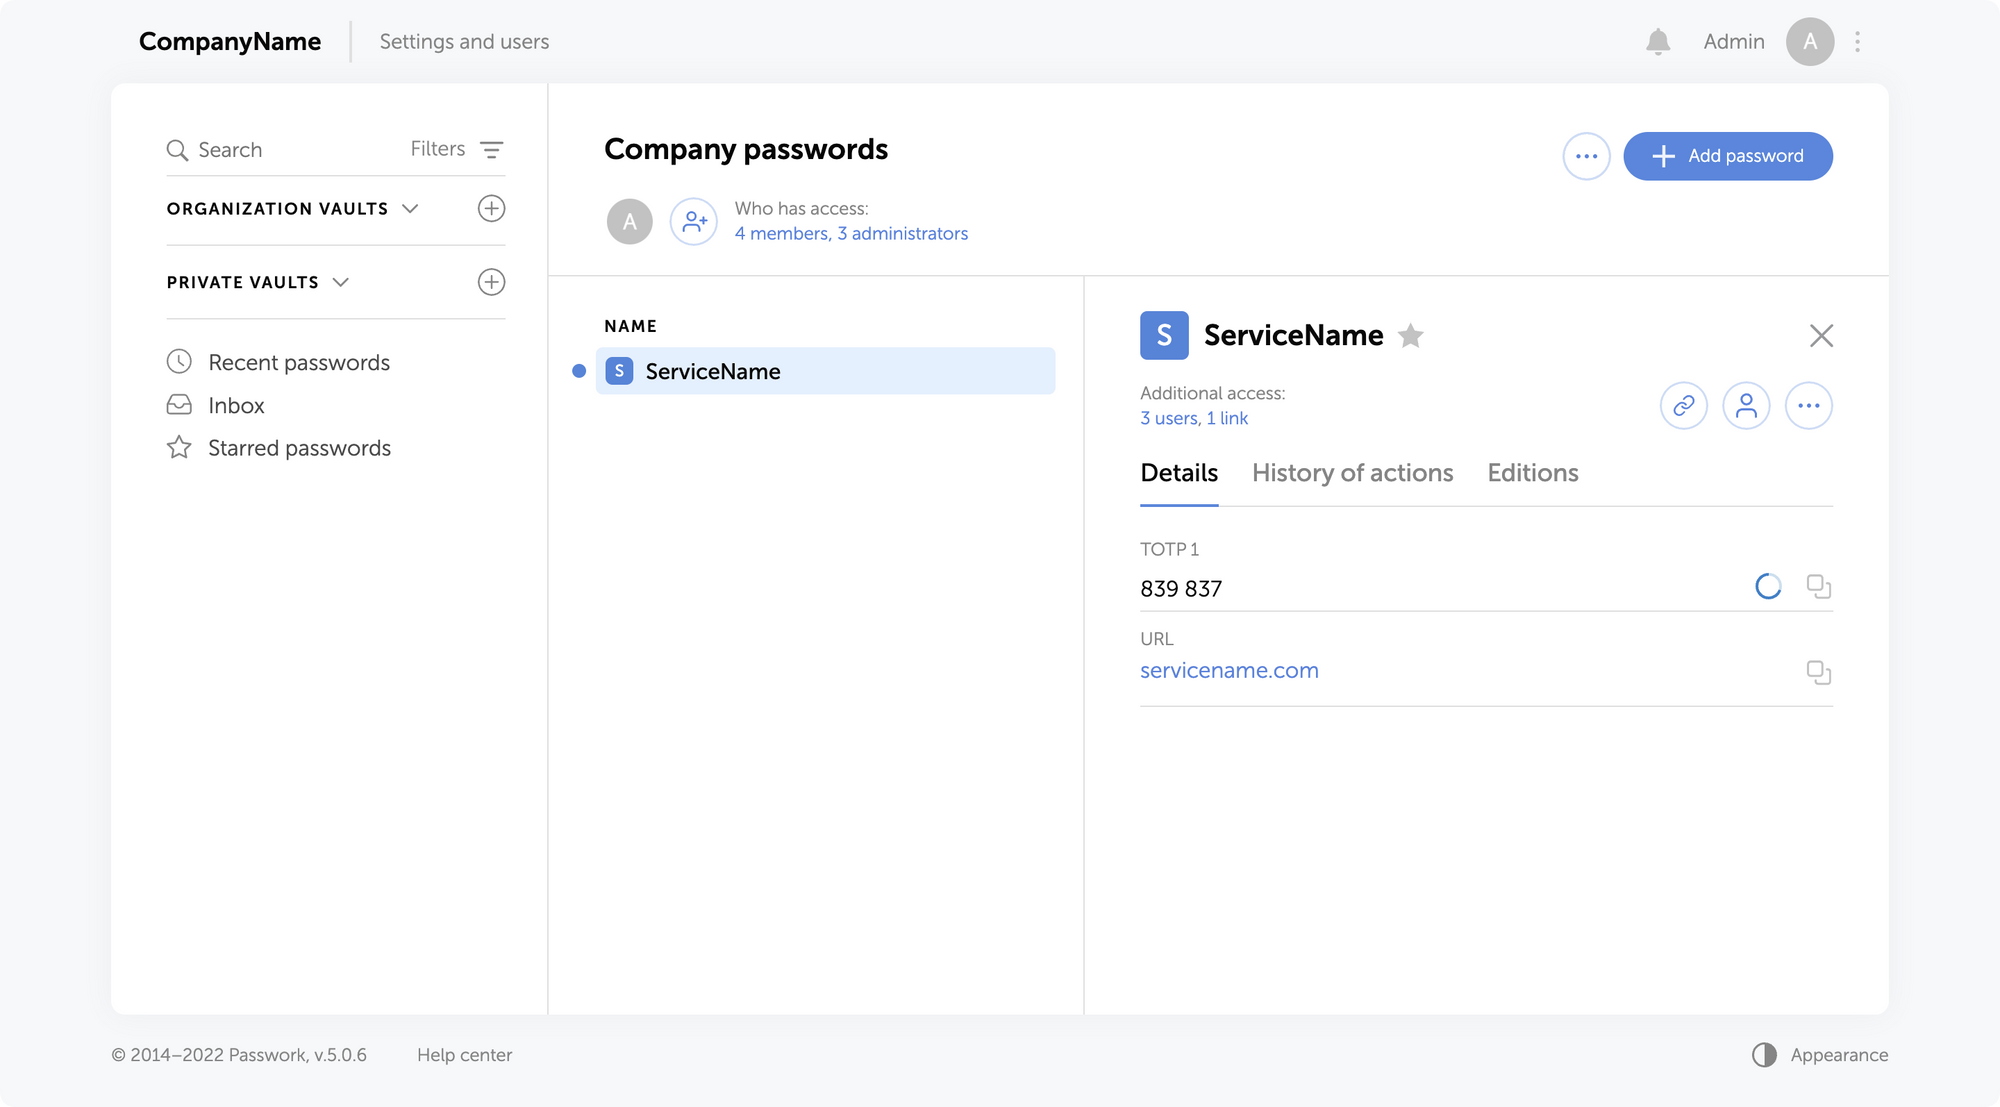
Failed login attempts are now displayed in the action history
The action history displays all failed user authorization attempts. This allows you to better track unauthorized access attempts and the actions of blocked users.
You can see all failed login attempts on the Activity Log page by enabling a filter in the Action column.
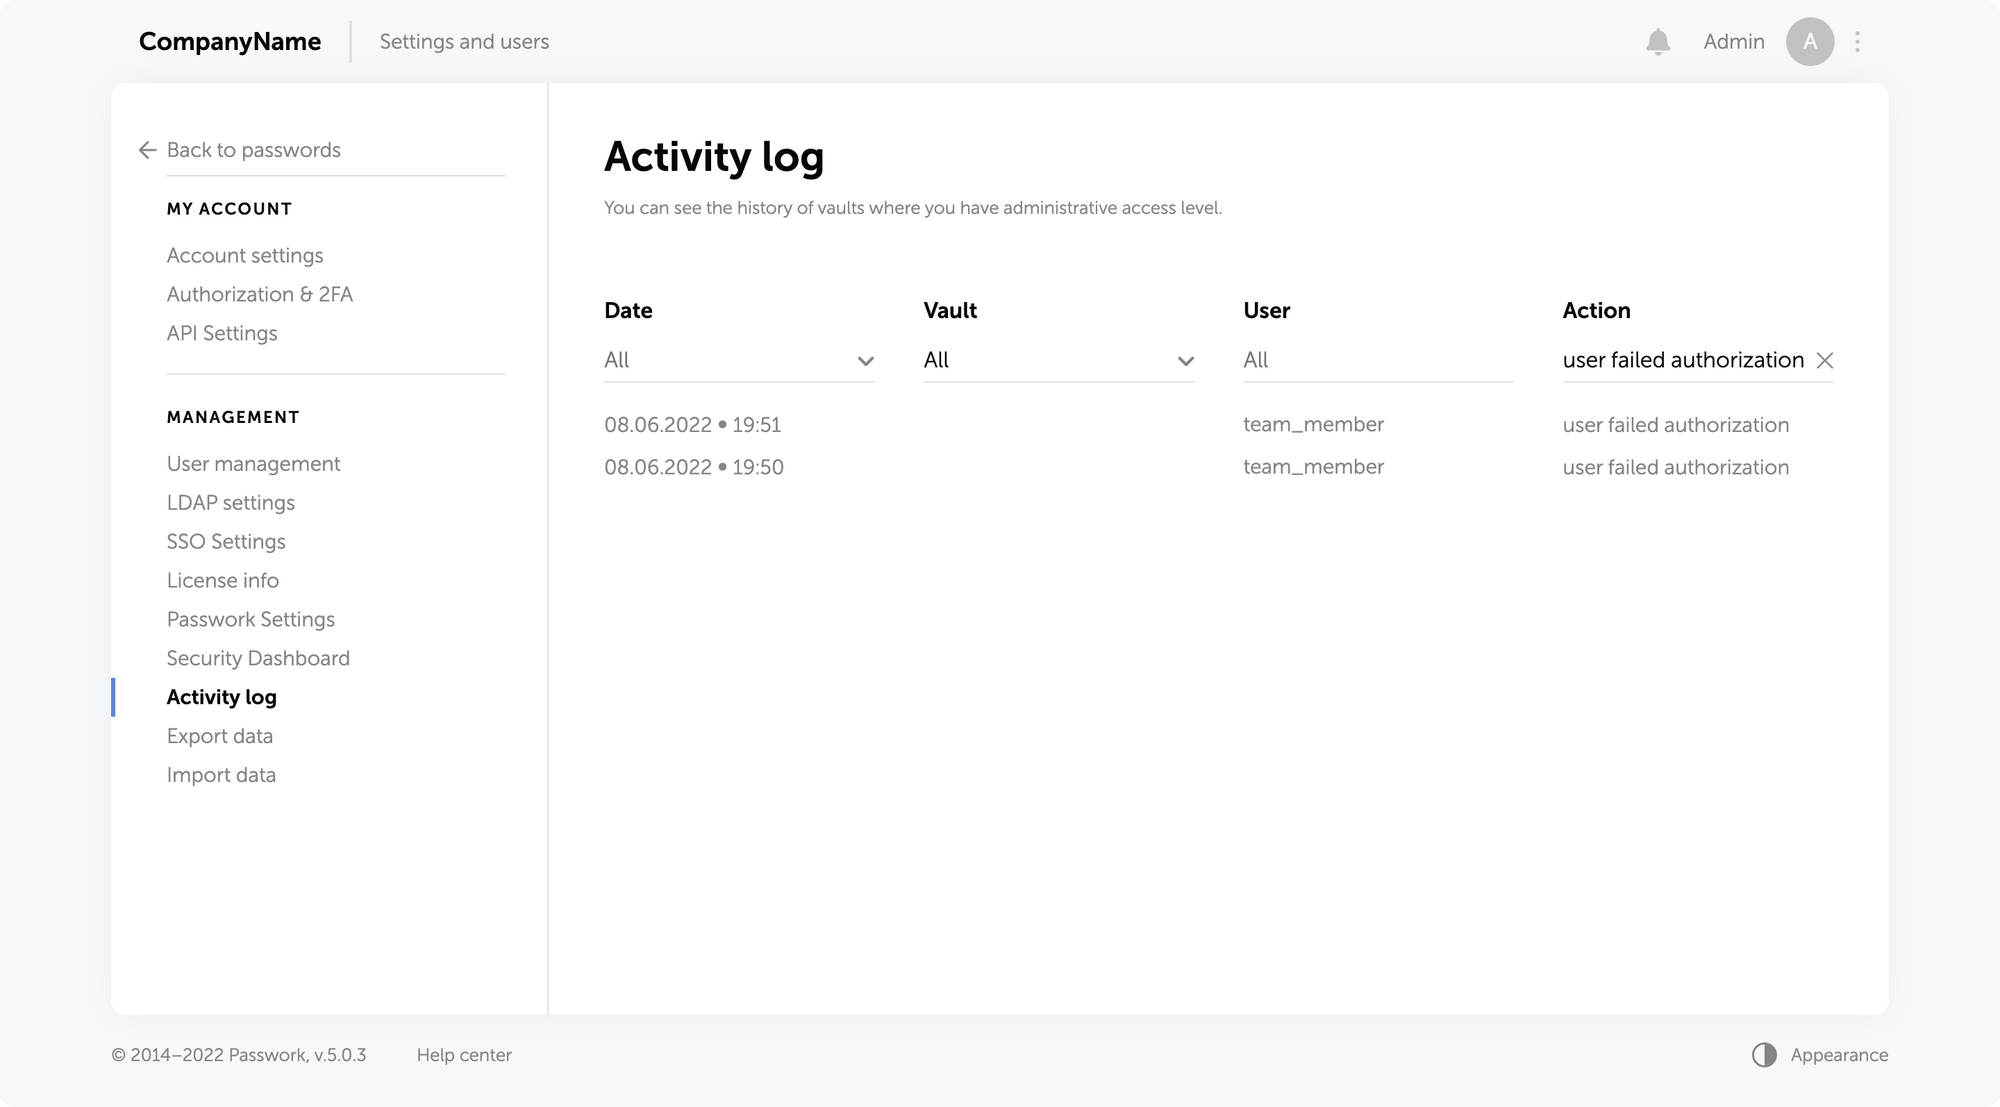
Ability to enable priority authorization using SSO
The new version of Passwork now allows you to enable SSO priority authorization for all users. You can enable it in the "SSO settings" section.
With this option enabled, only the "Sign in via SSO" button is displayed on the authorization page, the login and password fields appear only when switching to the standard authorization.
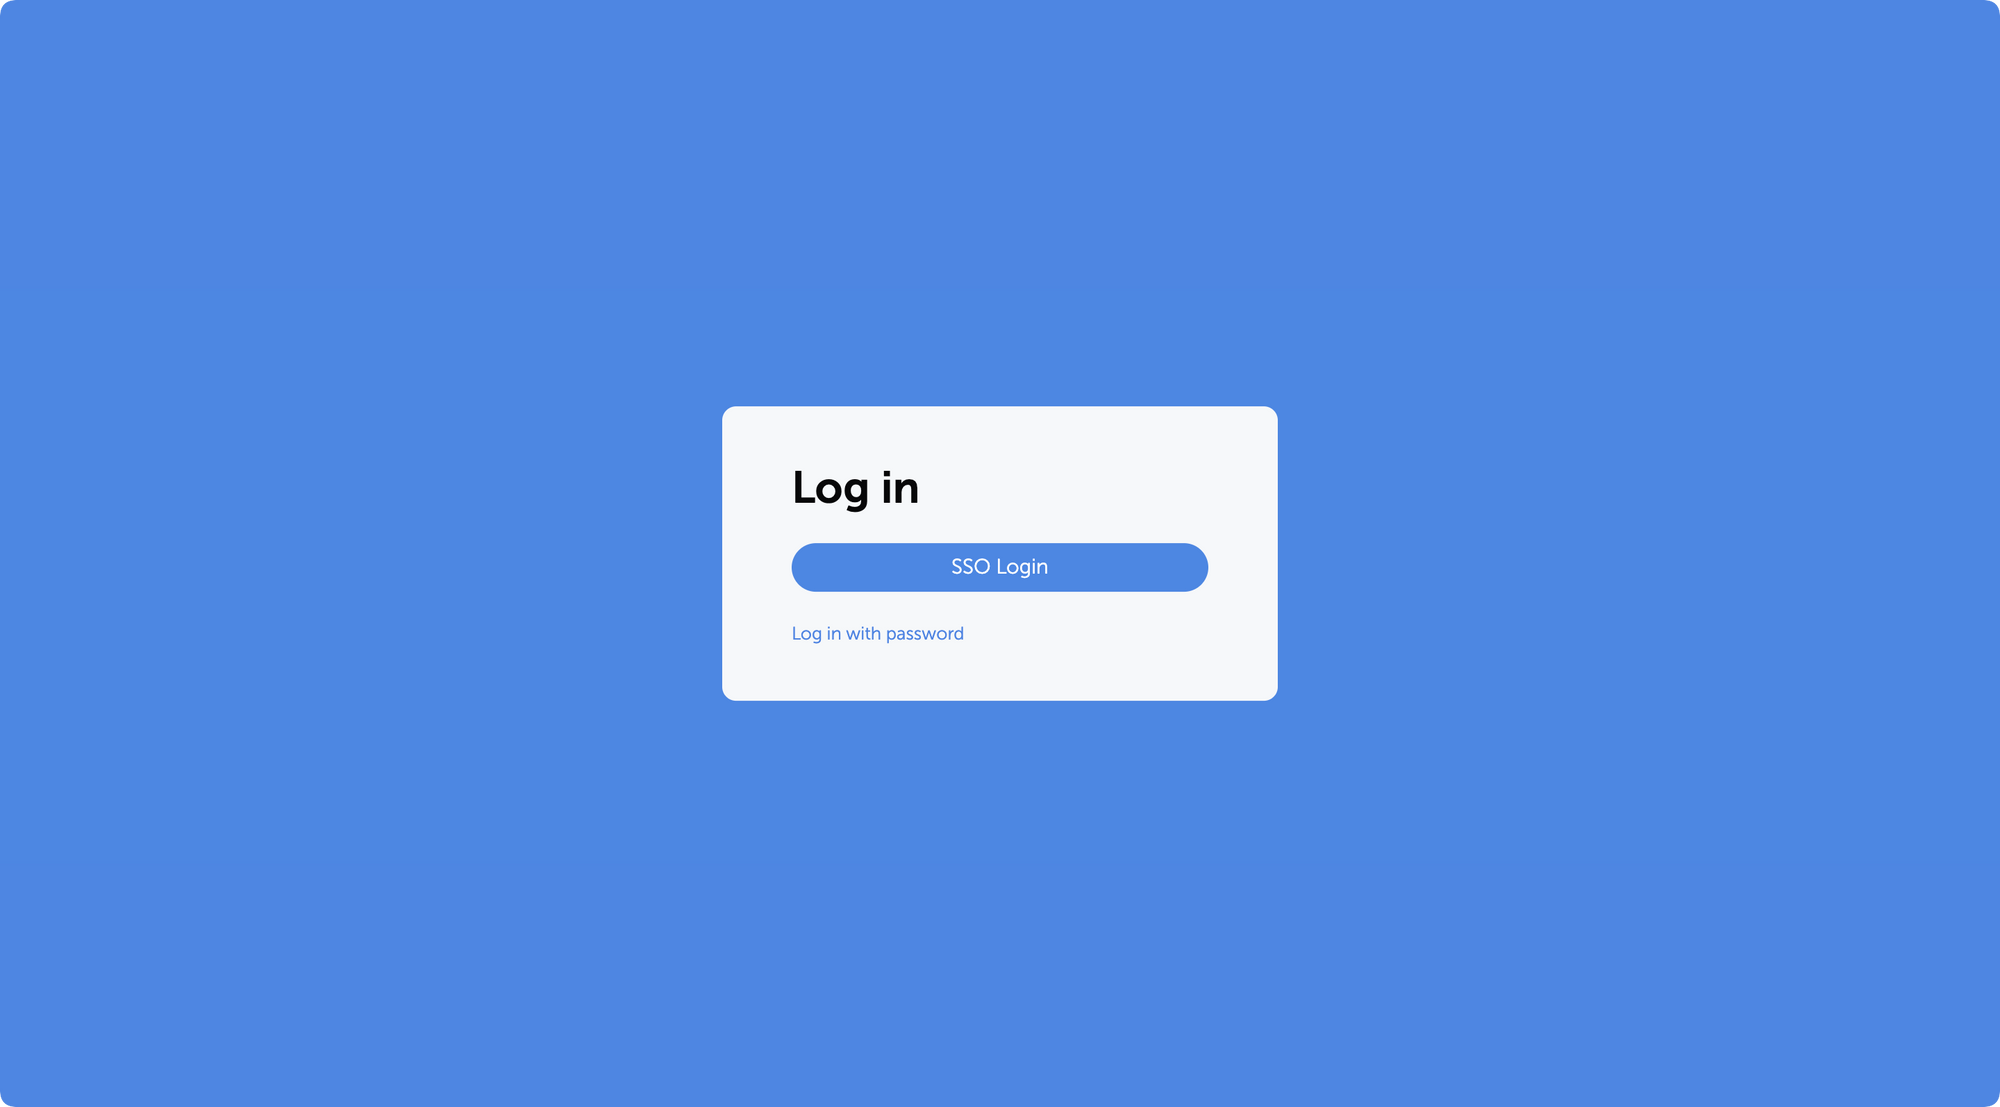

Optimized work with a large number of users
Passwork has been tested and optimized for 20,000+ users.
Improved LDAP integration
- Test mode for LDAP roles and groups linking
- Saving LDAP logs to a CSV file
- Updating user attributes during synchronization with LDAP directory
Mobile app update
- Passwork 5 support
- Ability to copy passwords on long press
- New home screen view with separating by type of vault
- Inbox passwords
- Improved search mechanism
- Debug mode
Python connector 0.1.5: Automated secrets management
The new Python connector version 0.1.5 expands CLI utility capabilities. We’ve added commands that solve critical tasks for DevOps engineers and developers — secure retrieval and updating of secrets in automated pipelines. What this solves Hardcoded secrets, API keys, tokens, and database credentials create security vulnerabilities and operational bottlenecks.

GDPR password security: Guide to effective staff training
Learn proven strategies to train employees for GDPR password security compliance. Reduce breach risks with practical training methods.
HIPAA requirements for password management
Introduction In the complex ecosystem of modern healthcare, patient data is essential for secure management. In 2024, the U.S. healthcare sector experienced over 700 large-scale data breaches, marking the third consecutive year with such a high volume of incidents. This surge compromised over 275 million patient records, a significant

Introducing Passwork 5.0
Are you sure that your home is protected in the way that you think? Sure, you can secure it with modern locks or an alarm system to protect yourself from robbers who want to steal your money or furniture, but what about those who are looking at your home as a means of stealing your privacy?
As the number of smart electronic devices we use every day increases, we have to make sure that the personal information that is recorded by these devices is safe.
So let’s talk about home security and how to protect yourself from those that are looking for ways to hack your smart devices.

Which smart devices can be hacked?
Almost every smart system used with modern devices is potentially dangerous as hackers know hundreds of ways to obtain remote access to them. But still, some devices seem too ordinary and primitive to be hacked. Perhaps a robot vacuum cleaner or a smart baby monitor. But there are more sophisticated technologies like a smart TV or smart house security system. They're all vulnerable since they're connected to the internet and are frequently part of your home Wi-Fi network. Recent research showed that every one of them has several serious security flaws.
What are the risks?
Many experts note that when it comes to smart home devices, you should be thinking about ‘when’ they will be hacked, not 'if,' because many are notoriously easy to hack and provide no protection whatsoever. Scientists from the European watchdog Eurovomsumers examined 16 regularly used devices from a variety of manufacturers and discovered 54 vulnerabilities that exposed consumers to hacker attacks, with potential implications ranging from security system deactivation to personal data theft.
According to the results of research, hackers can gain access to highly sensitive information such as banking credentials or even utilise many linked devices to stage enormous distributed denial of service (DDOS) operations, which allows them to ruin banking or other service networks.
Whenever most internet users realise the vulnerabilities associated with the usage of computers connected to the Internet, many people still do not pay enough attention to the fact that their home smart devices also present the same danger. As all home devices are commonly connected to the same Wi-Fi network, it gives an opportunity for hackers to get access to all domestic technologies at the same time.
Security gaps
One of the most significant dangers that are presented by smart home devices is the potential for a ‘deauthentication attack’, in which a hacker orders the device to disconnect from the house Wi-Fi. It may cause the blocking of systems and devices, which won’t be able to respond to users’ requests as a result. It was also discovered that some apps designed for home appliances are able to transfer unencrypted data. It means that if hackers break into their system, they’ll gain access to the owner's personal information, such as Wi-Fi passwords or even listen to what happens around the device if it’s equipped with a microphone. A stolen WiFi password may provide hackers access to phones or computers connected to this network and lead to an eventual data leak.
Due to the gaps in security systems, smart devices often have flaws that make them vulnerable to attack. Designers of these devices focus on the comfort of exploitation and multifunctionality of their products, but not on their security. But now, when almost everything from house alarms to refrigerators can be hacked, it becomes a paramount point.
Recent research that took place in America and Europe has shown that about a half of interviewees use smart home devices, but most of them do nothing to protect themselves from being compromised. Thus, even though people know about the risks, they still do nothing to minimize them. One of the possible reasons for such behavior is the lack of knowledge and accessible information about how to make the usage of smart home devices secure.
How can you secure your home devices?
Of course, the most basic way to protect yourself from the hacking of your smart home devices is just not to use them and replace them with less functional but safer options. But what if you can’t go without such a pleasure? Well, Euroconsumers — one of the most well-known private organizations for consumers — developed a list of recommendations that can help people who want to maintain their privacy while using smart devices:
1. Use an ethernet cable instead of Wi-Fi to connect your devices to the network where possible;
2. Create strong multilayered passwords for your devices and Wi-Fi;
3. After installing your Wi-Fi network, always change the default name;
4. Always keep your devices up-to-date and switch them off if you’re not using them at a certain moment;
5. When you use a device for the first time, always finish the setup procedure;
6. Do not buy cheap devices with a low level of protection.
Conclusion
When we’re talking about smart devices, we’re not just talking about full smart house systems such as alarms. Rather, we’re talking about smart appliances such as TVs, doorbell systems, vacuum cleaners, and other common household things. Using them makes our lives more comfortable and saves time and energy. However, they each have their own flaws, and many are vulnerable when it comes to hacking. So, consumers should pay attention to this point of using smart devices and consider all possible ways to protect their privacy without refusing to exploit such useful appliances. If you use one of these devices, try to get more information regarding what manufacturers pay more attention to regarding the security of their goods. Moreover, make sure to protect your own devices from hacking. It won’t take a lot of time or effort, but it will save your sensitive data and protect you from being compromised.
Why do employees ignore cybersecurity policies?
Employees often ignore cybersecurity rules not out of laziness, but because they feel generic, irrelevant, or disconnected from real work. True change starts with empathy, leadership, and context-driven policies. Read the full article to learn how to make security stick.

Passwork: Secrets management and automation for DevOps
Introduction In corporate environment, the number of passwords, keys, and digital certificates is rapidly increasing, and secrets management is becoming one of the critical tasks for IT teams. Secrets management addresses the complete lifecycle of sensitive data: from secure generation and encrypted storage to automated rotation and audit trails. As

How to teach children about password security: Tips for parents
We live in a digital age, and children must learn about internet safety as a first port of call. They are constantly on their phones and tablets, and many of them complete their coursework online. To secure personal information, all of these services require a password, but the passwords are

How secure are smart home devices?
What is a brute force attack?
Among a myriad of different cyberattacks, the brute force attack seems to be the most common and primitive way of hacking. This technique involves guessing login information through trial-and-error, where hackers try all conceivable combinations in the hope of guessing correctly.
The term “brute force" refers to the method itself, being both brutal and forceful. Despite the fact that brute force attacks are a pretty ancient cyberattack approach, they still remain a prominent technique among modern-day hackers.
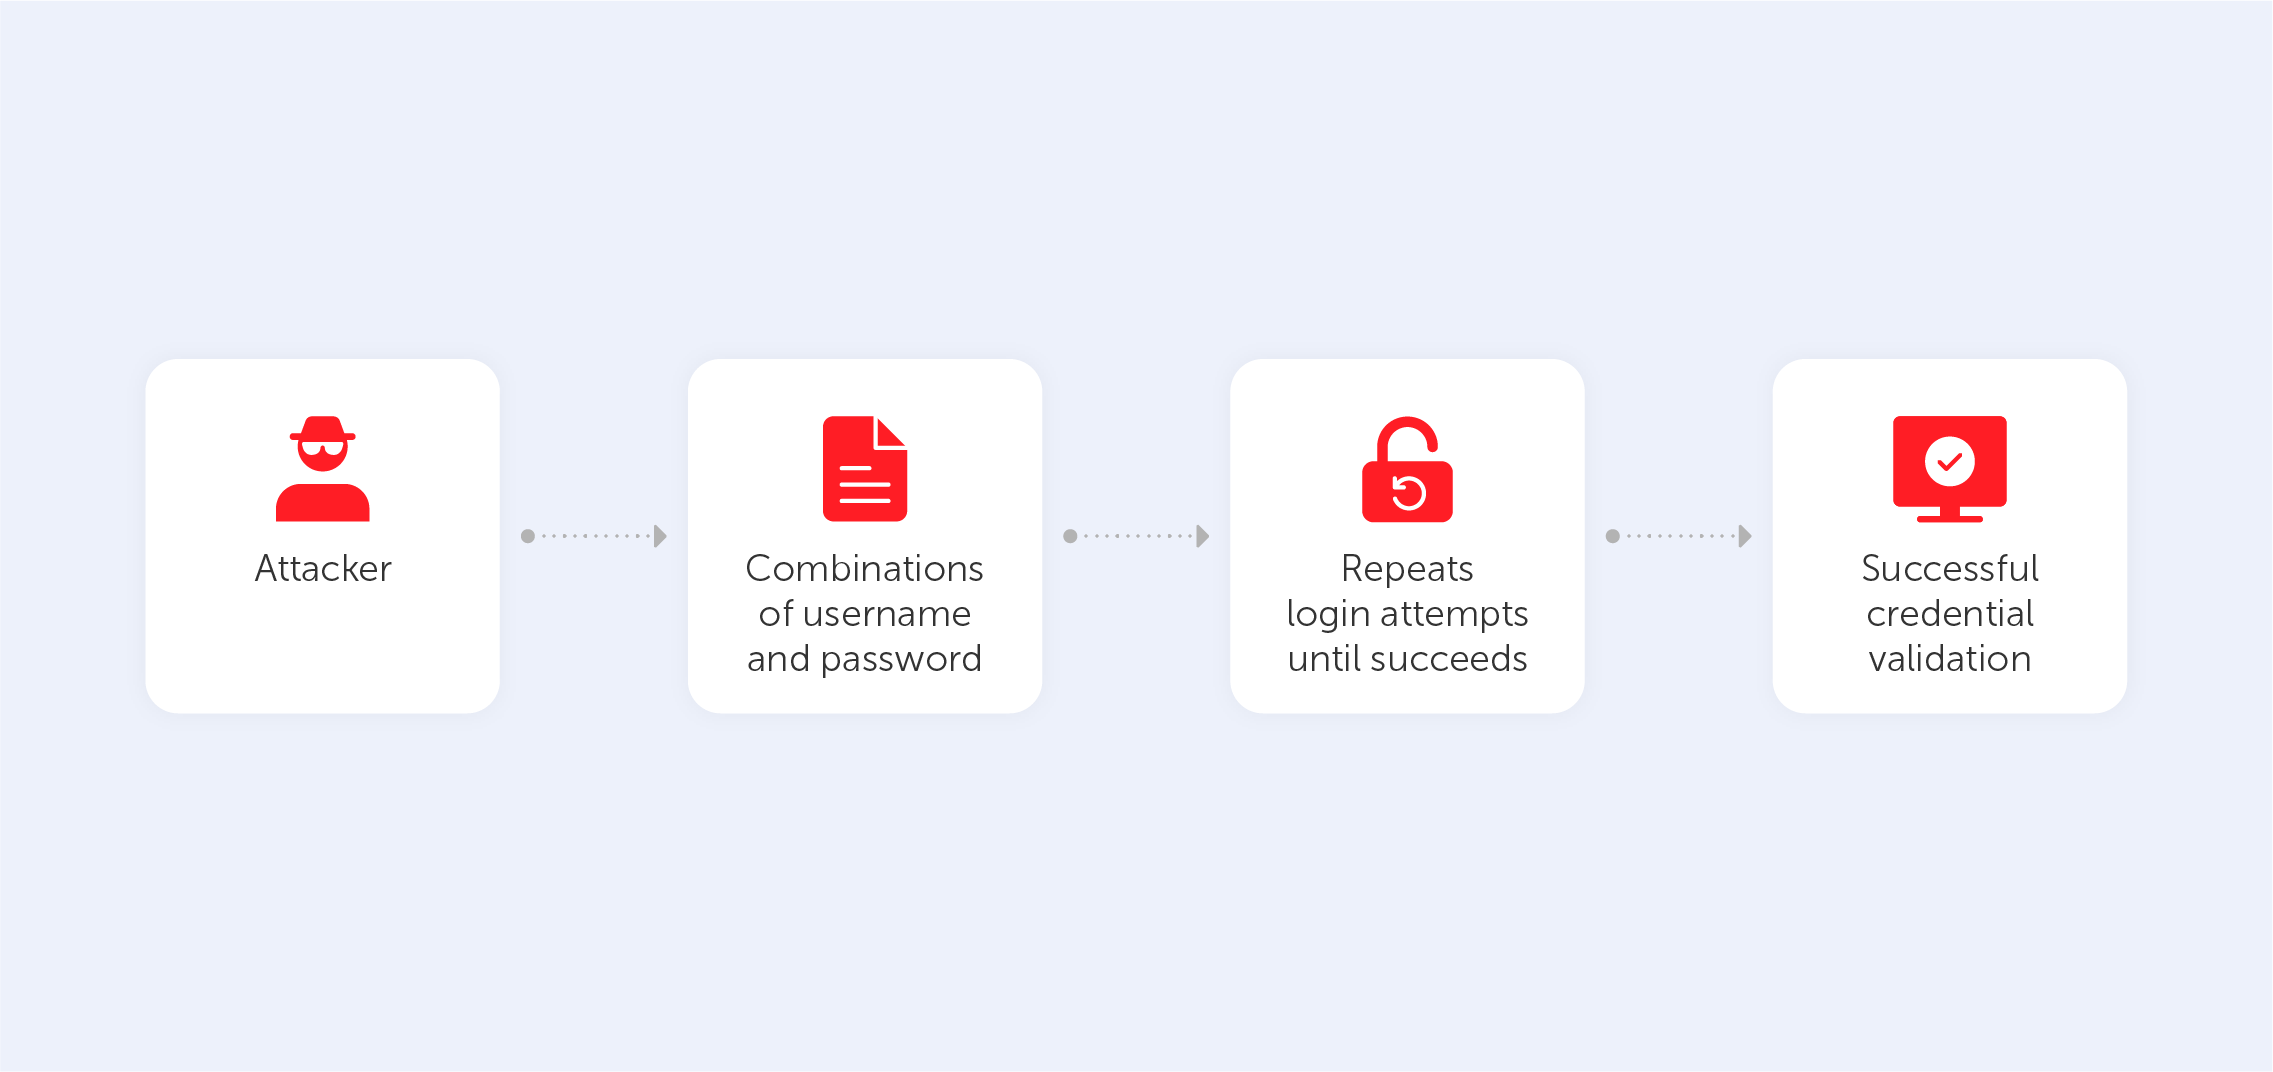
Types of brute force attacks
A brute force attack can be split into a few different types, each kind employing a variety of techniques that serve to unearth your private data. You should be aware of how cybercriminals apply each type in order to ensure maximum protection.
1. The simple brute force attack — this refers to the process of simply guessing the login credentials via logical deliberation, without the use of any software. Hackers just go through every standard combination of letters and numerals, perhaps combining this with some information that they know about you. This method is cumbersome yet reliable as many people still use primitive and common passwords and PINs like “user1” or “12345” in order to remember it easily. Also, users, who use the same password for every account put themselves in extra danger; if the hacker does guess one password correctly, then it’s likely that they’ll be using that password as the first port of call when it comes to other accounts.
2. A dictionary attack — this is a type of brute force attack that involves the user submitting a very large variety of different password combinations. Although this kind of assault is technically a brute force attack, it takes a significant place in the process of cracking passwords. The name of this technique comes from the actions that a hacker performs during the break-in attempt. The criminals scan through password dictionaries modifying words using different numbers and abbreviations. It usually takes a lot of time and has poor success rates when compared to newer techniques. However, it’s easy to do if you have a computer at your disposal.
3. A hybrid brute force attack — this type combines the two that we’ve just looked at: the brute force attack and the dictionary attack. Combination passwords, which mix common words with random characters, are cracked using these approaches. Usually, it starts with a certain username which is used as a base for the following actions: hackers input a list of words that potentially could be included in the password, then combine them with different characters and numbers until they reach the correct password.
4. Reverse brute force attack — contrasting with other types of brute force attack, the reverse attack starts with a known password. Usually, hackers get these from leaked databases that are freely available on the internet. Attackers choose one password and look through millions of accounts until one matches. Of course, it’s easier for the criminal to locate a match when the password includes a name or a birth date, so it’s better to avoid using such information in your password.
5. Credential staffing — this type of attack is based on users’ cybersecurity illiteracy. Hackers collect and store lists of already cracked or stolen passwords and usernames connected to them and then go through dozens of other websites to see if they can obtain access to other accounts of the same user. Thus if the person utilizes the same password for various social networks, apps and websites, he or she allows the attacker to get every bit of private information contained on each account.
6. Botnets — this type of attack can be combined with any of the above. The main point of a botnet attack is to use extra computational resources to attack the victim. This way, hackers manage to avoid the costs and difficulties associated with running programs on their own systems by exploiting hijacked machines to carry out the brute force attack. Furthermore, the usage of botnets provides an additional layer of anonymity which is also desirable for hackers.
Brute force attack tools
It can take a long time to crack the password of somebody’s email or website, so hackers have created some software to assist them in breaching accounts, which makes the process easier and faster.
1. Aircack-ng is a toolset that provides the hacker with the opportunity to enter various Wi-Fi security systems. They’ll be able to monitor and export data through the use of this software. They can even hack companies using techniques such as spoofing access points and packet injection. Such software is free and can be acquired by anyone.
2. DaveGrohl is a brute-forcing tool that was made to assist in dictionary attacks. It offers a mode that helps hackers to attack a victim using the force of several computers.
3. John the Ripper is a program made for recovering passwords. It supports thousands of encryption systems including those used in macOS, Unix, Windows, various web applications, network traffic, and document files.
These programs can quickly go through all conceivable combinations and choose the correct one to breach a variety of computer protocols, encrypted information storage systems and modems.
Examples of brute force attacks:
Brute force attacks are so common that almost every person or organization has at least once fallen victim. Even worldwide organizations that are known for their robust security systems could be exposed to a brute force attack. For example, in 2018, it was uncovered that Firefox’s master password was quite easy to figure out. Because of this, nobody knows how much personal data was actually leaked into the network. This wasn’t the only brute force attack to occur that year. Unknown hackers compromised the accounts of numerous members of the Parliament of Northern Ireland.
Three years before that, Dunkin Donuts, a doughnut and coffee franchise, became a victim of another brute force attack that resulted in people losing large quantities of money due to a breach that took place in the company’s mobile app. Cybercriminals utilized brute force to obtain illegal access to the credentials of more than 19 thousand people, eventually taking their money. Unfortunately, the company didn’t make users aware of the attack and people couldn’t take the appropriate precautions to protect their personal data and money in the future, so a complaint was eventually filed against it.
Despite most people actually being aware of the measures required for privacy maintenance, a lot of users still disregard the rules of cybersecurity by trying to simplify access to their accounts with a simple, reusable and easily memorable combination. This way, they make themselves potential victims of brute force attacks, which are largely possible thanks to the carelessness of cyber-civilians.
Common myths about password managers
Worried that password managers are risky or hard to use? It’s time to rethink. In this article, we debunk common myths about password managers, break down how they actually work, and show why solutions like Passwork are vital for your cybersecurity. Learn how these tools keep your data protected.
Passwork: Secrets management and automation for DevOps
Introduction In corporate environment, the number of passwords, keys, and digital certificates is rapidly increasing, and secrets management is becoming one of the critical tasks for IT teams. Secrets management addresses the complete lifecycle of sensitive data: from secure generation and encrypted storage to automated rotation and audit trails. As

Why do I need a password manager?
Password managers protect your accounts by encrypting credentials, generating strong passwords, and blocking phishing attacks. They help individuals and businesses streamline password management, minimizing risks from weak or reused passwords. Discover their key features in the full article.