Multi-factor authentication (often known as MFA for short), refers to the process of confirming the identity of a user who is attempting to log in to a website, application, or another type of resource using more than one piece of information. Indeed, multi-factor authentication is the difference between entering a password to gain access to a resource and entering a password plus a one-time password (OTP), or a password plus the answer to a security question. Another example of multi-factor authentication is entering a password plus the answer to a security question.
Multi-factor authentication provides greater assurance that individuals are who they claim to be by requiring them to confirm their identity in more than one way. This, in turn, reduces the risk of unauthorised access to sensitive data. Multi-factor authentication requires individuals to confirm their identity in more than one way. After all, entering a stolen password to get access is one thing; it is quite another to enter a stolen password and then be needed to additionally input an OTP that was sent to the smartphone of the real user.
Multi-factor authentication can be achieved through the use of any combination of two or more factors. Two-factor authentication is another name for the practice of using only two factors to verify a user's identity.
How Does MFA work?
MFA is effective because it necessitates the collection of extra verification information (factors). One-time passwords are one of the multi-factor authentication mechanisms that consumers encounter most frequently (OTP). OTPs are the four-digit to eight-digit codes that you frequently receive through email, SMS, or a mobile application of some kind. When using OTPs, a fresh code will be created at predetermined intervals or whenever an authentication request is sent in. The code is created based on a seed value that is assigned to the user when they first register and some other component, which might simply be a counter that is incremented or a time value. This seed value is used in conjunction with some other factor to generate the code.
The three categories of multi-factor authentication methods
Generally speaking, a technique of multi-factor authentication will fall into one of these three categories:
• Something you are familiar with: a PIN, password, or the solution to a security question
• Something you own: an OTP, a token, a trusted device, a smart card, or a badge
• Something you are, such as your face, fingerprint, retinal scan, or other biometric information
Methods of multi-factor authentication
In order to accomplish multi-factor authentication, you will need to utilize at least one of the following methods in addition to a password.
Biometrics
A method of verification that depends on a piece of hardware or software being able to recognize biometric data, such as a person's fingerprint, facial characteristics, or the retina or iris of their eye.
Push to approve
A notice is shown on someone's smartphone that prompts the user to tap their screen in order to accept or deny a request for access to their device.
One-time password (OTP)
A collection of characters that are created automatically and are used to authenticate a user for a single login session or transaction only.
An SMS
A method for sending a One-Time Password (OTP) to the user's smartphone or other devices.
Hardware token
A compact, portable OTP-generating device that is sometimes referred to as a key fob.
Software token
A token that does not exist in the form of a physical token but rather as a software program that can be downloaded onto a smartphone or other device.
The advantages of multi-factor authentication
Enhancing the level of safety
Authentication that takes into account many factors is more secure. After all, when there is only one mechanism defending a point of access, such as a password, all a malicious actor needs to do to get admission is figure out a means to guess or steal that password. This is the only thing that needs to be done in order to acquire access. However, if admittance additionally needs a second (or perhaps a second and a third) element of authentication, then it becomes far more difficult to obtain access, particularly if the requirement is for something that is more difficult to guess or steal, such as a biometric characteristic.
Providing support for various digital initiatives
Multi-factor authentication is a key enabler in today's business world, where more companies are keen to deploy remote workforces, more customers want to purchase online rather than in shops, and more companies are migrating apps and other resources to the cloud. In this day and age, it can be difficult to ensure the safety of organisational and e-commerce resources. Multi-factor authentication can be an extremely useful tool for assisting in the protection of online interactions and financial transactions.
Are there any disadvantages to multi-factor authentication?
It is feasible to establish a less easy-to-access environment while building a more secure one — and this might be a disadvantage (this is especially true as zero trust, which sees everything as a possible threat, including the network and any apps or services running on it, gains acceptance as a safe access basis). No employee wants to spend additional time each day dealing with several impediments to getting on and accessing resources, and no consumer wants to be slowed down by multiple authentication procedures. The objective is to strike a balance between security and convenience so that access is secure but not so onerous that it causes excessive hardship for those who legitimately require it.
The role of risk-based authentication in multi-factor authentication
One technique to achieve a balance between security and convenience is to increase or decrease authentication requirements based on the risk associated with an access request. This is what risk-based authentication entails. The risk might be associated with either what is being accessed or who is requesting access.
The risk presented by what is accessed
For example, if someone seeks digital access to a bank account, is it to initiate a money transfer or simply to verify the status of an existing transfer? Or, if someone interacts with an online shopping website or app, is it to place an order or to monitor the progress of an existing purchase? For the latter, a username and password may be sufficient, but multi-factor authentication makes sense when a high-value item is at stake.
The risk is presented by the person requesting access
When a remote employee or contractor seeks access to the corporate network from the same city, on the same laptop, day after day, there's little reason to assume it's not that person. But what happens when a request from Mary in Minneapolis arrives from Moscow unexpectedly one morning? A request for extra authentication is warranted due to the possible danger – is it really her?
The future of Multi-Factor Authentication: AI, Machine Learning and more
Multi-factor authentication is always improving to provide enterprises with access that is both more secure and less unpleasant for individuals. Biometrics is an excellent example of this concept. It's more secure, since stealing a fingerprint or a face is difficult, and it's more convenient because the user doesn't have to remember anything (such as a password) or make any other substantial effort. The following are some of the current advancements in multi-factor authentication.
Machine learning (ML) and artificial intelligence (AI)
AI and ML may be used to identify characteristics that indicate if a particular access request is "normal" and as such, does not require extra authentication (or, conversely, to recognize anomalous behaviour that does warrant it).
Online Quick Identity (FIDO)
The FIDO Alliance's free and open standards serve as the foundation for FIDO authentication. It facilitates the replacement of password logins with safe and quick login experiences across websites and applications.
Authentication without a password
Rather than utilizing a password as the primary means of identity verification and complementing it with alternative non-password methods, passwordless authentication does away with passwords entirely.
Be certain that multi-factor authentication will continue to evolve and develop in the pursuit of methods for individuals to show they are who they say they are — reliably and without having to jump through an endless number of hoops.
1.1 What Are ‘Certificates’ and Why Are They Needed?
Certificates are text files on a web server, the placement and content of which confirms the identity of the responsible owner of a web resource. Owner confirmation is carried out by specially authorized companies or divisions of an organization – Certification Centers (also referred to as the CC, Certificate Authority, CA).
Additionally, certificates contain the public key required to establish an encrypted connection to work on a network in order to prevent data interception by intruders. The protocols by which this connection is established end with the letter "S", from the English word "Secure" — see HTTP(S), FTP(S), etc. This means that standard internet protocols, such as HTTP and FTP, are used over an encrypted TLS connection, whereas ordinary messages are exchanged over TCP/IP without encryption. TLS (which stands for Transport Layer Security is a protocol that ensures secure data transfer based on SSL (Secure Sockets Layer), which is another cryptographic protocol. This uses asymmetric cryptography to authenticate exchange keys so that a session can be established, symmetric encryption to further preserve the confidentiality of the session, and the cryptographic signature of messages to guarantee the delivery of information without loss. Despite the fact that it is the only TLS protocol that is actually used, due to habit, the entire family of these protocols is called SSL, and the accompanying certificates are SSL certificates.
The use of SSL certificates primarily allows you to prevent data theft by using clones of sites of well-known services, when attackers duplicate the main pages of said sites, employ similar domain names, and forge personal information forms. The user may input personal information about themselves, their documents, and payment details on fake websites. As a result, users' personal information may subsequently be used to gain unauthorized access to other resources or social networks so it can be resold, or used to steal funds from a bank account. Service owners can help customers avoid these problems by configuring HTTPS on their resource and demonstrating the authenticity of their web pages to their users directly in the browser address bar.
As mentioned above, TLS/SSL is used to encrypt traffic from the client to the web server, and this prevents intruders from intercepting traffic on public unsecured networks.
1.2 How Do They Work?
When it comes to TLS /SSL, three parties are involved: the client – the consumer of services or goods on the internet; the server – the provider of these services or goods; and the Certification Center, whose duties include ensuring that the domain name and resource belong to the organization specified in the registration information of the certificate.
The TLS/SSL algorithm works as follows:
1. The owners of the service contact the Certification Center through partners and provide information about themselves.
2. The Certification Center makes inquiries about the owners of the service. If the primary information is verified, the Certification Center issues the owners of the service with a certificate which includes the verified information and a public key.
3. The user launches a browser on a personal device and goes to the service page.
4. The browser, along with other standard operations, requests the SSL certificate while the service page is loading.
5. The service sends the browser a copy of the certificate in response.
6. The browser checks the validity period and validity of the copy of the certificate using the Certificate Centers’ pre-installed root certificates. If everything is approved, the browser sends the corresponding response to the service, signed with the client's key.
7. The service receives confirmation of the client’s verification with their digital signature and they begin an encrypted session.
Session encryption is carried out using PKI (Public Key Infrastructure). PKI is based on the following principles:
1. There is a related pair of non-interchangeable control sequences of almost random characters called keys: public or public and private, also referred to as private.
2. Any dataset can be encrypted with a public key. Because of this, the public key can be freely transmitted over the network, and an attacker will not be able to use it to harm users.
3. The private key is known only to its owner and can decrypt the received data stream into structured information that has been encrypted with a public key paired with it. The private key should be stored on the service and used only for local decryption of messages that have been received. If an attacker is able to gain access to a private key, then procedures for revoking and reissuing the certificate must be initiated to make the previous certificate useless. A leak of a private key is called a compromise.
An SSL certificate from a Certificate Authority is one way of distributing a server’s public key to clients in unsecured networks. After verifying the validity of the certificate, the client encrypts all outgoing messages with the public key attached to the certificate and decrypts incoming messages with the private one, thereby ensuring a secure communication channel.
1.3 Who Releases Them?
Certificates are issued by Certification Centers upon the request of customers. The Certification Center is an independent third–party organization that officially verifies the information specified in a certificate request: i.e. whether the domain name is valid, whether a network resource with this name belongs to a specific company or individual to whom it is registered; whether the site of the company or individual to whom the SSL certificate was issued is genuine, and other checks. The most famous international Certification Centers are Comodo, Geotrust, GoDaddy, GlobalSign, Symantec. The root SSL certificates of these Certification Authorities are pre-installed as trusted in all popular browsers and operating systems.
It is often more cost-effective to purchase certificates not directly from the Certification Center but from their partners instead, as they offer wholesale discounts. In Russia, many companies and hosting providers that have their own tariffs for the SSL certificate service sell certificates from well-known Certification Centers.
2. Advanced Information about Certificates
2.1 Which Crypto Algorithms Are Used?
The following algorithms are used to establish a secure connection:
Encryption algorithm
Hashing algorithms
Authentication algorithms
The most commonly used encryption algorithms for cryptographic operations in TLS/SSL are combinations of the algorithms RSA (an initialism of the names of the creators Rivest, Shamir and Adleman), DSA (which stands for Digital Signature Algorithm, patented by the National Institute of Standards and Technology of the USA) and several variations of the Diffie–Hellman algorithm or DH, such as a one-time DH (Ephemeral Diffie–Hellman, EDH) and DH based on elliptic curves (Elliptic curve Diffie–Hellman, ECDH). These Diffie-Hellman variations, unlike the original algorithm, provide progressive secrecy, i.e. when previously recorded data cannot be decrypted after a certain amount of time — even if it was possible to obtain the server's secret key — because the original parameters of the algorithm are generated again when the channel is re-established after a forced break when the connection has timed out.
Hashing algorithms are based on a family of mathematical functions for calculating the hash SHA (Secure Hash Algorithm). The hash function allows you to convert the original data array into a string of a certain length, and this length determines the amount of processing time and the computing power required. All encryption algorithms today support the SHA2 hashing algorithm, most often SHA-256. SHA-512 has a similar structure, but in it the word length is 64 bits rather than 32, the number of rounds in the cycle is 80 rather than 64, and the message is divided into blocks of 1024 bits rather than 512 bits. Previously, SHA1 and MD5 algorithms were used for the same purpose, but today they are considered vulnerable to attack. Modern services use keys 64 bits long and higher. The current version of the SHA-3 algorithm (Keccak), uses an amount necessary to verify the integrity of the transmitted data — MAC (Message Authentication Code). The MAC uses the mapping function to represent message data as a fixed length value, and then hashes the message.
In modern versions of the TLS protocol, HMAC is used (Hashed Message Authentication Code), which uses a hash function immediately with a shared secret key. This key is transmitted along with the flow of information, and to confirm authenticity, both parties must use the same secret keys. This provides greater security.
The General Algorithm of SSL Operation
1. Handshake protocol. The connection confirmation (handshake) protocol is the order of operations performed directly during the initialization of the SSL connection between the client and the server. The protocol allows the server and client to carry out mutual authentication, determine the encryption algorithm and MAC, as well as secret keys to protect data during a further SSL session. The handshake protocol is used by participants at the stage before data exchange. Each message transmitted as part of the handshake protocol contains the following fields:
Type is the category of messages. There are 10 categories of messages.
Length refers to the length of each message in bytes.
The content is the message itself and its parameters.
During the handshake, the following stages take place:
1.1 Determination of supported algorithms. At the first stage, the connection between the client and the server is initiated and the encryption algorithms are selected. First, the client sends a welcome message to the server, before entering response-waiting mode. After receiving the client's welcome message, the server returns its own welcome message to the client to confirm the connection. The client's welcome message includes the following data:
The maximum SSL version number that the client can support
A 32-byte random number used to generate the master secret
Session ID
A list of cipher suites
A list of compression algorithms
The format of the list of cipher suites is as follows:
<1>_<2>_<3>_<4>
Wherein lies:
The name of the protocol, for example, "SSL" or "TLS".
Key exchange algorithm (with an indication of the authentication algorithm).
The encryption algorithm.
Hashing algorithm. For example, the entry "SSL_DHE_RSA_WITH_DES_CBC_SHA" means that the fragment "DHE_RSA" (temporary Diffie-Hellman with RSA digital signature) is defined as a key exchange algorithm; the fragment "DES_CBC" is defined as an encryption algorithm; and the fragment "SHA" is defined as a hashing algorithm. As will be discussed later in TLSv1.3, the key exchange and encryption protocols are combined into an authenticated encryption algorithm with attached data (AEAD), so the entry there will be shorter. Example: TLS_AES_256_GCM_SHA384. The server response includes the following fields:
The SSL version number. On the client side, the lowest version number supported by the client and the largest version number supported by the server are compared. Depending on the server’s settings, selection priority can be given to either the client or server.
A 32-byte random number used to generate the master secret.
Session ID.
A set of ciphers from the list of ciphers supported by the client.
Compression method from the list of compression methods supported by the client.
1.2 Server authentication and key exchange
At the second stage, all messages are sent by the server. This stage is divided into 4 steps:
The sending of a digital certificate to the client so they can use the server's public key for authentication purposes.
Key exchange on the server. Depending on the established algorithm, this step may be skipped.
Client certificate request. Depending on the settings, the server may require the client to send their own certificate.
A message confirming that the server authentication and key exchange stage is complete, before moving on to the next stage.
1.3 Client authentication and key exchange:
At the third stage, all messages are sent by the client. This stage is divided into 3 steps:
The sending of the certificate to the server — if the server requested it (this depends on the established algorithm). If the algorithm includes this, the client can authenticate on the server. For example, in IIS, you can configure mandatory authentication of the client certificate.
Client key exchange (Pre-master-secret) – the sending of the master key to the server, which will later be encrypted using the server key. The client knows the master key and in case of server substitution will be able to terminate the connection.
Signing a random number to confirm ownership of the certificate's public key. This stage also depends on the algorithm chosen.
1.4 Server shutdown
At the fourth stage, messages are exchanged directly and errors are monitored. If an error is detected, the alarm protocol comes into effect. This stage consists of exchanging session messages: the first two messages come from the client, and the last two come from the server.
2. The Key Generation Process
To ensure the integrity and confidentiality of information, SSL requires six encryption secrets: four keys and two values of the initialization vector (IV, see below). The information’s authenticity is guaranteed by an authentication key (for example, HMAC). The data is then encrypted by a public key, and data blocks are created based on IV. The keys required by SSL are unidirectional, so when a client is hacked, the data obtained cannot be used to hack the server.
3. Record Agreement (Record Protocol)
The recording protocol is used after a connection between the client and the server has been successfully established, and when the client and server have passed mutual authentication and have determined the algorithm they will use to exchange information about the algorithms used. The recording protocol implements the following functions:
Confidentiality by using the secret key defined at the handshake stage;
Integrity by analyzing the MAC defined at the handshake.
4. Alarm Protocol
When the client and server detect an error, they send a message recognizing this. If it is a critical error, the algorithm immediately closes the SSL connection, and both sides first delete the session details: the identifier, secret, and key. Each error message is 2 bytes long. The first byte indicates the type of error. If the connection fails, the value is 1, while if a critical error is detected, it is 2. The second byte indicates the nature of the error.
2.2 Versions of SSL (SSL, TLS) — and How They Differ
During the initial installation of a secure connection between the client and the server, the protocol is selected from those supported by both sides from the set of SSLv3, TLSv1, TLSv1.1, TLSv1.2 or TLSv1.3.
Earlier versions of the SSL protocol are not used. The SSLv1 version was never made public. The SSLv2 version was released in February 1995, but it contained many security flaws that led to the development of SSLv3. Various IT companies have begun to attempt to implement their own versions of secure data transfer protocols. In order to prevent disunity and monopolization in the field of network security, the international community of designers, scientists, network operators, and providers (The Internet Engineering Task Force [IETF]), which was created by the Internet Architecture Council in 1986, is involved with developing protocols and organizing the internet, specifically regarding the standardized TLS protocol version 1, slightly different from SSL 3.0.
The technical details of the protocol are recorded by the release of a document called RFC (Request for Comments, working proposal). These documents can be found on the IETF website: www.ietf.org/rfc/rfcXXXX.txt , where XXXX is a four-digit RFC number. Thus, the TLSv1 version is fixed in RFC 2246, the TLSv1.1 version is fixed in RFC 4346, the TLSv1 version.2 in RFC 5246, and the TLSv1 version.3 in RFC 8446. In addition, RFC 3546 defines several extensions for cases when TLS is used in systems with limited bandwidth, such as wireless networks; RFC 6066 defines a number of additional TLS changes made to the extended client greeting format (presented in TLSv1.2); RFC 6961 defines a method for reducing traffic when a client requests information about the status of a certificate from the server; and, finally, RFC 7925 defines what happens to TLS (and DTLS) when it is used in IoT (Internet Of Things) to exchange data between hardware and other physical objects without human intervention.
As mentioned above, the TLSv1 protocol was released as an update to SSLv3. RFC 2246 states that "the differences between this protocol and SSLv3 are not hugely significant, but they are significant enough to exclude interaction between TLSv1 and SSLv3."
In contrast to the TLS Version 1.0, the TLSv1.1 protocol provides:
Added protection against attacks using CBC (Cipher Block Chaining), when each block of plaintext is associated with the previous block of ciphertext before encryption. 1. The implicit initialization vector (the original pseudorandom number initiating the calculation of the further cipher, IV) was replaced by an explicit one which is not secret, but nonetheless cannot be predicted in a reasonable timeframe. 2. A change in the handling of block filling errors when a data packet is expanded to a fixed block size.
Support for registering server IP address parameters and other network information.
The TLS 1.2 protocol is based on the TLS 1.1 specification. This is the most common at the moment. The main differences include:
The combination of MD5–SHA-1 hashing algorithms in a pseudorandom function (PRF) has been replaced by the more secure SHA-256, with the possibility of using a set of ciphers, the specified function.
The hash size in the finished message has become at least 96 bits.
The combination of MD5–SHA-1 hashing algorithms in the digital signature has been replaced by a single hash agreed upon during the handshake, which is SHA-1 by default.
The implementation of the function of selecting encryption and hashing algorithms for the client and server.
The extension of support for authenticated encryption ciphers used mainly for Galois/Counter mode (GCM) and CCM mode for Advanced Encryption Standard (AES).
The addition of TLS extension definitions and AES cipher suites.
The ending of backward compatibility with SSLv2 as part of the 6176 RFC. Thus, TLS sessions have ceased to negotiate the use of SSL version 2.0.
The TLS 1.3 protocol is based on the TLS 1.2 specification. Internet services are gradually transitioning to this protocol. The main differences include:
The separation of key matching and authentication algorithms from cipher suites.
The ending of support for unstable and less-used named elliptic curves.
The ending of support for MD5 and SHA-224 cryptographic hash functions.
The need for digital signatures even when using the previous configuration.
The integration of the HMAC-based key generation function and a semi-ephemeral DH sentence.
The introduction of support for a one-time resumption of the receive-transmit session (Round Trip Time or 1-RTT) handshakes, and initial support for zero time for resuming the receive-transmit session (the name of the 0-RTT mode).
Session keys obtained using a set of long-term keys can no longer be compromised when attackers gain access to them. This property is called perfect direct secrecy (PFS) and is implemented through the use of ephemeral keys during the DH key agreement.
The ending of support for many insecure or outdated functions, including compression, renegotiation, ciphers other than AEAD-block encryption modes (Authenticated Encryption with Associated Data), non-PFS key exchange (including static RSA key exchange and static DH key exchange), configurable EDH groups, elliptic curve point ECDH format negotiation, encryption modification specification protocol, UNIX time welcome message, etc.
The prevention of SSL or RC4 negotiation that was previously possible to ensure backward compatibility.
The ceasing of use of a record-level version number and fixing the number to improve backward compatibility.
The addition of the ChaCha20 stream cipher with the Poly1305 message authentication code.
The addition of digital signature algorithms Ed25519 and Ed448.
The addition of the x25519 and x448 key exchange protocols.
The addition of support for sending multiple responses to the Online Certificate Status Protocol, OCSP.
The encryption of all confirmations of receiving and transmitting a block of data after calling the server.
2.3 What Is PKI (Public Key Infrastructure)?
Public Key Infrastructure (PKI) is a system of software, hardware and regulatory methods that solve cryptographic tasks based on a pair of private and public keys. The PKI is based on the exclusive trust of the exchange participants in the certifying center in the absence of information about each other. The certifying center, in turn, confirms or refutes the ownership of the public key to the specified person who owns the corresponding private key.
The main components of PKI:
The certifying center or Certification Center is an organization that performs, among other things, legal verification of data on participants in a network interaction (client or server). From a technical point of view, the Certification Center is a software and hardware complex that manages the lifecycle of certificates, but not their direct use. It is a trusted third party.
A public key certificate (most often just ‘certificate’) consists of client or server data and public key signed with the electronic signature of the Certifying Center. The issuance of a public key certificate by a Certification Authority ensures that the person specified in the certificate also owns the private part of a single key pair.
Registration Center (RC) is an intermediary of the Certification Center that acts on the basis of trust in the root Certification Center. The Root Certification Center trusts the data received by the Registration Center while verifying the information about the subject. After verifying the authenticity of the information, the Registration Center signs it with its own key and transmits the data it has received to the root Certification Center. The Root Certification Authority verifies the registration authority’s signature and, if successful, issues a certificate. One Registration Center can work with several Certification Centers (in other words, it can consist of several PKIs), just as one Certification Center can work with several Registration Centers. This component may not be present in the corporate infrastructure.
Repository – a repository of valid certificates and a list of revoked certificates that are constantly updated. The list of revoked certificates (Certificate Revocation List, CRL) contains data on issued certificates whose paid period or validity period have elapsed, as well as certificates of resource owners that have been compromised or have not been authenticated.
A Certificate Archive is a repository of all certificates ever issued (including expired certificates) within the current PKI. The certificate archive is used for security incident investigations, which include verifying all data that has ever been signed.
The Request Center is the personal account of the Certification Center’s clients, where end users can request a new certificate or revoke an existing one. It is implemented most often in the form of a web interface for the registration center.
End users are clients, applications, or systems that own a certificate and use the public key management infrastructure.
3. How the Browser Works with SSL Certificates
3.1 What Happens in the Browser When the Certificate Is Checked?
Regardless of any extensions, browsers should always check a certificate’s basic information, such as the signature or the publisher. Steps for verifying Certificate Information:
1. Checking the integrity of the certificate. This is done with the cryptographic Verify operation with a public key. If the signature is invalid, then the certificate is considered fake: it has been modified after it was issued by a third party, so it is rejected.
2. Verifying the validity of the certificate. This is done with the cryptographic Decrypt operation, and by reading the accompanying information. The certificate is considered valid as long as the period for which the client has paid has not elapsed, or the expiration date has not passed. The expiration date of the certificate is the length of time for which the owner’s identity is validated by the Certifying Center that issued the certificate. Browsers reject any certificates with an expiration date that has expired before or started after the date and time of verification.
3. Checking the certificate revocation status. This is done with the cryptographic Decrypt operation, and loading and reconciliation with CRL. A number of circumstances, for example, law enforcement agencies’ appeals, the identification of a change in the source information or confirmation of the fact that the server's private key has been compromised, can make the certificate invalid before its expiration date. To do this, the certificate is added to the CRL on the side of the Certifying Center.
Certification authorities periodically release a new version of the signed CRL, and it is distributed in public repositories. Browsers access the latest version of the CRL when verifying the certificate. The main drawback of this approach is that it limits verification to the CRL issuance period. The browser will be informed of the revocation only after it receives the current CRL. Depending on the policy of the signing Certification Authority, the CRL update period can be calculated in weeks.
When working with TLSv2 and TLSv3, the browser can use the OCSP Network Certificate Status detection protocol described in RFC 6960. OCSP allows the browser to request the revocation status of a particular certificate online (the reply operation). If the OCSP is configured correctly, the verification of certificates in the CRL is much faster and avoids the use of actually revoked certificates until the next CRL update. There is an OCSP Stapling technology that allows you to include a copy of the response to the certificate status request from the Certifying Center in the headers of the HTTP responses of the web server, which in turn increases the performance and speed of data exchange.
4. Verification of the certificate publisher by the certificate chain.
Certificates are usually associated with several Certification Authorities: the root authority, which is the owner of the public key for signing certificates, and a number of intermediary ones, which refer to previous owners of the public key all the way up to the root one.
Browsers check the certificates of each Certifying Authority for being in the chain of trust with the root at the head. For added security, most PKI implementations also verify that the public key of the Certifying Authority matches the key with which the current certificate was signed. Thus, self-signed certificates are determined, because they have the same publisher only on the server where they were issued, or were added to the list of root certificates.
The X.509 v3 format allows you to determine which chain certificates should be checked. These restrictions rarely affect the average Internet user, although they are quite common in corporate systems at the development and debugging stage.
5. Checking the domain name restriction
The certification authority may restrict the validity of the certificate on a server with a specific domain name or a list of the organization's child domains. Domain name restrictions are often used for intermediate Certification Authority certificates purchased from a publicly trusted Certification Authority to exclude the possibility of issuing valid certificates for third-party domains.
6. Checking the certificate issuance policy
The Certificate Issuance Policy is a legal document published by the Certification Authority, which describes in detail the procedures for issuing and managing certificates. Certification authorities can issue a certificate in accordance with one or more policies, links to which are added to the information of the issued certificate so that the verifying parties can validate these policies before deciding whether to trust this certificate. For example, restrictions may be imposed on the region or time frame (for the period of technological maintenance of the Certification Center software).
7. Checking the length of the certificate chain
The X.509 v3 format allows publishers to define the maximum number of intermediate certification authorities that can support a certificate. This restriction was introduced after the possibility of forgery of a valid certificate was demonstrated in 2009 by including a self-signed certificate in a very long chain.
8. Verifying the public key assignment
The browser checks the purpose of the public key contained in the certificate encryption, signatures, certificate signature and so on. Browsers reject certificates, for example, if a server certificate is found with a key intended only for CRL signing.
9. Checking the rest of the chain certificates
The browser checks each certificate of the chain. If the verification data was completed without errors, then the entire operation is considered valid. If any errors occur, the chain is marked as invalid and a secure connection is not established.
3.2 How to View Certificate Information and Check that Everything Is Working Correctly
The security certificate can be checked directly in the browser. All modern browsers display certificate information visibly in the address bar. If a secure connection with a web resource is established, a lock icon is displayed on the left of the browser address bar. In case of an error, the crossed-out word "HTTPS" or an open lock icon will be displayed. Depending on the type of browser and its version, the type of icons and behavior when working with SSL certificates may differ. Below are examples of images for different versions of modern browsers:
Google Chrome
Mozilla Firefox
Opera
Microsoft Edge
Chrome for Android
Safari for iOS
To view the details of the certificate, click on the lock icon and in the subsequent menu, click on the option that outlines the security details. Information about the certificate will appear after clicking on the appropriate button or information link.
Google Chrome
Mozilla Firefox
Microsoft Edge
Chrome for Android
3.3 A Message that the Browser Does Not Trust the Certificate
Most browsers display a security warning. These warnings inform you that the certificate has not been verified by a trusted certificate authority.
There are a number of reasons why an SSL certificate may be considered invalid in the browser. The most common reasons are:
Errors in the certificate chain installation process, the intermediate certificate is missing;
The SSL certificate has expired;
The SSL certificate is valid only for the primary domain, not for subdomains;
A self-signed SSL certificate has been used, or the root certificate of the Certification Authority has not been added to the trusted list on the current device.
4. Certification Centers
4.1 More Details about the Certification Centers
As mentioned above, the main task of the Certification Center is to confirm the authenticity of encryption keys using electronic signature certificates. The overarching operating principle can be described by the phrase "users do not trust each other, but everyone trusts the Certifying Center."
Any HTTPS interaction is based on the fact that one participant has a certificate signed by the Certification Authority, and the other attempts to verify the authenticity of this certificate. Verification will be successful if both participants trust the same Certification Authority. To solve this problem, the Certification Center’s certificates are preinstalled in operating systems and browsers. If the Certification Authority itself has issued a certificate, it is called a root certificate. A certificate issued by a partner of the Certification Authority with which it has a trust relationship is called an intermediate certificate. As a result, a tree of certificates is formed with a chain of trust between them.
By installing the certificate of the Certifying Center in the system, you can trust the certificates that have been signed with it. A certificate (particularly for HTTPS) that is issued but not signed by a root or intermediate Certification authority is called a self-signed certificate and is considered untrusted on all devices where this certificate is not added to the root/intermediate lists.
According to the distribution level of certificates, the Certification Center can be international, regional, and corporate. The public key management infrastructure’s activities are carried out in accordance with the regulations of the appropriate level: i.e. public directives recorded by the international community of Internet users, the legislation of the region, or the relevant provisions of the organization.
The main functions of the certification center are:
verifying the identity of future certificate users;
issuing certificates to users;
revoking certificates;
maintaining and publishing lists of revoked certificates (Certificate Revocation List/CRL), which are used by public key infrastructure clients when they decide whether to trust a certificate.
Additional functions of the certification center are:
Generating key pairs, one of which will be included in the certificate.
Upon request, when resolving conflicts, the UC can verify the authenticity of the electronic signature of the owner of the certificate issued by this UC.
Browsers and operating systems of devices fix the trust of the Certifying Center by accepting the root certificate into their storage – a special database of root certificates of Certifying centers. The storage is placed on the user's device after installing the OS or browser. For example, Windows maintains its root certificate store in operating systems, Apple has a so-called trust store, Mozilla (for its Firefox browser) creates a separate certificate store. Many mobile operators also have their own storage. Regional and corporate should be added either at the stage of software certification in the country, or by contacting the technical support of the organization.
Regional representatives of the world Certification Centers have the authority to make legal requests for the activities of organizations related to the publication of web resources. For corporate Certification Centers, this is not necessary, since they usually have access to the internal information of the organization. For security purposes, Certification Authorities should not issue digital certificates directly from the root certificate transmitted to operators, but only through one or more Intermediate Certificate Authority, ICA. These intermediate Certification Authorities are required to comply with security recommendations in order to minimize the vulnerability of the root Certification authority to hacker attacks, but there are exceptions. For example, GlobalSign is one of the few certification authorities that have always (since 1996) used ICA.
Certificates come in different formats and support not only SSL, but also the authentication of people and devices, as well as certifying the authenticity of code and documents.
The universal algorithm for obtaining a certificate from the Certification Center:
1. Private key generation 2. Creation of a certificate signing request (CSR request) 3. Procurement of a certificate signed by the Certificate Authority’s root certificate after passing the checks 4. Configuration of the web server for your resource
Since browsers have a copy of the international Certification Authority’s root certificate, as well as a number of intermediate certificates from the chain of trust, the browser can check whether a certificate was signed by a trusted certification authority. When users or an organization create a self-signed certificate, the browser does not trust it as it knows nothing about the organization, so the root certificate of the organization must be manually added to all controlled devices. These certificates will become trusted after this.
4.2 What Are Root Certificates?
A root certificate is a file that contains service information about the Certification Authority. Special software or a library that verifies, encrypts and decrypts information is called a crypto provider (a provider of cryptographic functions). The cryptographer gets access to the encrypted information, thereby confirming the authenticity of the personal electronic signature.
A chain of trust for the certificates is then built based on the certifying center’s root certificate. Any electronic signature issued by the Certifying Center only works if there is a root certificate.
The root certificate stores information with the dates of its validity. The cryptographic provider can also get access to the organization's registry through the root certificate.
4.3 What Is a Certificate Chain?
Historically and technologically, certain Certification Centers are widely recognized among SSL users, and as a result, it was agreed that the certificates they issued would be considered root certificates, and they would always be trusted. Regional Certifying certificates, in turn, can be confirmed by the root Certifying center. In turn, they can confirm other certificates, forming a chain of trust to certificates. The Certifying Center acts as a guarantor-certifier which issues an SSL certificate at the request of the owner of a web resource.
The certificate and the web resource to which it is issued are certified by an electronic digital signature (EDS). This signature indicates who the owner of the certificate is and records its contents, that is, it allows you to check whether it has been changed by someone after it was issued and signed.
The list of certificates of root Certifying centers and their public keys is initially placed in the operating system’s software storage on the users' workstation, in the browser, and in other applications that use SSL.
If the chain of sequentially signed certificates ends with the root certificate, all certificates included in this chain are considered confirmed.
Root certificates located on the user's workstation are stored in a container protected by the operating system from accidental access. However, the user can add new root certificates themselves, and this is a source of potential security problems.
By carrying out certain actions and accessing an attacked workstation, an attacker can include their own certificate among the root certificates and use it to decrypt the data that is received.
The Root Certification Center can be formed by the government of a particular country or the leaders of an organization. In these cases, root Certification Centers will not operate everywhere, but they can nonetheless be used quite successfully in a specific country or within a specific enterprise.
At present, the list of root certification authorities on the user's computer can be automatically changed when updating the operating system, software products, or manually by the system administrator.
Certification centers can issue a variety of SSL certificates linked by what is known as a tree structure. The root certificate is the root of the tree, with the secret key with which other certificates are signed. All intermediate certificates that are at a lower level inherit the degree of trust that the root certificate has. SSL certificates located further down the structure receive trust in the same way from the Certifying Centers located higher up the chain. Using the example of the Comodo Certification Center, the structure of SSL certificates can explained as follows:
1. The root certificate of the Comodo Certification Authority: AddTrustExternalCARoot
2. Intermediate Certificates: PositiveSSL CA 2, ComodoUTNSGCCA, UTNAddTrustSGCCA, EssentialSSLCA, Comodo High-Assurance Secure Server CA
3. SSL certificates for individual domains
5. General Information about Certificate Types
5.1 Paid Trusted Certificates
The purchase of trusted certificates, except in some cases, is a paid service.
5.1.1 Where and How to Buy
In most cases in Russia, web resource hosting companies or partner organizations of international Certification centers provide SSL certificate services. It is possible to purchase certificates directly from Certification Centers, but such certificates are usually more expensive than from partners who purchase them in bulk.
The procedure for purchasing an SSL certificate is no different from purchasing other internet services. It entails:
1. Selecting a supplier and going to the SSL certificates order page.
2. Selecting the appropriate SSL certificate and clicking the purchase button.
3. Entering the name of your domain and selecting the protection option — for one domain or Wildcard certificate for a group of subdomains.
4. Paying for the service in whichever way is most convenient.
5. Continue configuring the service in accordance with the following parameters:
a. The number of domains that the certificate protects (i.e. one or more). b. Subdomain support. c. The speed of release. Certificates with domain-only validation are issued the quickest, while certificates with EV validation are issued the slowest. d. Most Certifiers offer unlimited certificate reissues. This is required if there are mistakes in the organization data. e. Warranty – for some certificates there is a $10,000 warranty. This is a guarantee not for the certificate buyer, but rather for the visitor of a site that installs a certificate. If a site visitor with such a certificate suffers from fraud and loses money, the Certification Center undertakes to compensate the stolen funds up to the amount specified in the guarantee. In practice, such cases are extremely rare. f. Free trial period – Symantec Secure Site, Geotrust Rapidssl, Comodo Positive SSL, Thawte SSL Web Server certificates have paid certificates. There are also free certificates. g. Refund – almost all certificates have a 30-day refund policy, although there are certificates without this.
5.1.2 Approximate Cost
SSL certificates can be separated into different groups based on their properties.
1. Regular SSL certificates. These are issued instantly and confirm only one domain name. Cost: from $20 per year.
2. SGC certificates. These support customers with increasing the level of encryption. Server Gated Cryptography technology allows you to forcibly increase the encryption level to 128 bits in older browsers that supported only 40 or 56 bit encryption. Cryptography is used to solve this problem, but it cannot cope with the other vulnerabilities present in unsecure browsers, so there are a number of root Certification centers that do not support this technology. Cost: from $300 per year.
3. Wildcard certificates. They provide encryption of all subdomains of the same domain by mask. For example, there is a domain domain.com; if the same certificate must be installed on support.domain.com, forum.domain.com and billing.domain.com, customers can issue a certificate for *.domain.com. Depending on the number of subdomains that need the certificate, it may be more cost-effective to purchase several ordinary SSL certificates individually. Examples of wildcard certificates: Comodo PositiveSSL Multi-Domain Wildcard and Comodo Multi-Domain Wildcard SSL. Cost: from $180 per year.
4. SAN Certificates Subject Alternative Name technology allows customers to use one certificate for several different domains hosted on the same server. Such certificates are also referred to as UCC (Unified Communication Certificate), MDC (Multi-domain certificate) or EC (Exchange Certificate). Generally, one SAN certificate includes up to 5 domains, but this number can be increased for an additional fee. Cost: from $395 per year.
5. Certificates with IDN support Certificates with national domain support (International Domain Name, such as *.US, *.CN, *.UK). Not all certificates can support IDN. This must be clarified with the Certification Center. Certificates supporting IDN include:
Thawte SSL123 Certificate;
Thawte SSL Web Server;
Symantec Secure Site;
Thawte SGC SuperCerts;
Thawte SSL Web Server Wildcard;
Thawte SSL Web Server with EV;
Symantec Secure Site Pro;
Symantec Secure Site with EV;
Symantec Secure Site Pro with EV.
As is mentioned above, partners of Certification Centers can provide significant discounts on prices — starting at $10 — or offer service packages.
5.1.3. Certificate Validation
Certificates are divided into the following levels of validation:
1. DV
Domain Validation, or certificates with domain validation. The certification authority verifies that the client who requests the certificate controls the domain that needs the certificate. A network service for verifying the ownership of WHOIS web resources is used to do this. This type of certificate is the cheapest and most popular, but it is not completely secure, since it contains only information about the registered domain name in the CN field (CommonName is the common domain name of a web resource).
2. OV
Organization Validation, or certificates with organization verification. The certification center verifies the affiliation of a commercial, non-profit or government organization to the client, who must provide legal information when purchasing. This type of certificate is seen as more reliable, since it meets the RFC standards and also confirms the registration data of the owner company in the following fields:
O (Organization – name of the organization);
OU (Organizational Unit – name of the organization's division);
L (Locality – name of the locality of the organization’s legal address);
S (State or Province Name – name of the territorial and administrative unit of the organization’s legal address);
C (Country Name – the name of the organization's country).
The certification center can contact the company directly to confirm this information. The certificate contains information about the person that confirmed it, but not data about the owner. An OV certificate for a private person is called IV (individual validation/ individual verification) and verifies the identity of the person requesting the certificate.
3. EV
Extended validation, or a certificate with extended validation. The Certification Center verifies the same data as the OV, but in accordance with stricter standards set by CA/Browser Forum. CA/Browser Forum (Certification Authority Browser Forum)is a voluntary consortium of certification authorities, developers of Internet browsers and software for secure email, operating systems, and other applications with PKI support. The Consortium publishes industry recommendations governing the issuing and management of certificates. This type of certificate is considered the most reliable. Previously, when using these certificates in a browser, the color of the address bar changed and the name of the organization was displayed. It is widely used by web resources that conduct financial transactions and require a high level of confidentiality. However, many sites prefer to redirect users to make payments to external resources confirmed by certificates with extended verification, while using OV certificates which are secure enough to protect the rest of the user data.
5.1.4. The Setup Process (General Information, What Is CSR?)
To initiate the certificate issuing process, a CSR request must be made. Technically, a CSR request is a file that contains a small fragment of encrypted data about the domain and the company to which the certificate is issued. The public key is also stored in this file.
The CSR generation procedure depends entirely on the software used on your server, and is most often performed using the settings in the administrative panel of your hosting. If your hosting does not provide this, then you can use online services to generate a CSR request, or alternatively you can turn to specialized software, such as OpenSSL, GnuTLS, Network Security Services, etc. After generating the CSR, the private key will also be generated.
To successfully generate a CSR, you need to enter data about the organization that has requested the certificate. The information must be entered in the Latin alphabet. The following parameters are sufficient:
Country Name — the country of registration of the organization in two-letter format. For the USA — US;
State or Province Name — region, region of registration of the organization. For New York — New York;
Locality Name — the city where the organization is registered. For New York — New York;
Organization Name — the name of the organization. For individuals, "Private Person" is indicated;
Common Name — the domain name of those who have requested the certificate;
Self–signed certificates are SSL certificates created by the service developers themselves. A pair of keys for them is generated through specialized software, for example, OpenSSL. Such a communication channel may well be used for internal purposes, i.e. between devices within your network or applications at the development stage.
5.3. Let’s Encrypt
Let's Encrypt is an Authentication Center that provides free X.509 cryptographic certificates for encrypting HTTPS data transmitted over the Internet and other protocols used by servers on the Internet. The process of issuing certificates is fully automated. The service is provided by the public organization Internet Security Research Group (ISRG).
The Let's Encrypt project was started to translate most of the Internet sites to HTTPS. Unlike commercial Certification centers, this project does not require payment, reconfiguration of web servers, use of e-mail, or the processing of expired certificates. This simplifies the installation and configuration of TLS encryption. For example, on a typical Linux-based web server, you need to run two commands that will configure HTTPS encryption, receive and install a certificate in about 20-30 seconds.
Let's Encrypt root certificates are installed as trusted by major software vendors, including Microsoft, Google, Apple, Mozilla, Oracle and Blackberry.
The Let's Encrypt Certification Authority issues DV certificates with a validity period of 90 days. It has no plans to start issuing OV or EV Certificates, although it began providing support for Wildcard certificates some time ago.
The key to the root certificate of the RSA standard has been stored in the HSM hardware storage since 2015 and is not connected to the network. This root certificate is signed by two intermediate root certificates, which were also signed by the IdenTrust certification authority. One of the intermediate certificates is used to issue sites’ final certificates, while the second is kept as a backup in storage that is not connected to the Internet, in case the first certificate is compromised. Since the root certificate of the IdenTrust center is preinstalled in most operating systems and browsers as a trusted root certificate, the certificates issued by the Let's Encrypt project are verified and accepted by clients — despite the absence of the ISRG root certificate in the trusted list.
The Automated Certificate Management Environment (ACME) authentication protocol is used to automatically issue a certificate to the destination site. In this protocol, a series of requests are made to the web server that seeks a signature for the certificate to confirm the ownership of the domain (DV). To receive requests, the ACME client configures a special TLS server, which is polled by the ACME server using Server Name Indication (Domain Validation using Server Name Indication, DVSNI).
Validation is carried out repeatedly, using different network paths. DNS records are pulled from a variety of geographically distributed locations to prevent DNS spoofing attacks. This is when domain name cache data is changed by an attacker in order to return a false IP address and redirect the intermediary to the attacker's resource (or any other resource on the network)1.
6. Paid Trusted Certificates
6.1 Usage on Windows Server and IIS
6.1.1 What Are the Formats of the Private Key?
These are today’s private key formats:
1. PEM format
This format is most often used by Certification Authorities. PEM certificates most often have extensions *.pem, *.crt, *.cer or *.key (for private keys) and others. For example, the package file SSL.com The CA available in the download table in the order of the certificate has the extension *.ca-bundle. The contents of the files are encrypted using Base64 and contain the strings "--BEGIN CERTIFICATE--" and "--END CERTIFICATE--".
This certificate format is common in Linux OS. Multiple PEM certificates and even a private key can be included in one file, one under the other. But most servers, such as Apache, expect the certificate and private key to be in different files.
2. PKCS#7/P7B format
PKCS#7 or P7B format certificates are usually saved in Base64 ACVII format and have the extension *.p7b or *.p7c. The P7B certificate contains the strings "--BEGIN PKCS7--" and "--END PKCS7--". This format contains only the certificate and certificate chain, but not the private key. Several commonly-used platforms support this format, including Microsoft Windows and Java Tomcat.
3. PKCS#12/PFX format
PKCS#12 or PFX format is a binary format for saving a certificate, any intermediate certificates, and a private key in one encrypted file. PFX files are usually saved with the extension *.pfx or *.p12. As a rule, this format is used on Windows certificates to export/import the certificate and private key 2.
6.1.2 How to Generate a CSR Request
To generate a CSR request in IIS 10, perform the following operations:
1. Run IIS from the iis.msc command line or from the visual interface.
2. Select your server from the Connections list and click the Server Certificates button.
3. On the Server Certificates page, click the Create Certificate Request link in the Actions block.
4. In the Request Certificate window of the wizard, fill in the CSR fields and click Next.
5. In the Cryptographic Service Provider Properties window of the wizard, select the required cryptographic provider, depending on the desired algorithm and the key length, and then click Next.
6. In the File Name window of the wizard, specify the path to the CSR being created, and then click Finish.
To send the finished CSR to the Certification Center, open the file in a text editor and copy the contents to the web form of the certificate provider.
6.1.3 How to Create a Private Key
As a result of creating the CSR, the private key will be created automatically by IIS. Viewing is available on the Certificates console snap-in in the Personal or Web Hosting points of the certificate tree.
The snap-in can be hidden in the console. To add it, run the mmc command in Start menu > Run and in the window that appears, add the Certificates snap-in to the list available on the local machine:
6.1.4 How to Export It
To export a private key for backup purposes or to configure a new server, follow these steps:
1. Find the certificate in the Certificates snap-in of the management console, and right-click on it. In the context menu that appears, click on the menu item All Tasks > Export;
2. In the Welcome to the Certificate Export wizardwindow of the Certificate Export Wizard, click Next and then in the Export Private Key window, set the switch to Yes, export the private key, and then click Next;
3. In the Export File Format window of the wizard, select the type item Personal Information Exchange – PKCS #12 (.PFX) and select the checkbox Include all certificates in the certification path if possible. Then click Next. Be aware that if the Delete the private key if the export is successful checkbox is checked, the private key created on the current server will be deleted after export;
4. In the Security wizard window, fill the Password checkbox and enter the password twice to protect the private key. It will be required for the subsequent import. Additionally, it is recommended that Active Directory users or groups that have the ability to use a private key are restricted. To do this, fill the Group or User Name checkbox and select Required Groups or Users, then click Next;
5. In the File to Export window of the wizard, specify the path to the exported file with the private key and its name. To do this, enter it manually or use the system file search dialog box, then click Next;
6. In the File to Export window of the wizard, specify the path to the exported file with the private key and its name. To do this, enter it manually or use the system file search dialog box, and then click Next. In the next window Completing the Certificate Export Wizard, a list of the installed settings will appear. Click Finish. The exported file will appear in the specified directory.
6.1.5 How to Configure SSL on IIS
To configure SSL in IIS, follow these steps:
1. Run IIS from the iis.msc command line or from the visual interface.
2. Select your server from the Connections list and click on the Bindings... link in the Actions block.
3. In the Site Bindings window, click Add.
4. In the Add Site Bindings window, fill in the following fields and click OK.
IP address – select the IP addresses of the servers with which the certificate will be associated from the drop-down list or click the All Unassigned button to associate the certificate with all servers.
Port – leave the value 443. This is a standard SSL port.
SSL certificate – select the required SSL certificate from the drop-down list.
The setup is finished, you can check the operation of the web service. If the private key is missing, then import it in the Certificates snap-in of the Management console. To do this, select the desired resource and right-click on it. Then, in the context menu that appears, click on the menu item All Tasks > Import, and follow the instructions of the wizard.
6.2 Usage on Linux
6.2.1 How to Create a Private Key
The private key that has been created can be obtained in the interface of the SSL certificate provider after sending the CSR or using specialized software, such as OpenSSL, for example.
Below is a fragment of private key generation in the web interface of the SSL certificate provider.
If the private key was created in the web interface, then the export is carried out by clicking the button there. After clicking on the button, the browser starts downloading the archive with the key file in the desired format.
To create a private RSA key using OpenSSL, one command is enough:
openssl genrsa -out rsaprivkey.pem 2048
This command generates the PEM private key and stores it in the rsaprivkey.pem file. In our example, a 2048-bit key is created, which is suitable for almost all situations.
To create a DSA key, you need to perform two steps:
The first step creates a DSA parameters file (dsaparam.pem), which in this case contains instructions for OpenSSL to create a 2048-bit key in step 2. The dsaparam.pem file is not a key, so it can be deleted after the public and private keys are created. In the second step, a private key is generated (dsaprivkey.pem file), which must be kept secret.
To create a file in the PKCS#12 format used in Windows OS, use the following command:
export – the operation of exporting the private key to the required format;
out – the directory in the file system where the resulting file should be placed;
inkey – private key file in PEM format;
in – file of the certificate received from the Certifying Center;
certfile is a copy of the root certificate and intermediate certificates in the chain. In the example above, they are missing.
6.2.2 How to Generate a CSR Request
To generate a CSR, fill in the suggested fields in the web form of the SSL certificate service provider. The figure above demonstrates an example of this. The set of minimum required fields is the same and is given in the section about CSR description, but some vendors can add their own or change the input method.
To generate CSR using OpenSSL, use the following command:
new – creating a new CSR request by direct input in the console. Without this option, the OpenSSL configuration file data will be used;
key – the name of the private key required for generation. If the option is not specified, a new private key will be created according to the default algorithm;
out – the path to the CSR file being created;
sha256 is an encryption algorithm.
After executing the command, a request to fill in the required fields will appear in the console.
Then send the resulting CSR to the Certifying Center. In response, a personal certificate must be returned.
6.2.3 How to Configure SSL for Apache
Follow these steps to configure SSL in Apache:
1. Add the personal certificate issued by the Certification Authority, the private key, and the root certificate to the /etc/ssl/ directory — along with the rest of the certificates in the chain.
2. Open the Apache configuration file with any text editor: vim, for example. Depending on the server OS, the file may be located in one of the following locations:
for CentOS: /etc/httpd/conf/httpd.conf;
for Debian/Ubuntu: /etc/apache2/apache2.conf;
3. If you are installing an SSL certificate on an OpenServer, use the path to its root folder. At the end of the file, create a copy of the "VirtualHost" block. Specify port 443 for the block and add the following lines inside:
SSLEngine on
SSLCertificateFile /etc/ssl/domain_name.crt
SSLCertificateKeyFile /etc/ssl/private.key
SSLCertificateChainFile /etc/ssl/chain.crt
4. Check the Apache configuration before restarting with the command: apachectl configtest, then restart Apache.
6.2.4 How to configure SSL for Nginx
Follow these steps to configure SSL in Nginx:
1. Open a text editor and add the contents of the personal certificate issued by the Certification Authority, and the root certificate — along with the rest of the certificates in the chain. The resulting file should look like this:
2. Save the resulting file with the *.crt extension to the /etc/ssl/ directory. Please note: the second certificate should come directly after the first, without any empty lines.
3. Save the your_domain file.key with the certificate's private key in the /etc/ssl directory.
4. Open the Nginx configuration file and edit the virtual host of your site that you want to protect with a certificate. Perform the minimum setup for the job by adding the following lines to the file:
/etc/ssl/your_domain.crt — the path to the file created with three certificates;
/etc/ssl/your_domain.key — the path to the file with the private key.
The names of files and directories can be arbitrary.
Additionally, you can configure the operation of the site over HTTP, the type of server cache, the cache update timeout, and the operating time of a single keepalive connection. You can also configure the supported protocols and their level of priority (server set or client set), as well as OCSP responses for certificate validation. Details are given in the Nginx user manual.
5. For the changes to take effect, restart the Nginx server with the following command:
sudo /etc/init.d/nginx restart
7. Self-Signed Certificates
7.1 Usage on Windows Server and IIS
7.1.1 How to Create a Private Key
You can create a private key with IIS by creating a CSR and then actioning the above instructions.
7.1.2 How to Create a Self-Signed Root Certificate
To generate a self-signed root certificate in IIS 10, perform the following operations:
1. Run IIS from the iis.msc command line or from the visual interface.
2. Select your server from the Connections list and click on the Server Certificates button.
3. On the Server Certificates page, click the Create Domain Certificate link in the Actions block.
4. In the Distinguished Name Properties window of the Create Certificate wizard, fill in the Common Name field (the server name specified in the browser), the remaining fields that were filled when creating the CSR, and click Next.
5. In the Online Certification Authority window of the wizard, specify in the Specify Online Certification Authority field the repository where you want to place the root certificate. In the Friendly Name field, specify the name of the certificate, and then click Finish.
7.1.3 How to Create an SSL Certificate Signed by the Root
To generate a self-signed SSL certificate in IIS 10, perform the following operations:
1. Run IIS from the iis.msc command line or from the visual interface.
2. Select your server from the Connections list and click on the Server Certificates button.
3. On the Server Certificates page, click the Create Self-Signed Certificate link in the Actions block.
4. In the ‘Create Self-Signed Certificate’ window in the ‘Friendly Name’ field, specify the name of the certificate in the ‘Select a Certificate Store for the New Certificate’ field. Then, select the repository in which the self-signed certificate will be stored, and click OK.
7.1.4 How to Configure IIS for a Self-Signed Certificate
IIS configuration for Configuring IIS for a self-signed certificate requires the same process as a certificate issued by a Certification Authority.
7.2 Usage on Linux
7.2.1 How to Create a Private Key
Creating a private key using the genrsa command and other similar ones in OpenSSL is described above.
7.2.2. How to Create a Self-Signed Root Certificate
To generate a self-signed root certificate in OpenSSL, run the following command:
7.2.4. How to Configure Apache for a Self-Signed Certificate
Apache configuration for a self-signed certificate is performed in the same way as for a certificate issued by a Certification Authority.
7.2.5. How to Configure Nginx for a Self-Signed Certificate
Nginx configuration for a self-signed certificate requires the same process as a certificate issued by a Certification Authority.
7.3 How to Make Self-Signed Certificates Trusted
7.3.1 On Windows
To make a self-signed certificate trusted, follow these steps:
1. Find the repository of trusted certificates in the Certificates snap-in of the management console. Right-click on it, and then in the Context Menu that appears, click on the menu item All Tasks > Import;
2. In the Welcome to the Certificate Import wizard window of the Certificate Import wizard, click Next. Then, in the File to Import window, specify the path to the imported file with the self-signed certificate. To do this, either enter it manually or use the system file search dialog box. Afterwards, click Next.
3. In the Private Key Protection window of the wizard, enter the password specified when creating the self-signed certificate. Set the checkboxes Mark this key as exportable to allow further export of the certificate for backup purposes, and Include all extended properties, then click Next. Further export will only work if the private key is available.
4. In the Certificate Store window of the wizard, turn on Place all certificates in the following store, select the Trusted Root Certification Authorities repository, and then click Next. In the next window Completing the Certificate Import Wizard, you will see a list of the installed settings. Click Finish. The imported file will appear in the specified repository.
7.3.2 On macOS
To add a self-signed certificate to trusted certificates, follow these steps:
1. Open the Keychain Access application by clicking on the icon below and go to the All Items menu item.
2. Use Finder to find the self-signed certificate file (*.pem, *.p12 or other).
3. Drag the file to the left side of the Keychain Access window.
4. Go to the Certificates menu item, find the self-signed certificate that has been added and double-click on it.
5. Click on the Trust button in the drop-down menu and set the When using this certificate field from System Defaults to Always Trust.
7.3.3 On Linux
To add a self-signed certificate to trusted ones in Linux OS (Ubuntu, Debian), follow these steps:
1. Copy the root self-signed certificate file to the /usr/local/share/ca-certificates/ directory. To do this, run the command sudo cp foo.crt /usr/local/share/ca-certificates/foo.crt, where foo.crt is the personal certificate file.
2. Run the sudo update-ca-certificates command.
To add a self-signed certificate to trusted certificates in Linux OS (CentOS 6), follow these steps:
1. Install the root certificates using the command: yum install ca-certificates.
2. Enable the dynamic configuration mode of root certificates: update-ca-trust force-enable.
3. Add the certificate file to the directory /etc/pki/ca-trust/source/anchors/: cp foo.crt /etc/pki/ca-trust/source/anchors/.
4. Run the command: update-ca-trust extract.
7.3.4 On iOS
To add a self-signed certificate to trusted certificates, follow these steps:
1. Install any web server and place the certificate file in the root of the application directory.
2. Go to the URL of the web server, after which the file will be downloaded to the profile of the current user.
3. Open the Profiles menu and click Install.
4. Go to Settings > General > About-> Certificate Trust Settings and set the switch for the certificate to Enabled.
7.3.5 On Android
To make a self-signed certificate trusted, follow these steps:
1. Download the file to the device.
2. Go to Settings > Security > Credential Storage and tap Install from Device Storage.
3. Find the *.crt that has been downloaded and enter its name in the Certificate Name field. After it has been imported, the certificate will be displayed in Settings > Security > Credential Storage > Trusted Credentials > User.
7.3.6 How to Make a Root Certificate Trusted in Windows AD Group Policies
To make a root certificate trusted in Windows Active Directory Group Policies, follow these steps:
1. Run the Group management snap-in from the gpmc.msc command line.
2. Select the desired domain, right-click on it, and select Create a GPO in this domain and link it here.
3. Specify the name of the group policy in the window that appears and click OK.
4. Right-click on the created group policy and click Edit.... On the next screen, go to Computer Configuration > Policies > Administrative Templates > Windows Components > Windows Update. Select Allow signed content from intranet Microsoft update service location and click Edit Policy Settings.
5. Set the switch to Enabled and click OK.
6. Go to Computer Configuration>Windows Settings >Security Settings>Public Key Policies and trust the required certificate in accordance with the instructions above.
7. Repeat step 4 and close the Group Policy Editor. The policy will be applied shortly. To apply it immediately, run gpupdate /force on the command line.
8. Let’s Encrypt
8.1 Usage on Windows Server and IIS
8.1.1 How to Issue a Certificate
To install the Let's Encrypt certificate, an ACME client must be installed on the server. The following implementations are common for Windows:
The Windows ACME Simple Utility (WACS) is a command–line utility for interactively issuing a certificate and binding it to a specific site on your IIS web server;
The ACMESharp Powershell module is a Powershell library. It has many commands for interacting with Let's Encrypt servers via the ACME API;
Certify is a graphical SSL certificate manager for Windows that allows you to interactively manage certificates via the ACME API.
To issue a Let's Encrypt certificate using WACS, follow these steps:
2. Open a command prompt and run the client wacs.exe from the specified location.
3. Press the N key. This will create a certificate for IIS.
4. Select the certificate type: DV for one domain, DV for all domains in IIS (SAN), domains corresponding to Wildcard, or a manual list of domains in IIS.
5. Depending on the choice, WACS.exe will display a list of sites running on the IIS server and will prompt you to select the desired site.
6. After selecting the site, provide an email address to receive information about problems including site certificate updates (several addresses can be given if they are separated by commas).
7. Agree to the terms of use by pressing the Y key, after which Windows ACME Simple will connect to Let's Encrypt servers and try to automatically generate a new SSL certificate for the site 3.
8.1.2 How to Configure IIS for Let's Encrypt Certificate
The WACS utility saves the certificate's private key (*.pem), the certificate itself, and a number of other files to the directory C:\Users\%username%\AppData\Roaming\letsencrypt-win-simple . It will then install the generated Let's Encrypt SSL certificate in the background and bind it to your IIS site.
To install the Let's Encrypt certificate, the ACME client must be installed on the server. For Linux, this is the Certbot utility.
To issue a Let's Encrypt certificate using Certbot, follow these steps:
1. Install Certbot according to the instructions on the website https://certbot.eff.org / to the server. 2. Execute the certificate issue command: certbot --nginx or certbot --apache. When launching for the first time, an email address for receiving information about problems site certificate updates and other alerts may be required.
Certbot will analyze the ServerName directive that corresponds to the domain name with the requested certificate in the web server’s configuration files. If you need to specify multiple domains or wildcard, use the command line key -d.
8.2.2 How to Configure IIS for a Let's Encrypt Certificate
After executing the certbot command, the web server configuration will be updated automatically. The certbot client will display a successful completion message, and will also show the path to the directory where the certificates are stored.
9. Certificate Renewal for Linux and Windows
9.1 Paid Trusted
When extending the validity of the SSL/TLS certificate, creating a new CSR request is recommended. Generating a new request will create a new unique key pair (public/private) for the updated certificate.
The web interface of many SSL certificate providers allows you to renew the certificate manually or automatically. After renewing, the user will receive a new reissued certificate. This needs to be reconfigured again in accordance with the instructions above.
9.2 Self-Signed
Self-signed certificates are renewed by recreating and configuring the web server in accordance with the instructions described above.
9.3 Let’s Encrypt
9.3.1 On Windows
Windows ACME Simple creates a new rule in the Windows Task Scheduler (called win-acme-renew) to automatically renew the certificate. The task is started every day, and the certificate renewal itself is performed after 60 days. When extending, the scheduler runs the command:
C:\\<path to the WACS directory>\\wacs.exe --renew --baseuri "<https://acme-v02.api.letsencrypt.org >"
You can use the same command to manually update the certificate.
9.3.2 On Linux
To renew the certificate via certbot, you need to run the following command:
certbot Renew --force-Renewal
To specify a specific domain, use the -d parameter.
10. Testing
10.1 Services (SSL Checkers) that Allow You to Check SSL Tinctures on a Public Server
SSL verification is carried out using online services provided by Certification Centers, as well as third-party developers such as:
These services allow you to gain information about certificates, domains, organizations, cities, serial numbers, algorithms used, their parameters (such as key length) and details about the certificate chain.
10.2 Verification of the Entire Certificate Chain
The entire certificate chain is verified by SSL Shopper, Symantec SSL Toolbox and SSL Checker. The links are given above.
10.3 Checking on iOS (via a Special App)
To check certificates on iOS devices, install the SSL Checker app from the App Store. With this application, you can check the current status and validity of the SSL certificate of any server, including self-signed certificates. The application can detect changes in the certificate parameters and send notifications about it.
10.4 Checking on Android
To check certificates on Android devices, install the SSL Certificate Checker application from Google Play. Using this application, you can check the current status and attributes of the SSL certificate of any server, including the certificate chain.
Are you sure that your home is protected in the way that you think? Sure, you can secure it with modern locks or an alarm system to protect yourself from robbers who want to steal your money or furniture, but what about those who are looking at your home as a means of stealing your privacy?
As the number of smart electronic devices we use every day increases, we have to make sure that the personal information that is recorded by these devices is safe.
So let’s talk about home security and how to protect yourself from those that are looking for ways to hack your smart devices.
Which smart devices can be hacked?
Almost every smart system used with modern devices is potentially dangerous as hackers know hundreds of ways to obtain remote access to them. But still, some devices seem too ordinary and primitive to be hacked. Perhaps a robot vacuum cleaner or a smart baby monitor. But there are more sophisticated technologies like a smart TV or smart house security system. They're all vulnerable since they're connected to the internet and are frequently part of your home Wi-Fi network. Recent research showed that every one of them has several serious security flaws.
What are the risks?
Many experts note that when it comes to smart home devices, you should be thinking about ‘when’ they will be hacked, not 'if,' because many are notoriously easy to hack and provide no protection whatsoever. Scientists from the European watchdog Eurovomsumers examined 16 regularly used devices from a variety of manufacturers and discovered 54 vulnerabilities that exposed consumers to hacker attacks, with potential implications ranging from security system deactivation to personal data theft.
According to the results of research, hackers can gain access to highly sensitive information such as banking credentials or even utilise many linked devices to stage enormous distributed denial of service (DDOS) operations, which allows them to ruin banking or other service networks.
Whenever most internet users realise the vulnerabilities associated with the usage of computers connected to the Internet, many people still do not pay enough attention to the fact that their home smart devices also present the same danger. As all home devices are commonly connected to the same Wi-Fi network, it gives an opportunity for hackers to get access to all domestic technologies at the same time.
Security gaps
One of the most significant dangers that are presented by smart home devices is the potential for a ‘deauthentication attack’, in which a hacker orders the device to disconnect from the house Wi-Fi. It may cause the blocking of systems and devices, which won’t be able to respond to users’ requests as a result. It was also discovered that some apps designed for home appliances are able to transfer unencrypted data. It means that if hackers break into their system, they’ll gain access to the owner's personal information, such as Wi-Fi passwords or even listen to what happens around the device if it’s equipped with a microphone. A stolen WiFi password may provide hackers access to phones or computers connected to this network and lead to an eventual data leak.
Due to the gaps in security systems, smart devices often have flaws that make them vulnerable to attack. Designers of these devices focus on the comfort of exploitation and multifunctionality of their products, but not on their security. But now, when almost everything from house alarms to refrigerators can be hacked, it becomes a paramount point.
Recent research that took place in America and Europe has shown that about a half of interviewees use smart home devices, but most of them do nothing to protect themselves from being compromised. Thus, even though people know about the risks, they still do nothing to minimize them. One of the possible reasons for such behavior is the lack of knowledge and accessible information about how to make the usage of smart home devices secure.
How can you secure your home devices?
Of course, the most basic way to protect yourself from the hacking of your smart home devices is just not to use them and replace them with less functional but safer options. But what if you can’t go without such a pleasure? Well, Euroconsumers — one of the most well-known private organizations for consumers — developed a list of recommendations that can help people who want to maintain their privacy while using smart devices:
1. Use an ethernet cable instead of Wi-Fi to connect your devices to the network where possible;
2. Create strong multilayered passwords for your devices and Wi-Fi;
3. After installing your Wi-Fi network, always change the default name;
4. Always keep your devices up-to-date and switch them off if you’re not using them at a certain moment;
5. When you use a device for the first time, always finish the setup procedure;
6. Do not buy cheap devices with a low level of protection.
Conclusion
When we’re talking about smart devices, we’re not just talking about full smart house systems such as alarms. Rather, we’re talking about smart appliances such as TVs, doorbell systems, vacuum cleaners, and other common household things. Using them makes our lives more comfortable and saves time and energy. However, they each have their own flaws, and many are vulnerable when it comes to hacking. So, consumers should pay attention to this point of using smart devices and consider all possible ways to protect their privacy without refusing to exploit such useful appliances. If you use one of these devices, try to get more information regarding what manufacturers pay more attention to regarding the security of their goods. Moreover, make sure to protect your own devices from hacking. It won’t take a lot of time or effort, but it will save your sensitive data and protect you from being compromised.
Which words pop into your head when creating a password for your new account on a website or on a social network? Safety? Privacy? Well, there’s some bad news for you here — in our digital world, hackers are clued-up on hacking any kind of password that you can think into existence, and as a matter of fact, it’s a global problem. Users of the internet can never be sure that their accounts are protected enough to prevent data theft. Even global organizations such as Facebook can be the subject of cyber-attacks. And we mention the social giant for good reason too — in March 2020, the British company Comparitech stated that the data of more than 267 million people was leaked.
Ergo, it’s of paramount importance to know which techniques cybercriminals use to hack your password and steal your private information. There are a great number of methods that hackers can use to deceive people in order to steal private credentials and data. That’s why, today, we’re going through the most common techniques that can be used, so you’ll be in the know and much more secure online as a result.
1. Phishing
The easiest and most common way of hacking someone’s password is phishing. There are plenty of techniques here: phishing can take the form of an email, an SMS, a direct message on a social media platform, or a public post on a website. Cybercriminals spread a link or attachment that hooks an internet user in. Pushing leads a victim to a fake log-in page where he or she has to enter their data. After hacking, the hackers get a variety of data that can be used for any purpose. This way, people get their sensitive information served on a silver platter. As this technique is one of the oldest ones in the book, most users are aware of such a ploy. Almost everyone knows that following a suspicious link on the internet is a sure way of compromising yourself. Indeed, that’s why emails from unknown addresses tend to fall straight into the spam box and we’re used to blocking unknown numbers.
2. Social engineering
This type of cyberattack is based on the mistakes and imprudence that come as standard with the human brain. A criminal tricks the victim by acting like he or she is a real agent of an official company. It might be a fake call from your bank or some kind of technical support branch. You’ll likely be asked to provide confidential data so that the ‘agent’ may investigate ‘suspicious activity’ on your bank account. Usually, social engineering is mostly successful in manipulating pensioners due to their often dull mental blade and trusting nature. This technique is quite widespread and is much easier than creating an entire fake website to phish someone’s password.
3. Brute force attack
Brute force attacks are best characterized by the long, heavy method of checking each possible password variant. This way is really time-consuming, so most hackers use special software to automate the process. Most of the time, such attacks are based on knowledge gained from previous cracks as users often reuse their passwords on multiple websites and platforms. Also, cybercriminals might try lists of common variations of letters and numbers. That’s why, to protect yourself from such attacks, you should use as many symbols as possible and create passwords from unconnected words and unpredictable alpha-numerical compilations. Alternatively, you could use a password manager to automate this struggle (nudge nudge).
4. Dictionary attack
The dictionary attack partly resembles the previous method (brute force attack), the main idea of such a cyber attack is to submit all possible password variations by taking words from the dictionary. It makes the process of researching the right combination easier due to the strict structure of the dictionary. Moreover, it takes less time to crack the password If the hacker knows some sensitive information about the victim, like the name of their child, pet, or favorite color, for instance. Indeed, predictable human nature is the reason why this is such an effective method. To eliminate the possibility of such a cyberattack, it’s worth mixing semantically unconnected words, numerals, and other symbols. The best way, of course, is to get a password manager (nudge nudge).
5. Rainbow table attack
Passwords stored on the victim’s computer are usually encrypted. The plain text is replaced by various strings (hashes) to prevent data leaks. This method is named ‘hashing’. However, this method doesn’t guarantee that the password won’t be cracked; hackers are very familiar with such multi-layer security. The ‘rainbow table’ is a list of passwords and their hashes that have already been acquired through previous attacks. Hackers try to decrypt hashes by figuring out the correct combination based on different variations from the rainbow table. As a result, the password’s code may be retrieved from the database, removing the necessity to hack it. A good way to mitigate the risks of such an attack is to use software that includes randomly generated data in the password before hashing it.
6. Spidering
Many companies base their passwords on the names of the products they produce to help their staff remember the credentials that they need to access corporate accounts. Spidering is a type of cyberattack that uses this information to hack the company’s system and exploit the obtained information for malicious purposes. They surf the sites of organizations and learn about their businesses. Then, this knowledge is used to make a list of keywords that can be exploited in brute force attacks. As this process is quite time-consuming, experienced hackers utilize automatic software such as the infamous ‘web crawler’.
7. Malware
Malware is a harmful kind of software created to steal private information from the computer that it has been installed on. The victim gives access to his or her computer by clicking on a link specially made by cybercriminals. While this technique has various forms, the most common are keyloggers and screen scrapers that take a video of a user's screen or screenshots when passwords are being entered. They then send this data to the hacker. Some kinds of malware can encrypt a system’s data and prevent users from accessing certain programs. Others can look through users’ data to find a password dictionary that can be used in a variety of ways.
The amount of techniques being used by hackers to crack our passwords is increasing exponentially. The more ways there are to prevent break-ins, the more work hackers ought to do to get around them. That’s why, you should leave it to us, Passwork, your neighborly password managing wizards, to lift the burden from your shoulders.
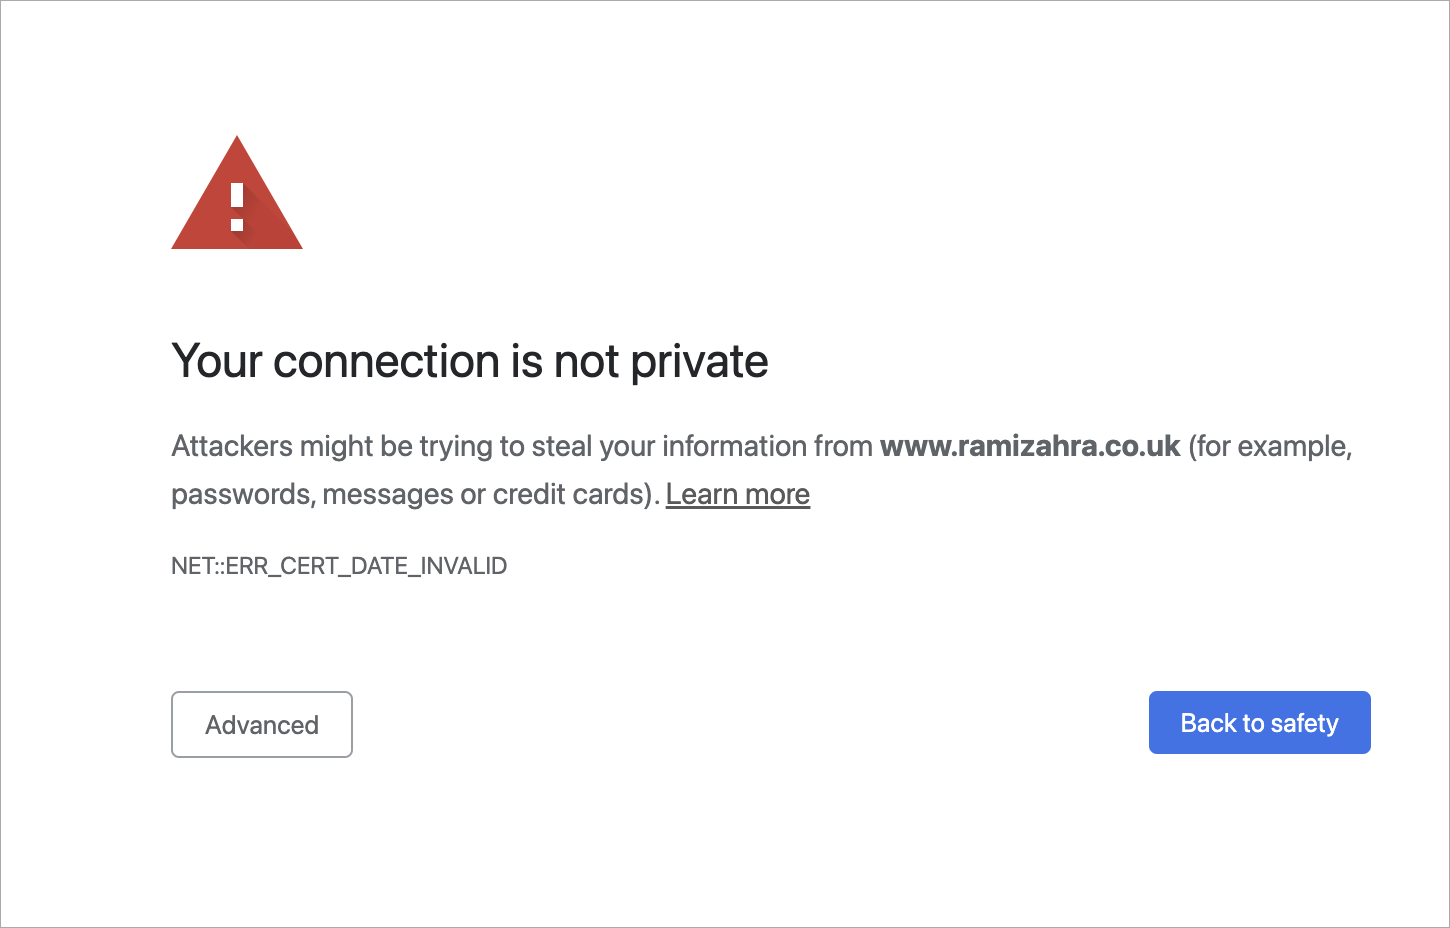
Many times, we’ve mentioned self-signed certificates and their most common use cases in our blog. After all, the main difference between a regular certificate and a self-signed one is that in the latter case, you act as the CA (Certificate Authority). But there are a variety of services that provide CA services for free, with the most popular being ‘Let’s Encrypt’, which is going to be the subject of this article.
What’s that?
‘Let’s Encrypt’ is a free certificate authority developed by the Internet Security Research Group (ISRG).
It provides free TLS/SSL certificates to any suitable client via the ACME (Automatic Certificate Management Environment) protocol. You can use these certificates to encrypt communication between your web server and your users. ‘Let's Encrypt’ provides two types of certificates. Single-domain SSL and Wildcard SSL, which covers a single domain and all of its subdomains. Both types of SSL certificates have a 90-day validity period. These domain-validated certificates do not require a dedicated IP address. They accomplish this by delivering the client a unique token and then retrieving a key generated from that token via an HTTP or DNS request.
There are dozens of clients available which can be easily integrated with a variety of standard administrative tools, services, and servers. They also come written in a range of different computer languages.
We'll use the win-acme client in this tutorial because it's a basic, open-source, and constantly updated command-line application. It not only produces certificates but also automatically installs and renews them. And yes, this tutorial is for Windows users.
How does it work?
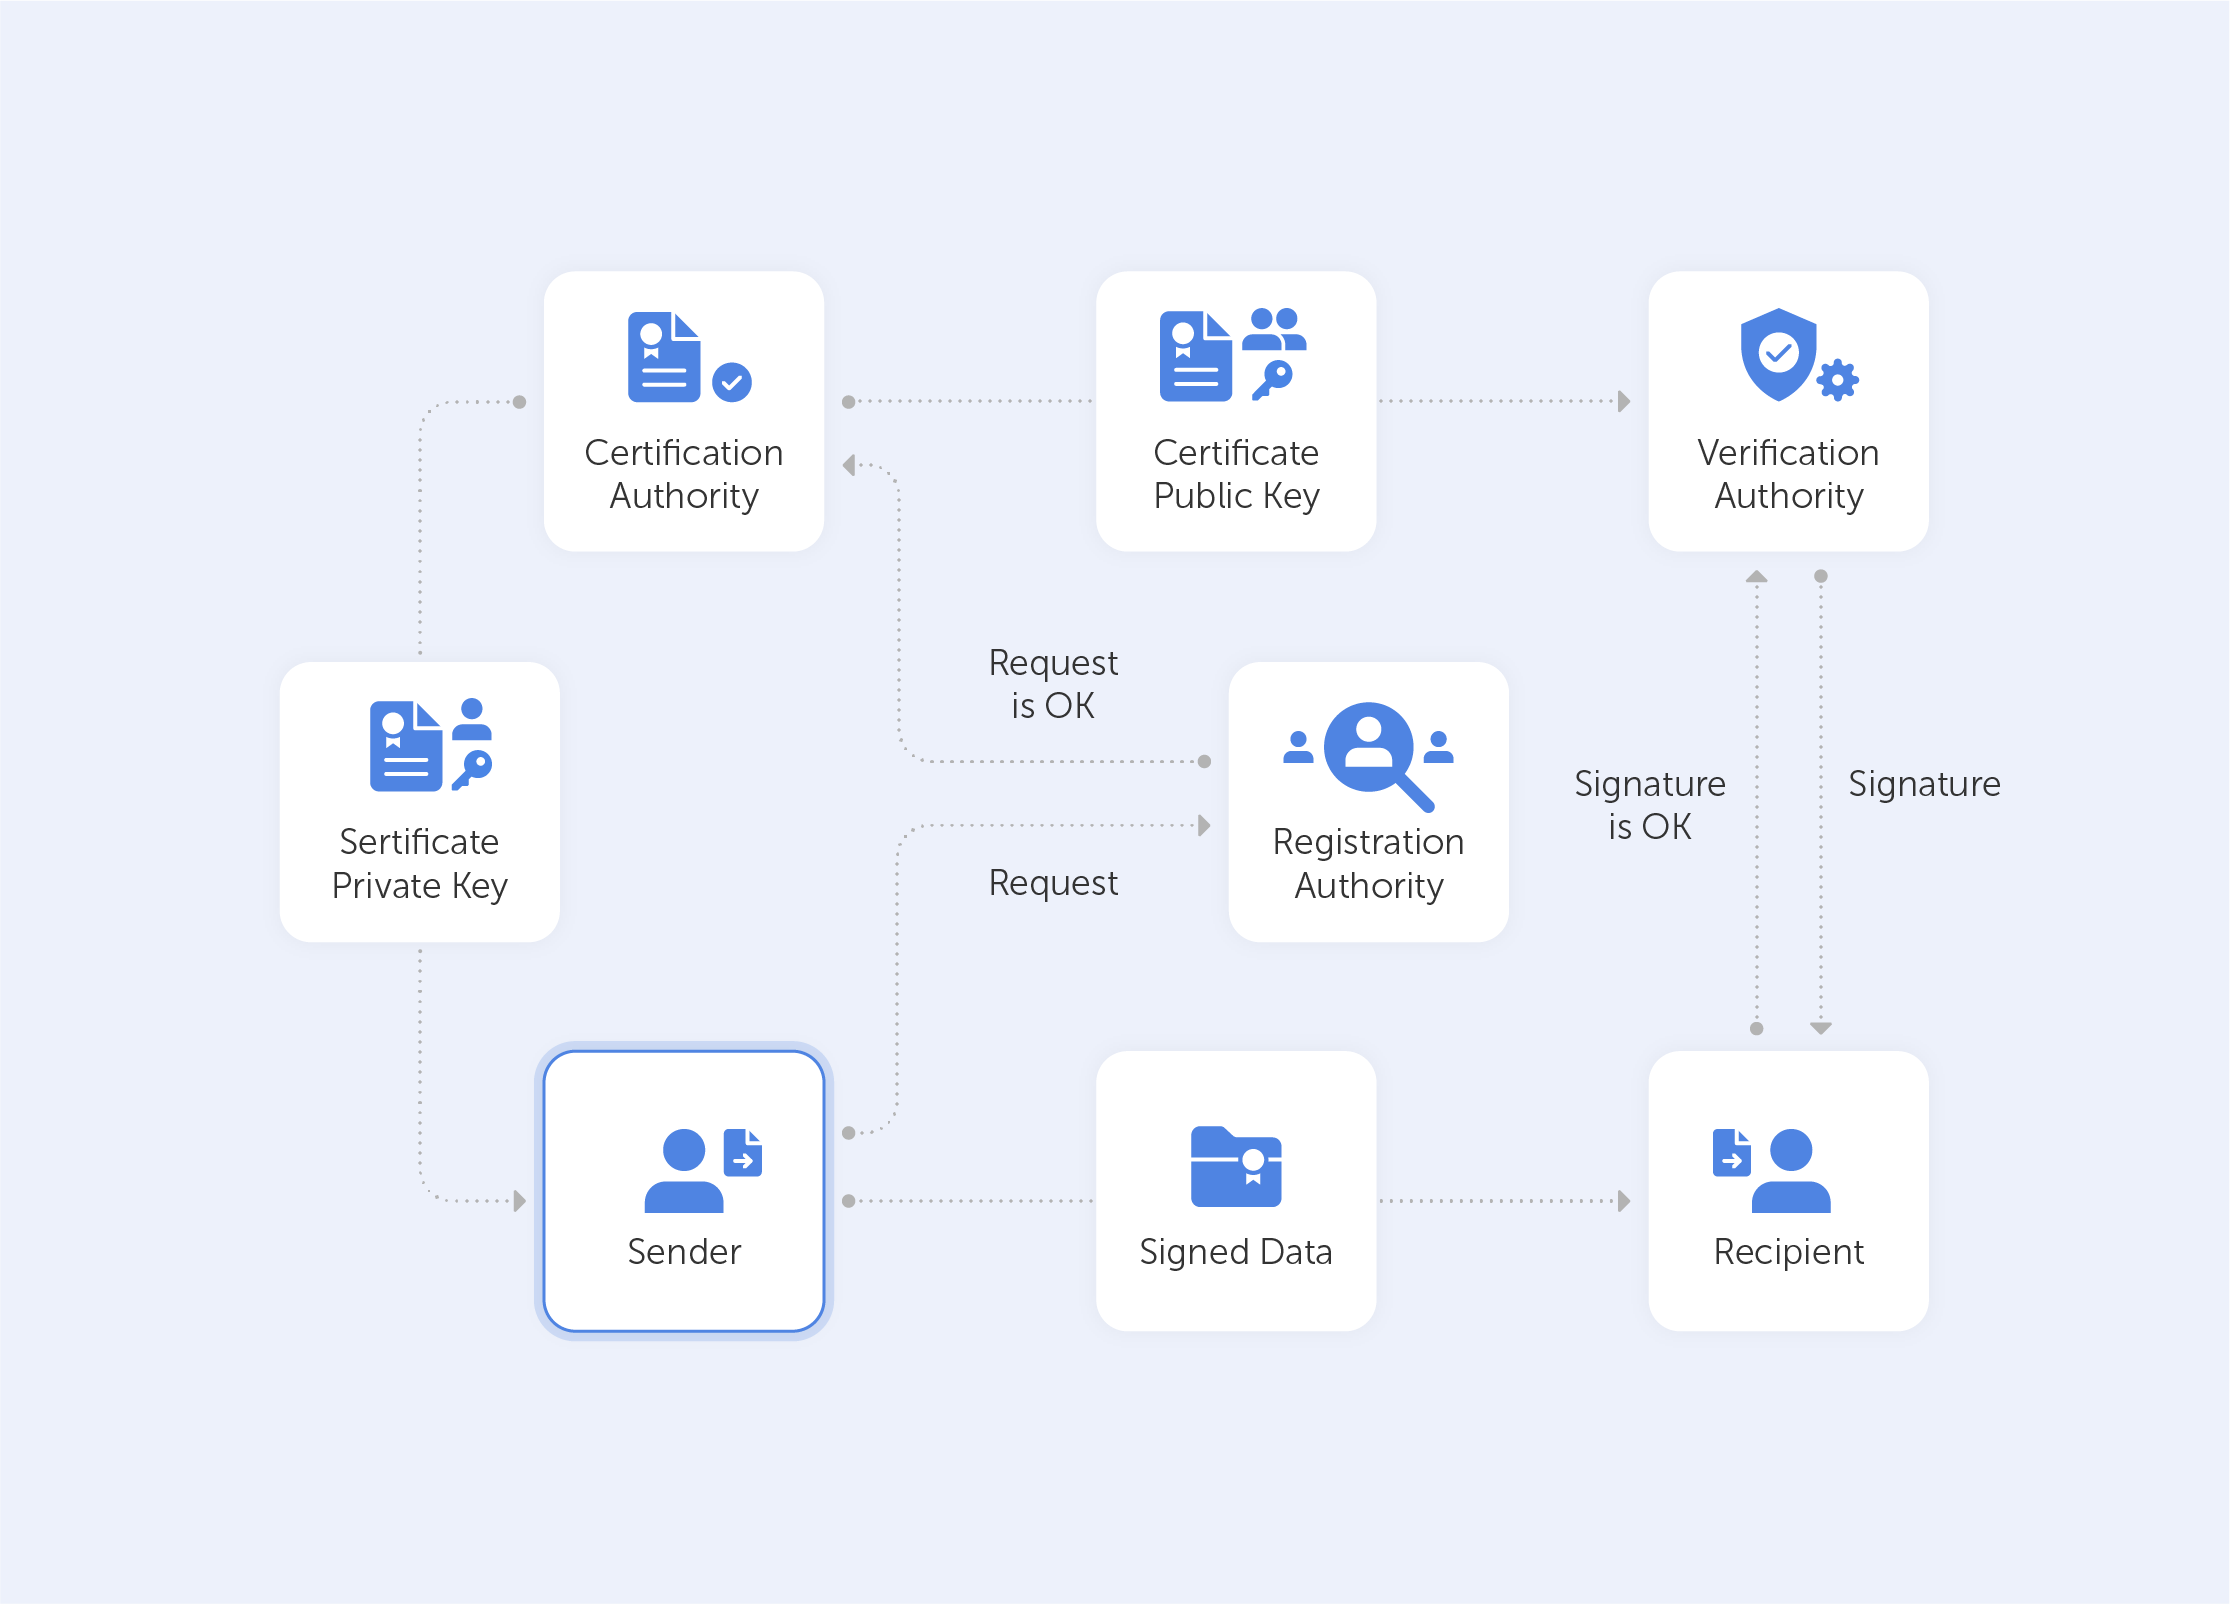
‘Let's Encrypt’ verifies the ownership of your domain before issuing a certificate. On your server, the Let's Encrypt client creates a temporary file (a token) with the required information. The Let's Encrypt validation server then sends an HTTP request to get the file and validates the token, ensuring that your domain's DNS record resolves to the ‘Let's Encrypt’ client-server.
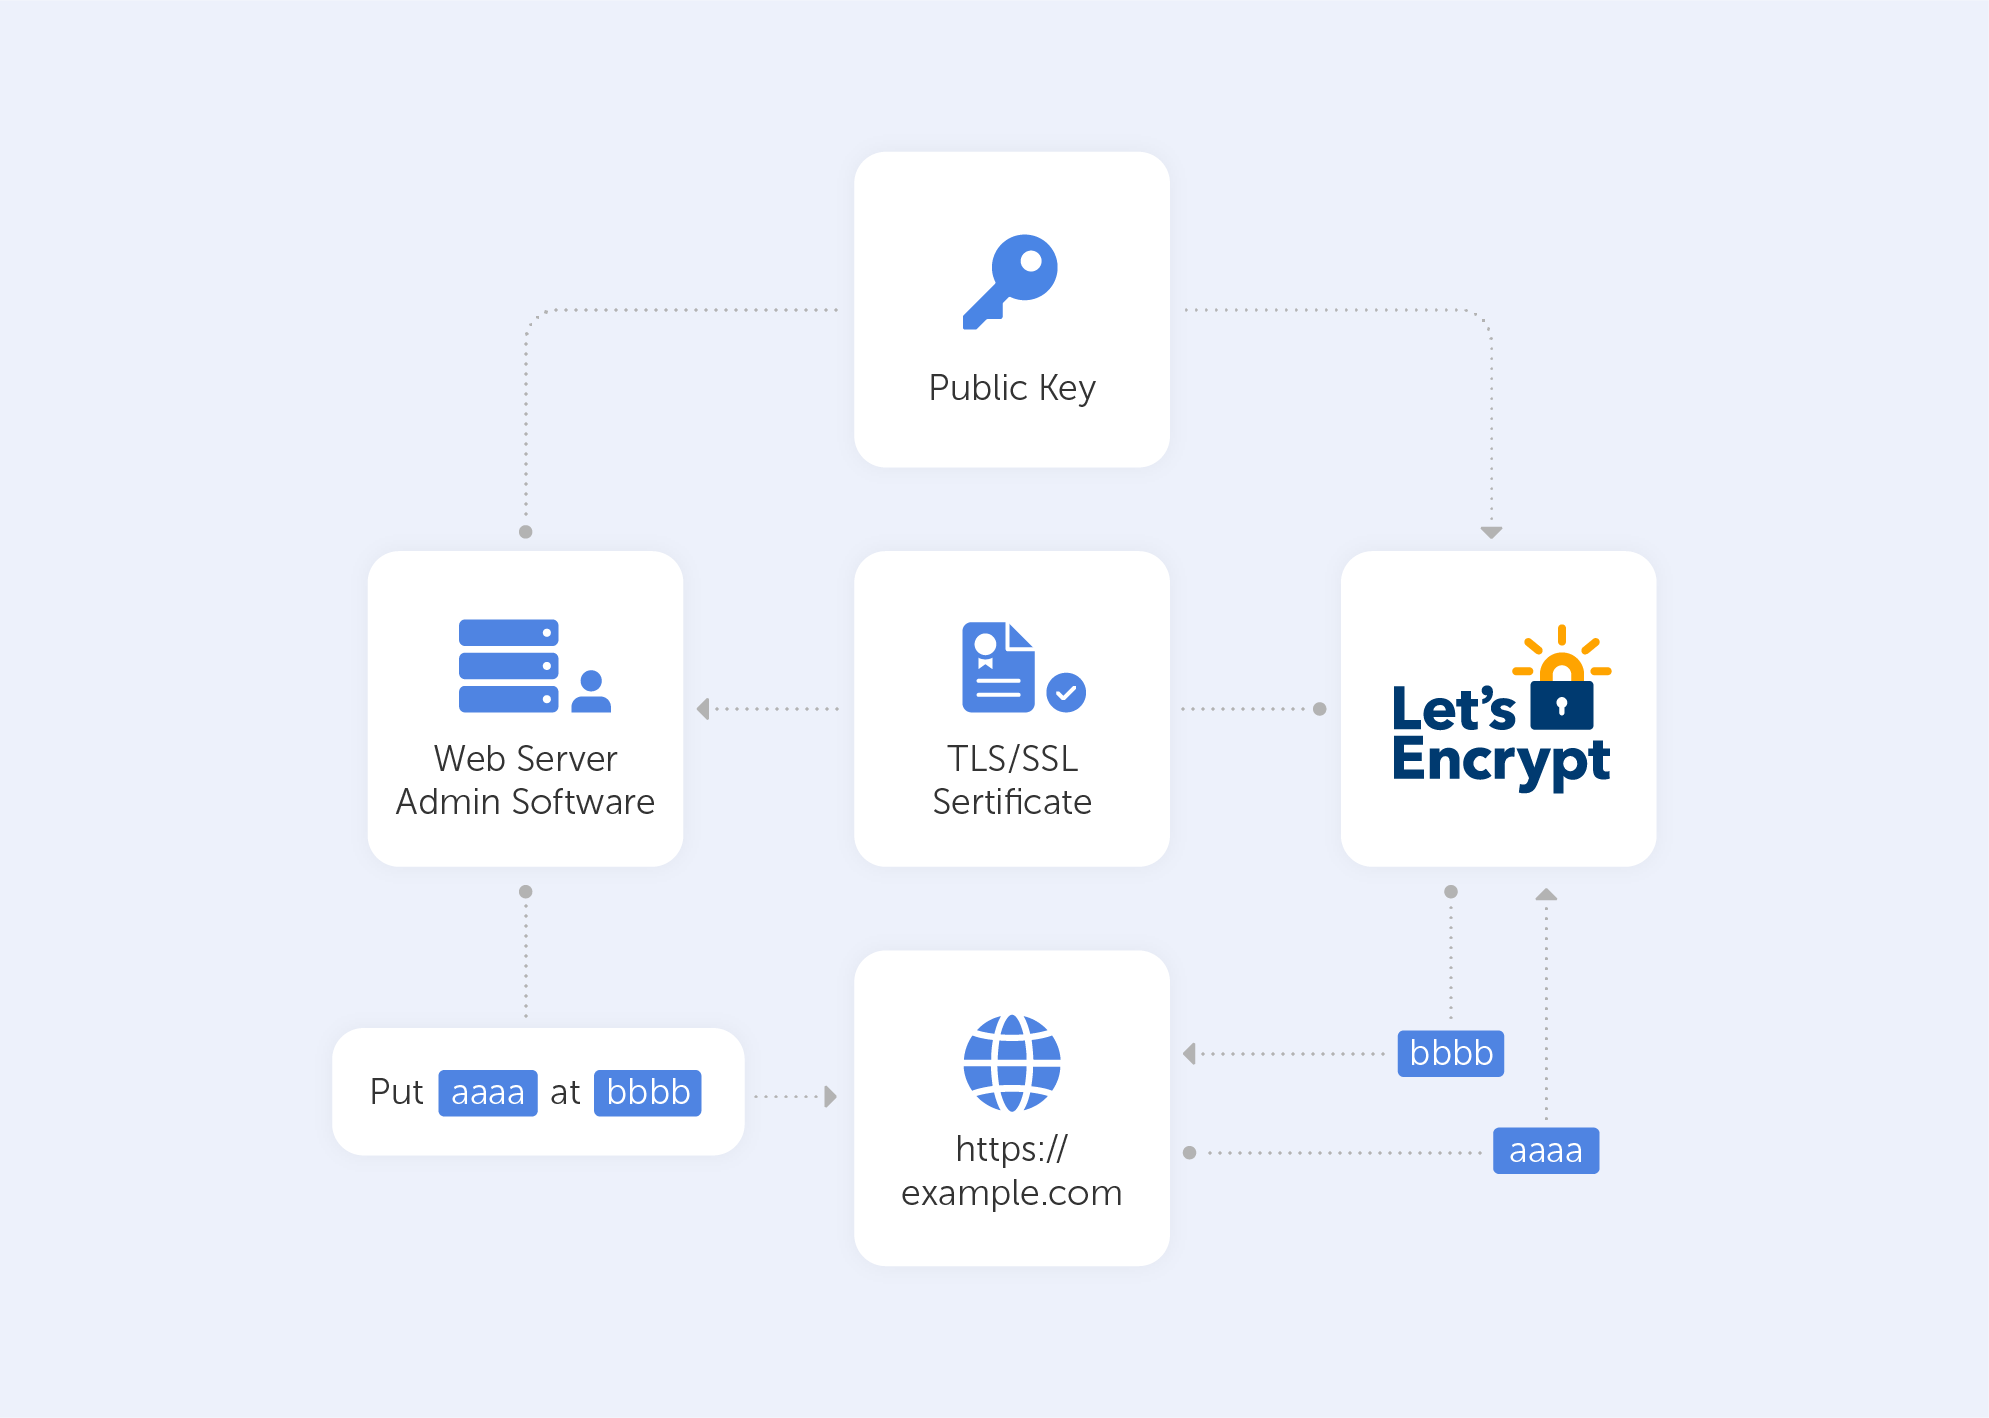
In an HTTP-based challenge, for example, the client will generate a key from a unique token and an account token, then save the results in a file that the web server will serve. The file is then retrieved from the Let's Encrypt servers at: http://passwork.com/.well-known/acme-challenge/token.
The client has demonstrated that it can control resources on example.com if the key is correct, and the server will sign and provide a certificate.
How do I set it up?
Before we start:
Make sure that you’ve downloaded the latest version of the application on the server from its Github release page;
Scroll down to ‘assets’ and download the zip package named win-acme.v2.x.x.x.zip from the release page. If you're having difficulty with Internet Explorer, you may install Chrome on the server following this approach. Once the application has been downloaded, unpack it and save it somewhere safe for future use.
Now let’s Generate the Let’s Encrypt Certificates
Simply run wacs.exe to generate the Let's Encrypt certificates. Because we downloaded the application via the internet, you may receive a notification from Windows Defender claiming that "Windows protected your PC". Because of this, after clicking the "More Info" link, click the "Run Anyway" option. Because it’s open-source and widely utilized, the application is completely safe to use.
Follow these simple steps once the application has started:
Choose N in the main menu to create a new certificate with default settings;
Choose how you want to determine the domain name(s) that you want to include in the certificate. These may be derived from the bindings of an IIS site, or you can input them manually;
A registration is created with the ACME server if no existing one can be found. You will be asked to agree to its terms of service and to provide an email address that the administrators can use to contact you;
The program negotiates with the ACME server to try and prove your ownership of the domain(s) that you want to create the certificate for. By default, the http validation mode is picked and handled by our self-hosting plugin. Getting validation right is often the most tricky part of getting an ACME certificate. If there are problems, please check out some of the common issues for an answer;
After the proof has been provided, the program gets the new certificate from the ACME server and updates or creates IIS bindings as required, according to the logic documented here;
The program remembers all choices that you made while creating the certificate and applies them for each subsequent renewal.
And that’s pretty much it. It will successfully generate an SSL certificate for you if your domain is pointing to your server. It will also include a scheduled task that will renew the certificate when it expires. The SSL certificate will be installed automatically by the application.
Are there other options?
‘Certbot’ is the most widely used kind of ‘Let's Encrypt’ client. We didn’t give it much light in this article because it's “designed for Linux” and also a little more advanced. It comes with easy-to-use automatic configuration features for Apache and Nginx. And yes, there is a Windows version as well.
There are many other clients to choose from – the ACME protocol is open and well-documented. On their website, ‘Let's Encrypt’ keeps track of all ACME clients.
Here’s a list of the best options (n.b. most are for Linux):
lego. Lego is a one-file binary installation written in Go that supports many DNS providers;
acme.sh. Acme.sh is a simple shell script that can run in non-privileged mode and interact with more than 30 different DNS providers;
Caddy. Caddy is a full web server written in Go with built-in support for Let’s Encrypt.
‘Let’s Encrypt’ is just great, there are no other ways to put it. It’s a free, automated, and open certificate authority, run for the public’s benefit. It can be accessed via a variety of tools and services. The best part is, they really keep their motto close to heart:
“We give people the digital certificates they need in order to enable HTTPS (SSL/TLS) for websites, for free, in the most user-friendly way we can. We do this because we want to create a more secure and privacy-respecting Web for all.”
Let's imagine that you decided to google ‘best sauces for Wagyu steak’. You went through several web pages, and then on page two of the search results, you get this notification from your Chrome browser:
Something went wrong, that's for sure. What happened? Should you proceed to the page without a private connection?
An IT expert would surely reply:
The error that you got here was probably because of an SSL/TLS handshake failure.
SSL? TLS?? Acronyms you’ve no doubt heard before, but ones that nevertheless evoke a dreary sense of confusion in the untrained mind. In this article, we’ll try to explain what SSL/TLS is, how it works and at the very least, you’ll understand what that lock icon on the address bar is.
Where did TLS originate?
TLS stands for Transport Layer Security, and it is right now the most common kind of Web PKI. It’s used not only to encrypt internet browsing but also for end-to-end connection (video calling, messaging, gaming, etc.).
As for now, we expect almost any kind of connection on the internet to be encrypted, and if something is encrypted, we get an alert similar to that seen in figure A. But that wasn't always the case. If you go back to the mid-90s – very little on the internet was encrypted. Maybe that was because fewer people were using the internet back then, or maybe it was because there weren’t credit-card details flying all over the place.
The history of TLS starts with Netscape. In 1994, it developed Secure Socket Layer 1 – the grandfather of modern TLS. Technically, it fits between TCP and HTTP as a security layer. While version 1 was used only internally and was full of bugs, very quickly, they fixed all the issues and released SSL 2. Then, Netscape patented it in 1995 with a view to stopping other people patenting it so they could release it for free. This was a very odd yet generous move, considering what the real-life patent practice was at that time.
In 1995, the world was introduced to Internet Explorer, a browser that used a rival technology called PCT (Private Communications Technology), which was very similar to SSL. But as with any rivalry – there could only be one winner. In November 1996, SSL 3 was released, which, of course, was an improvement on SSL 2. Right after that, the Internet Engineering Task Force created the Transport Layer Security Working Group to decide what the new standard for internet encryption would be. It was subsequently renamed from SSL to TLS (as far as we know, this was because Microsoft didn't want Netscape to have dibs on the name). It actually took three years for the group to release TLS 1. It was so similar to SSL 3 that people began to name it SSL 3.1. But over time, through updates, the security level rose massively; bugs were terminated, ciphers were improved, protocols were updated etc.
How does TLS actually work?
TLS is a PKI protocol that exists between two parties. They effectively have to agree on certain things to identify each other as trustworthy. This process of identification is called a 'handshake'.
Let’s take a look at a TLS 1.2 handshake, as an example.
First, let's load any webpage, then, depending on your browser, press the lock icon near the web address text field. You’ll be shown certificate info and somewhere between the lines you'll find a string like this:
This is called a Cipher Suite. It’s a string-like representation of our 'handshake' recipe.
So, let’s go through some of the things shown here:
First, we have ECDHE (Elliptic-curve Diffie–Hellman), which is a key agreement protocol that allows two parties, each having an elliptic-curve public–private key pair, to establish a shared secret over an insecure channel. In layman’s terms, this is known as key exchange;
The RSA is our Public Key authentication mechanism (remember, we need a Public Key for any PKI);
AES256 refers to the cipher that we’re going to use (AES) and its' key size (256);
Lastly, SHA384 is effectively a building block that is used to perform hash functions.
Now, the trick is to exchange all that data in just several messages via our 'handshake'.
What exactly happens when we go to a new web page?
After we establish a TCP (Transmission Control Protocol) connection, we start our handshake. As always on the web, the user (Client) is requesting data from the Server – so he sends a 'Client Hello' message, which contains a bunch of data including:
The max TLS version that this Client can support so that both parties are able to 'speak the same language;
A random number to protect from replay attacks;
List of the cipher suites that the Client supports.
Assuming the Server is live, it responds with 'Server Hello', containing the Cipher Suite and TLS version it chose to connect with the Client + a random number. If the server can't choose a Suite or TLS version due to version incompatibility – it sends back a TLS Alert with a handshake failure. At this point, both the User and the Server know the communication protocol.
Keep in mind that the server is sending a Public key and a Certificate containing an RSA key. It’s important to know that the Certificate has an expiration date. You’ll understand why by the end of the article.
On top of that, the Server is sending a Server Key Exchange Message containing parameters for ECDHE with a public value. Very importantly, this Exchange Message also contains a digital signature (all previous messages are summarized using a hash function and signed using the private key of the Server). This signature is crucial because it provides proof that the Server is who they say they are.
When the Server is done transmitting all the above-mentioned messages, it sends a 'Server Hello Done' message. In Layman’s terms, that’s an ‘I’m done for the day, I’ll see you at the pub’ kind of message.
The Client, on the other hand, will look at the Certificate and verify it. After that, it will verify the signature using the Certificate (you can't have one without the other). If all goes well, the Client is assured of the Server’s authenticity and sends a Client Key Exchange Message. This message doesn't contain a Certificate but does contain a Premaster Secret. It is then combined with the random numbers that were generated during the ‘Hello’ messages to produce a Master Secret. The Master Secret is going to be used for encryption at the next step.
It may seem very complicated now, but we’re almost done!
The next stage involves the Client sending the ‘Change Cipher Spec’ message, which basically says "I’ve got everything, so I can begin encryption – the next message I'll send you is going to be encrypted with parameters and keys".
After that, the Client proceeds to send the ‘Finished’ message containing a summary of all the messages so far encrypted. This helps to ensure that nobody fiddled with the messages; if the Server can't decrypt the message, it leaves the 'conversation'.
The Server will reply in the same way – with a Change Cipher Spec and a Finished message.
Handshaking is now done, parties can exchange HTTP requests/responses and load data. By the way, the only difference between HTTP and HTTPS is that the last one is secure – that's what the 'S' stands for there.
As you can see, it's incredibly difficult to crack this system open. However, that's exactly what we need to ensure security. Moreover, those two round trips that the data travels take no time at all, which is great; nobody wants their GitHub to take a month and a half to load up. By the way, the more advanced TLS 1.3 does all that in just one round trip!
Your connection is not private
When something goes wrong with TLS, you’ll see the warning that we demonstrated at the very beginning of this article. Usually, those are issues associated with the Certificate and its expiration date. That’s why your internet will refuse to work if you’ve messed around with the time and date settings on your device. But, if everything with the date and time is in check – never proceed to a website that triggers this warning, because most likely, between you and the server, somebody is parsing your private data.
Let’s imagine that somehow you’re in the driver’s seat of a start-up, and a successful one too. You’ve successfully passed several investment rounds and you’re well on your way to success. Now, big resources lead to big data and with big data, there’s a lot of responsibility. Managing data in such a company is a struggle, especially considering that data is usually structured in an access hierarchy – Excel tables and Google Docs just don’t cut the cake anymore. Instead, the company yearns for a protocol well equipped to manage data. The company yearns for LDAP.
What is LDAP?
The story of LDAP starts at the University of Michigan in the early 1990s when a graduate student, Tim Howes, was tasked with creating a campus-wide directory using the X.500 computer networking standard. Unfortunately, accessing X.500 records was impossible without a dedicated server. Additionally, there was no such thing as a ‘client app’. As a result, Howes co-created DIXIE, a directory client for X.500. This work set the foundations for LDAP, a standards-based version of DIXIE for both clients and servers – an acronym for the Lightweight Directory Access Protocol.
It was designed to maintain a data hierarchy for small bits of information. Unlike ‘Finder’ on your Mac, or ‘Windows Explorer’ on your PC, the ‘files’ inside the directory tree, although small, are contained in a very hierarchical order – exactly what you need to organize, for example, your HR structure, or when accessing a file. Compared to good old Excel, it is not a program, but rather a protocol. Essentially, a set of tools that allow users to find the information that they need very quickly.
Importantly, this protocol answers three key questions regarding data management:
— Who? Users must authenticate themselves in order to access directories. — How? A special language is used that provides for query or data manipulations. — Where? Data is stored and organized in a proper manner.
Let’s now go through these key questions in greater detail.
Who?
It’s bad taste to provide internal data to any old Joe. That’s why LDAP users cannot access information without first proving their identity.
LDAP authentication involves verifying provided usernames and passwords by connecting with a directory service that uses the LDAP protocol. All this data is stored in what is referred to as a core user. This is a lot like logging into Facebook, where you’re only able to access a user’s feed and photos if they’ve accepted your friend request, or if their profile has been set to public.
Some companies that require advanced security use a Simple Authentication and Security Layer (SASL), for example, Kerberos, for the authentication process.
In addition, to ensure the maximum safety of LDAP messages, as soon as data is accessed via devices outside the company’s walls, Transport Layer Security (TLS) may be used.
How?
The main task of a data management system is to provide “many things to many users”.
Rather than creating a complex system for each type of information service, LDAP provides a handful of common APIs (LDAP commands) to do this. Supporting applications, of course, have to be written to use these APIs properly. Still, the LDAP provides the basic service of locating information and can thus be used to store information for other system services, such as DNS, DHCP, etc.
Basic LDAP commands
Let’s look at the ‘Search’ LDAP command as an example, if you’d like to know which group a particular user is a part of, you might need to input something like this:
Isn’t it beautiful? Not quite as simple as performing a Google search, that’s for sure. So, your employees will perform all their directory services tasks through a point-and-click management interface like Varonis DatAdvantage.
All those interfaces may vary depending on their configuration, which is why new employees should be trained to use them, even if they’ve used LDAP before.
Where?
As we mentioned before, LDAP has the structure of a tree of information. Starting with the roots, it contains hierarchical nodes relating to a variety of data, by which the query may then be answered.
The root node of the tree doesn't really exist and can't be accessed directly. There is a special entry called the root directory specific entry, or rootDSE, that contains a description of the whole tree, its layout, and its contents. But, this really isn't the root of the tree itself. Each entry contains a set of properties, or attributes, in which data values are stored.
The tree itself is called the directory information tree (DIT). Branches of this tree contain all the data on the LDAP server. Every branch leads to a leaf in the end – a data entry, or directory service entry (DSE). These entries contain actual records that describe objects such as users, computers, settings, etc.
For example, such a tree for your company could start with the description of a position held, starting with you at the top as the director, finishing at the bottom with Joe Bloggs, the intern.
Each position would be tied to a person with a set of attributes, complete with links to subordinates. The attributes for a person may include their name, surname, phone number, email, in addition to their responsibilities. Each attribute would have a value inside, like ‘Joe’ for name and ‘Bloggs’ for surname.
The actual data contents may vary, as they totally depend on use. For example, you could have data issuing rights to certain people regarding the coffee machine. So, no Frappuccino for our intern Joe.
Sure, you can add more sophisticated data regarding each individual – their personal family trees, or even voice samples for instance, but typically, the LDAP would just point to the place where such data can be found.
Is it worth it?
LDAP is able to aggregate information from different sources, making it easier for an enterprise to manage information. But as with any type of data organization, the biggest difficulty is creating a proper design for your tree. There is always trial and error involved while building a directory for a specific corporate structure. Sometimes this process is so difficult that it even results in the reorganization of the company itself in favor of the hierarchical model. Despite this, for almost thirty years, the LDAP has held its title as the most efficient solution for the organization of corporate data.
Imagine you’re a system administrator at Home Depot. Just as you’re about to head home, you notice that your network has just authorized the connection of a new air-conditioner. Nothing too peculiar, right? The next morning, you wake up to find that terabytes of data including logins, passwords and customer credit card information have been transferred to hackers. Well, that’s exactly what happened in 2014, when a group of hackers, under the guise of an unassuming HVAC system, landed an attack that cost Home Depot over $17.5 million dollars, all over an incorrectly configured PKI. In this article, we’ll be conducting a crash course in PKI management.
So, what’s a PKI?
‘Public key infrastructure’ is a term that relates to a set of measures and policies that allow one to deploy and manage one of the most common forms of online encryption – public-key encryption. Apart from being a key-keeper for your browser, the PKI also secures a variety of different infrastructures, including internal communication within organizations, Internet of Things (IoT), peer to peer connection, and so on. There are two main types of PKIs:
• The Web PKI, also known as the “Internet PKI”, has been defined by RFC 5280 and refined by the CA/Browser Forum. It works by default with browsers and pretty much everything else that uses TLS (you probably use it every day).
• An Internal PKI – is the one you run for your own needs. We’re talking about encrypted local networks, data containers, enterprise IT applications or corporate endpoints like laptops and phones. Generally speaking, it can be used for anything that you want to identify.
At its core, PKI has a public cryptographic key that is used not to encrypt your data, but rather to authenticate the identities of the communicating parties. It’s like the bouncer outside an up-market club in Mayfair – you’re not getting in if you’re not on the list. However, without this ‘bouncer’, the concept of trustworthy online communication would be thrown to the wind.
So, how does it work?
PKI is built around two main concepts – keys and certificates. As with an Enigma machine, where the machine’s settings are used to encrypt a message (or establish a secure protocol), a key within a PKIisa long string of bits used to encrypt or decrypt encoded data. The main difference between the Enigma machine and a PKI is that with the latter, you have to somehow let your recipient know the settings used to encode the encrypted message.
The PKI gets its name because each party in a secured connection has two keys: public and private. A generic cipher protocol on the other hand, usually only uses a private one.
The public key is known to everyone and is used throughout the network to encode data, but the data cannot be accessed without a private key, which is used for decoding. These two keys are bound by complex mathematical functions which are difficult to reverse-engineer or crack by brute force. By the way, this principle is an epitome of asymmetrical cryptography.
So, this is how data is encrypted within a public key infrastructure. But let’s not forget that identity verification is just as important when dealing with PKIs – that’s where certificates come into play.
Digital Identity
PKI certificates are most commonly seen as digital passports containing lots of assigned data. One of the most important pieces of information in such a certificate relates to the public key: the certificate is the mechanism by which that key is shared – just like your Taxpayer Identification Number (TIN) or driver’s license, for instance.
But it’s not really valid unless it has been issued by some kind of entrusted authority. In our case, this is the certificate authority (CA). Here, there is an attestation from a trusted source that the entity is who they claim to be.
With this in mind, it becomes very easy to grasp what the PKI consists of:
• A certificate authority, which issues digital certificates, signs them with its public key and stores them in a repository for reference;
• A registration authority, which verifies the identities of those requesting digital certificates. A CA can act as its registration authority or can use a third party to do so;
• A certificate database that stores both the certificates, their metadata and, most importantly, their expiration dates;
• A certificate policy outlining the PKI's procedures (this is basically a set of instructions that allows others to judge how trustworthy a PKI is).
What is a PKI used for?
A PKI is great for securing web traffic – data flowing through the open internet can be easily intercepted and read if it isn't encrypted. Moreover, it can be difficult to trust a sender’s identity if there isn’t some kind of verification procedure in place.
But even though SSL/TLS certificates (that secure browsing activities) may demonstrate the most widespread implementation of PKI, the list doesn’t end there. PKI can also be used for:
• Digital signatures on software;
• Restricted access to enterprise intranets and VPNs;
• Password-free Wi-fi access based on device ownership;
• Email and data encryption procedures.
PKI use is taking off exponentially; even a microwave can connect to Instagram nowadays. This emerging world of IoT devices brings us new challenges and even devices seemingly existing in closed environments now require security. Taking the ‘evil air conditioner’ that we spoke about in the introduction as an example – gone are the days where we can take a piece of kit for face value. Some of the most compelling PKI use cases today center around IoT. Auto manufacturers and medical device manufacturers are two prime examples of industries currently introducing PKI for IoT devices. Edison’s Electronic Health Check-up System would be a very good example here, but we’ll save that for a future deep-dive.
Is PKI a cure-all?
As with any technology – execution is sometimes more important than the design itself. A recent study by the Ponemon Institute surveyed nearly 603 IT and security professionals across 14 industries to understand the current state of PKI and digital certificate management practices. This study revealed widespread gaps and challenges, for example:
• 73% of security professionals admit that digital certificates still cause unplanned downtime and application outages;
• 71% of security professionals state that migration to the cloud demands significant changes to their PKI practices;
• 76% of security professionals say that failure to secure keys and certificates undermines the trust their organization relies upon to operate.
The biggest issue, however, is that most organizations lack the resources to support PKI. Moreover, only 38% of respondents claim they have the staff to properly maintain PKI. So for most organizations PKI maintenance becomes a burden rather than a cure-all.
To sum up, PKI is a silent guard that secures the privacy of ordinary online content consumers. However, in the hands of true professionals, it becomes a power tool that creates an encryption infrastructure that is almost infinitely scalable. It lives in your browser, your phone, your Wi-fi access point, throughout the web and beyond. Most importantly, however, a correctly-configured PKI is the distance between your business and an imposter air conditioner that wants your hard-earned cash.
Password managers are a game-changer when it comes to security, convenience and efficiency. If you're new to them, you might be wondering what is the purpose of a password manager? The answer lies in avoiding the risks that come with weak or reused passwords. Managing passwords securely can be a real challenge. Cyber threats like identity theft, data breaches and more are all too real. The safest way to store passwords is with a personal password keeper.
Think of it as a simple password vault for all your login credentials. Rather than relying on your memory or insecure methods like writing them down, the safest place to keep passwords is using a password manager ensuring that all your credentials are stored in an encrypted database, accessible only through a master password. With a password manager, you can secure your password and create strong, unique passwords — no more worrying about remembering them all.
What do password managers do? They securely store passwords, and many also help in automatically filling in your credentials on websites, reducing the risk of phishing attacks. They also help with keeping passwords securely across all your devices — that means your credentials are safe wherever you access them.
Why a password manager is essential for security
The human factor in digital security
The more digital we become — the COVID-19 pandemic has certainly accelerated that — the more online accounts we have. And with that comes more passwords to keep track of. Unfortunately, human error is a leading cause of data breaches. People still use weak passwords or reuse the same credentials across multiple sites. That makes it far too easy for cybercriminals to get in. Password managers enhance your password practices to prevent vulnerabilities.
Phishing attacks have become incredibly common, and weak password practices expose businesses to risks. Is it safe to use password managers? Yes, a password manager eliminates the risk of human error and keeps your credentials safe by storing them in an encrypted database. It can automatically fill in your credentials only when a legitimate site is detected. That stops you from unknowingly entering passwords on phishing sites. And because it eliminates the risk of human error, protecting your passwords becomes much easier.
Security audits
Security audits are a key part of any business's security strategy. Weak, outdated, or compromised credentials can lead to security vulnerabilities. Businesses that fail to enforce strong password policies risk non-compliance with industry regulations.
One of the key benefits of password managers is that it can automatically alert users when passwords need updating. It also provides an audit trail, making it easier to track and manage password changes efficiently. Additionally, password managers ensure quick password rotation when an employee leaves the company, minimizing the risk of data leaks — this proactive security measure helps companies comply with industry standards and pass audits with ease.
Managing absences and staff changes
Temporary absences and staff turnover can disrupt business workflows. A business password manager ensures employees with the necessary permissions can access credentials securely. That prevents bottlenecks and inefficiencies.
For example, if a key team member is on vacation or out sick, other employees may need access to shared accounts. With a password manager, authorized team members can securely retrieve credentials without compromising security.
Disaster recovery is another critical aspect. In the unfortunate event of an emergency where key personnel are unavailable, having a secure and structured password management system ensures continuity. Companies can avoid business disruptions by ensuring authorized personnel can access critical information without compromising security policies.
Seamless access across devices and browsers
A key advantage of password managers is that they work seamlessly across multiple browsers and devices. Solutions like Passwork are where flexibility really shines. Whether you’re using a desktop, laptop, or smartphone, you can securely store your passwords and access them anywhere. That's especially useful for remote teams, who need smooth and secure login experiences.
Browser extensions fill in credentials automatically, cutting down on login friction. You can use Chrome, Firefox, Safari or Edge — your choice. Many password managers support cross-platform synchronization, changes made on one device are instantly available on another.
Password manager pricing and what to expect
Password managers come in all shapes and sizes, and so do the costs. You can get a basic version for free, with the essentials, while premium plans offer advanced security features like two-factor authentication, encrypted password sharing and audit logs. Choosing an easy to use password manager is essential for keeping things simple and secure. Business solutions often include features for multiple users, ensuring secure credential management across the board.
While a free password manager may be sufficient for individuals, businesses should consider paid options to benefit from enterprise-grade security and administrative controls. Scalable plans that grow with your organization's needs can be a cost-effective way to manage security. And the cost of investing in a password manager is often much lower than the financial and reputational damage caused by a data breach.
Organizations that proactively invest in password security mitigate risks and reduce the likelihood of costly security incidents. When you're shopping for the best way to store passwords, consider what matters most to you: encryption, ease of use, and the ability to store passwords securely across different platforms. Look for features like two-factor authentication and secure password sharing for optimal protection.
Getting started with a password manager
How to use a password manager? It’s pretty straightforward — choose a password manager that fits your needs. Consider factors such as encryption strength, compatibility with devices, and business-oriented features if you need them.
Install the software or use a web-based version for cloud-based access
Start storing passwords securely by importing existing credentials or generating new, strong passwords
Enable auto-fill and auto-change to save time and reduce the risk of phishing attacks
Set up two-factor authentication (2FA) for extra security layer against unauthorized access
Password managers also allow users to categorize passwords into folders or groups, making it easier to manage credentials efficiently. Businesses can take advantage of role-based access control (RBAC) to ensure employees only have access to the passwords relevant to their job responsibilities.
Different types of password managers
Cloud-based
Cloud-based solutions store encrypted passwords on remote servers, allowing you to access your credentials from any device. They offer convenience and accessibility, but you have to trust the provider's security measures. Passwork Cloud ensures high-level encryption and secure access, giving businesses full control over their password management while maintaining ease of use.
Self-hosted
Self-hosted solutions store passwords on a company servers rather than the cloud. While they reduce the risk of cloud-based attacks. Self-hosted password managers provide organizations with complete data control, allowing them to implement their own security policies and compliance measures. This makes them ideal for companies that prioritize on-premises data security.
Browser-based
Many web browsers offer built-in password management tools, but they often lack the advanced security features of dedicated solutions. Web browser password manager is better suited for casual users rather than businesses handling sensitive data. These managers may also be vulnerable to browser-based threats or device compromises. A standalone password manager is a more robust choice for organizations that require enterprise-grade security.
Essential features of a reliable password manager
Strong encryption
A secure password manager should use AES-256 encryption to protect stored credentials from cyber threats. This ensures that even if your data is intercepted, it remains unreadable to unauthorized users.
Auto-fill and auto-change
These features simplify login processes and improve password security by automatically updating passwords when needed. Auto-change is particularly useful for regularly updating credentials without manual effort.
Two-factor authentication
Adds an extra layer of security, ensuring that even if a master password is compromised, unauthorized access is prevented. Many password managers support biometric authentication, such as fingerprint or facial recognition, for added protection.
Intuitive and user-friendly interface
A password manager should be easy to navigate, making it simple for users to store, retrieve, and manage credentials effectively.
Stay safe and secure your data with a password manager
Secure password management is a must. If you haven't started using a password manager yet, now is the time to take control of your online security. If you use a password manager what do you as the user need to remember is just a single master password — that's it. Protect your passwords with the help of a password manager and keep them safe from cyber threats.
Passwork is where security and convenience meet-the necessities for businesses that are serious about staying ahead. That means more than just a password manager. It means a robust security system that reduces the risk of human error. By automating password management and giving you secure, centralized access to sensitive data Passwork helps you protect your business in real-time.
Whatever your company size, investing in secure password management just makes sense. Don't wait for a data breach to happen. Take the next step now with Passwork and start protecting what matters most.
Password managers protect your accounts by encrypting credentials, generating strong passwords, and blocking phishing attacks. They help individuals and businesses streamline password management, minimizing risks from weak or reused passwords. Discover their key features in the full article.
A couple of guesses — your mother's maiden name, your date of birth, your pet's name. And Bam! Your password is stolen.
Password theft is becoming more common every day. While one of the most notorious incidents was the 2014 Russian hacker incident that compromised more than 1.2 billion passwords, this is far from an isolated event. There are news stories about password-related breaches almost every day. And yet, many people continue to use weak, easily guessable passwords.
Why? Because they’re easy to remember. But as simple as these passwords are for you, they’re even easier for hackers to crack. This is a serious concern for businesses, where cybersecurity is paramount.
Why security policies alone aren't enough
Large enterprises often implement password policies requiring employees to use strong passwords. However, since it's easier to remember short passwords, many employees disregard the policies and choose weak passwords. A policy alone isn’t much help here.
The solution? A corporate password manager that ensures strong, unguessable passwords are used across the company. By using the right technology, you can significantly reduce the risk of a data breach.
While a corporate password manager can choose passwords for you, how do you choose the right one for your business? Here are some tips to help you find the best software for your enterprise.
Tip #1: Choose the right solution for your company
Password management solutions typically come in two forms: SaaS (cloud-based) or on-premise. Both have their advantages, depending on your company’s needs.
SaaS (Software-as-a-Service): This option is managed by the provider, and you typically pay a subscription fee based on the number of users or the level of service. SaaS solutions are great for small- to mid-sized businesses, as they offer flexibility, scalability, and minimal setup costs.
On-Premise: With an on-premise solution, the software is hosted on your company’s own servers. While there’s a higher upfront cost for hardware and software licenses, this option is ideal for larger enterprises that require full control over their data for compliance or security reasons.
Both options have their merits, so choose a vendor that offers both SaaS and on-premise solutions. This way, you can make a decision based on your company’s specific needs, ensuring you have the right balance between cost, security, and scalability.
Tip #2: Identify potential vulnerabilities
A critical feature of any corporate password manager is its ability to safeguard your data against vulnerabilities. Before committing to a solution, take the time to identify any weak points in the software.
Here’s a quick test: Sign in to the password manager and press F12 to open the browser’s developer console. In the “Network” tab, check for any external requests, like analytics scripts or third-party integrations. A secure password manager should not allow external third-party scripts that could expose you to cross-site scripting (XSS) or other attacks.
When third parties are allowed to call into the system, they can make the system vulnerable. Whether you prefer a SaaS password manager or an on-premise password manager, it should hold all sensitive information in such a way that external applications cannot access them.
Tip #3: Verify encryption standards
The password manager should store all passwords in an encrypted form. To verify this, use the browser’s developer tools again (F12 → Network tab). Now open any website where you need to sign in. Save the password in the password manager. Check whether the password appears as plain text or in encrypted form.
If it’s stored in plain text, the system is vulnerable to hacks. Strong encryption is essential. Look for password managers that use AES-256 encryption combined with an RSA handshake, which is the gold standard for secure data encryption.
Different password managers have different encryption standards. The highest cipher is AES-256 with an RSA handshake. This is military-grade encryption and is virtually unhackable. If your corporate password manager provides this level of encryption and owns its own servers, you don’t have to worry about the security of your information.
Tip #4: Choose a vendor with transparent policies
When selecting a password manager, transparency is key. Check the vendor’s website for whitepapers and documentation on the algorithms and cryptography they use. Vendors with open-source or auditable code are preferable, as they demonstrate a commitment to transparency and security.
Zero-knowledge encryption is another critical feature. This means that the vendor has no access to your master password or any of your sensitive data. For instance, Passwork ensures all passwords are stored in encrypted vaults using a 256-bit cipher, making them accessible only to the user.
Opting for an open-source solution is a smart move, as it allows you to inspect the code and confirm that the cryptography being used is reliable and secure.
Tip #5: Ensure auditability
If you opt for an on-premise solution, auditability is important. You should be able to inspect and audit the internal code to verify that it meets your company’s security standards.
Regular password audits are also essential for maintaining a secure system. A good password manager will automatically notify you when passwords need to be updated due to age or reuse across multiple services. This feature helps maintain optimal security across your entire organization.
If the code is open-source, you may even have the ability to customize it. However, be cautious, as making changes to the code can introduce instability. Always consult with the vendor before making any significant modifications.
Tip #6: Implement two-factor authentication (2FA)
A reliable corporate password manager should support strong two-factor authentication (2FA) options to enhance security. Passwords alone aren’t always enough to safeguard sensitive data, as they can be stolen or cracked. 2FA ensures that even if a password is compromised, an additional authentication factor—such as a code sent to your phone or an authentication app—protects your accounts.
When selecting a password manager, ensure it integrates with a variety of 2FA methods, such as time-based one-time passwords (TOTP) or SMS codes. Implementing 2FA will greatly reduce the risk of unauthorized access to your corporate accounts, making it an essential security measure for any business.
Tip #7: Test the SSL security
Advanced corporate password management tools use Secure Sockets Layer (SSL). The SSL transfers data securely between the client and the server. Passwork uses SSL along with AES-256 bit encryption and RSA handshake to ensure your data is encrypted according to the highest standards.
There are several online tools to check if there are any potential issues with the SSL quality of the password manager. With tools such as SSL Labs and SSL Checker, you can find out if the SSL certificates of the password manager are valid.
Tip #8: Look for flexibility across platforms
A good corporate password manager should work seamlessly across all platforms and devices your employees use. Whether it’s desktop or mobile, macOS, Windows, iOS, or Android, the solution should offer compatibility with all major operating systems.
Additionally, ensure the password manager offers browser extensions for popular web browsers such as Chrome, Firefox, Safari, and Edge. Syncing across devices is another crucial feature. If an employee saves a password on their desktop browser, it should automatically be available when they log in on their mobile device.
The bottom line
There are several corporate password managers available, but make sure you choose the best one. Your password manager should not only be secure but also adaptable to your company’s needs. If you find a password manager that meets all the criteria listed above and is affordable, choose it to safeguard your passwords.
Remember, security isn’t an area where you can afford to cut corners. Your enterprise passwords are extremely important so don’t compromise on quality. Choose password manager that meets all your security requirements, including strong encryption, transparency, auditability, and two-factor authentication.
As the saying goes, “If you’re not paying for the product, you are the product.” Make the right choice by selecting software that keeps your company’s details safe. It not only simplifies things for your employees but also ensures your valuable information remains secure from prying eyes.